

BBQKaeding
-
Posts
61 -
Joined
-
Last visited
-
Days Won
1
Posts posted by BBQKaeding
-
-
I found the torch works well for spot lighting, but it still takes awhile for the unit to get heat soaked for grilling, at least a lot longer than it took for my #7 Kamado. My son got a spark in his eye the first time he lit with the MAPP torch so I have goggles at the ready now.
Since I like to do prep work work while the KK is coming up to temperature, I decided to expand on the hair dryer idea so I didn't have to hold it. I had an old CPAP hanging around. This worked great!
-
 3
3
-
-
That pizza looks simply amazing, in all respects. My new (cheap) oven doesn't even have a lower element so I basically have to do all my pizza cooks on the KK to get a crispy crust. If you want to share your pizza dough recipe, I'd be very appreciative.
-
Sweeeeeeeeeeeeeeeeet!
You have been bitten by the scarce but notorious kamado bug and there's no going back now. Welcome to the club

-
I'm thinking a more traditional spit configuration would work best for a whole hog. A ridged diameter basket is one size that won't fit all. Even with "right size" hog, the shoulders, butt and belly are unlikely to have the same girth.
The key is simply preventing the hog from slipping during rotation and that can be done with a few strategically placed spines screwed into the main rod. Place the rod with the spines into the cavity, pushing the spines along the back bone, and then secure the exterior of the hog with a few belts. To keep with the KK's SS theme, I'd consider copying the concept used for hose clamps and/or garment belts. A worm gear to tighten the belts would work (with a portable drill and socket: http://spitjack.com/product/WHOLE-PIG-ROTISSERIE-BINDING-SYSTEM.html), but there are other options for fastening with the right tension - like a belt buckle or push-though clamp. Thin strap sheet SS or flexible SS fabric could work for the belt material, but I'd want these to roll-up (<= 1mm thick) so they're easy to soak for cleaning and for storage. The spines can be removed from the rod and soaked and the rod itself could break down into 2 or 3 segments. But don't screw the rods together. Use a half-round carve-out at ends and secure the junction with an enclosing retainer and set screws. Then we don't have the rotational direction issues.
SS cable could work too for the belts (with cable clamps), but personally I think cable will dig deeper into the meat, be unsightly once removed, and cable is much harder to clean and sanitize than strap metal. SS chain would be better than cable, IMO.
BTW, when you're feeling better I still want to discuss the vertical hanger/rotisserie concept
")
-
I volunteer for user acceptance testing and feedback
") ?
?
If not, or if you're taking pre-orders, Dennis, this is a good thread to fill the queue - starting with me. Do you have a price or target?
I want the cold smoke back
 .
.
-
Another brewer - nice! BTW, that's wort boiling on my profile pic

Cheers!
-
Sign me up! Really, let me know the minute you can ship one my way
-
Expand
This looks really cool. You had mentioned cooking a pork butt this way. Were there any other meats that you've cooked using the meat hanger?
It's most typically any fowl but it also hangs a dutch oven nicely. I didn't do that with my #7 though because I had a mushi-kamado grill (grill with hole in the middle) in which the dutch over would sit closer to the fire. It was awesome for cooking soup, stew, etc. The dutch oven sat in the middle, recessed, and I'd grill the veges and protein around the edges and then chop and add when ready. Smoked soup can be sooooooo good

-
Expand
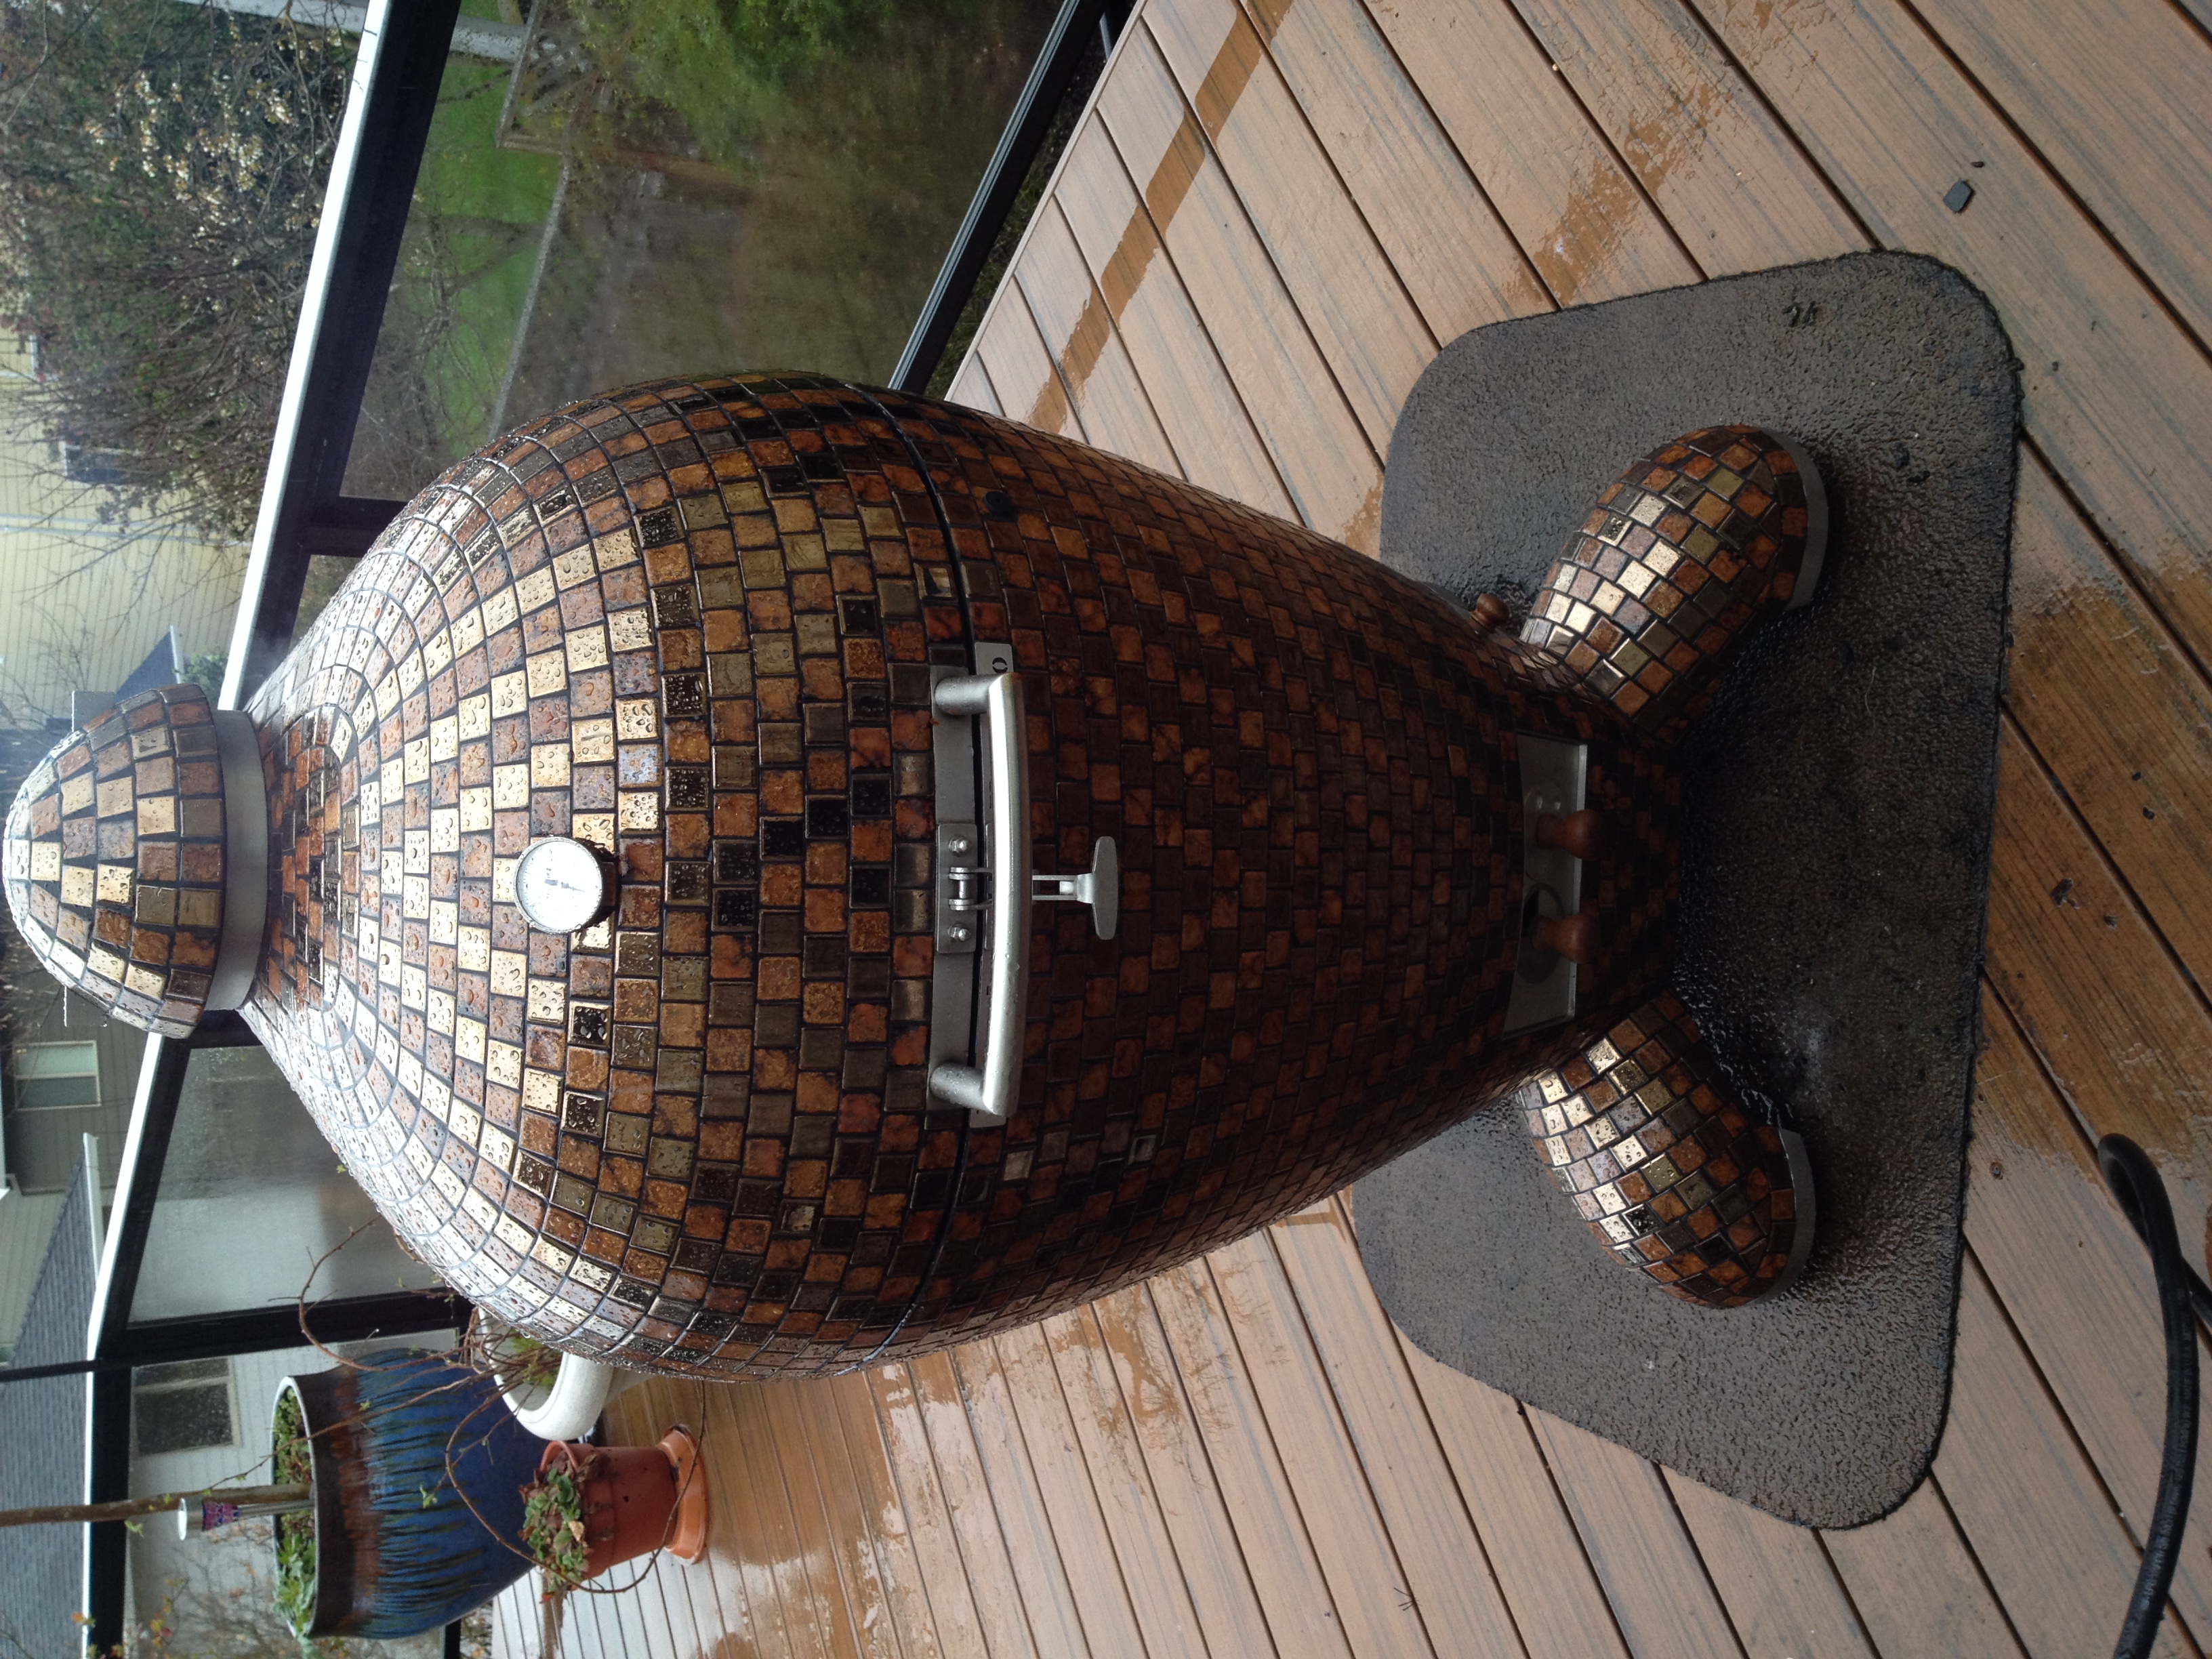
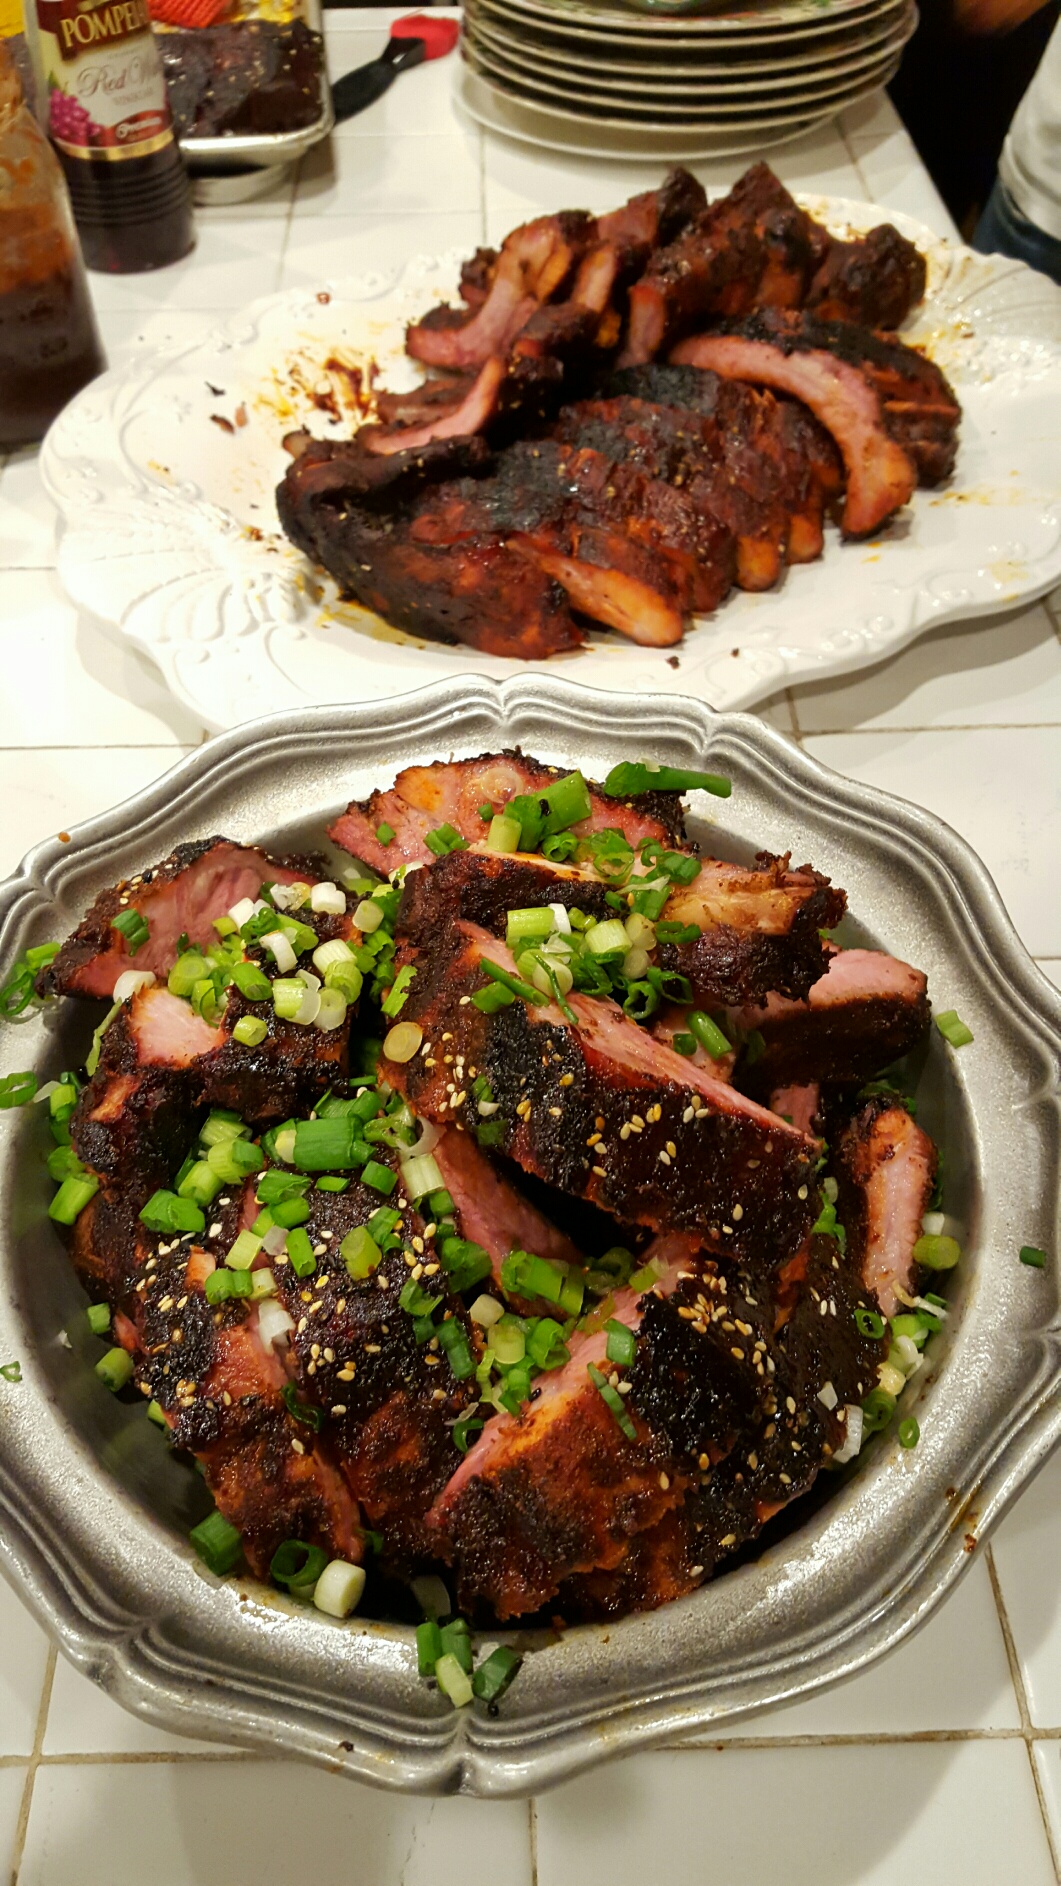
Stunning colors. Congratulations on your KK. Admittedly, I never even considered that color but WOW, impressive. I showed my wife, she reminded me that ours is pretty too. lol.. I think she saw dollar signs in my eyes.
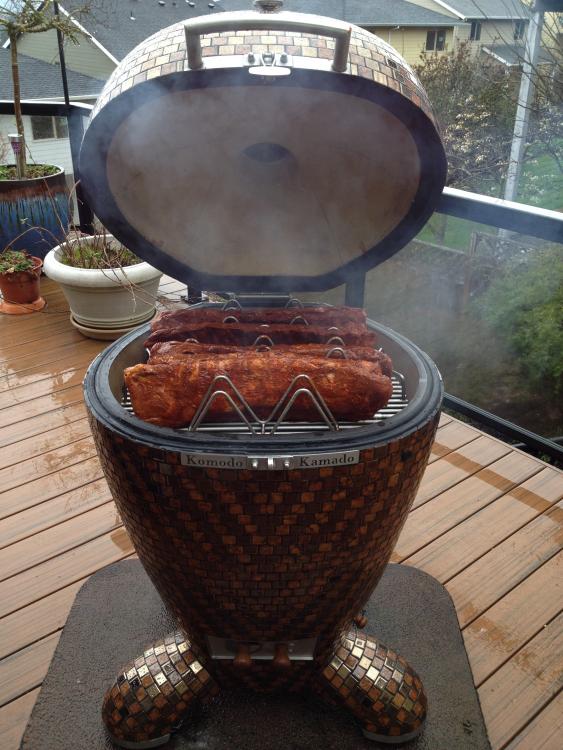
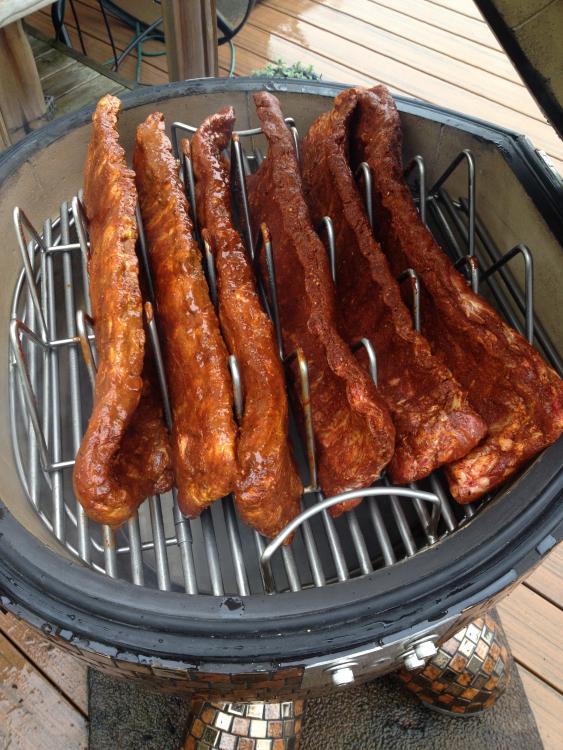
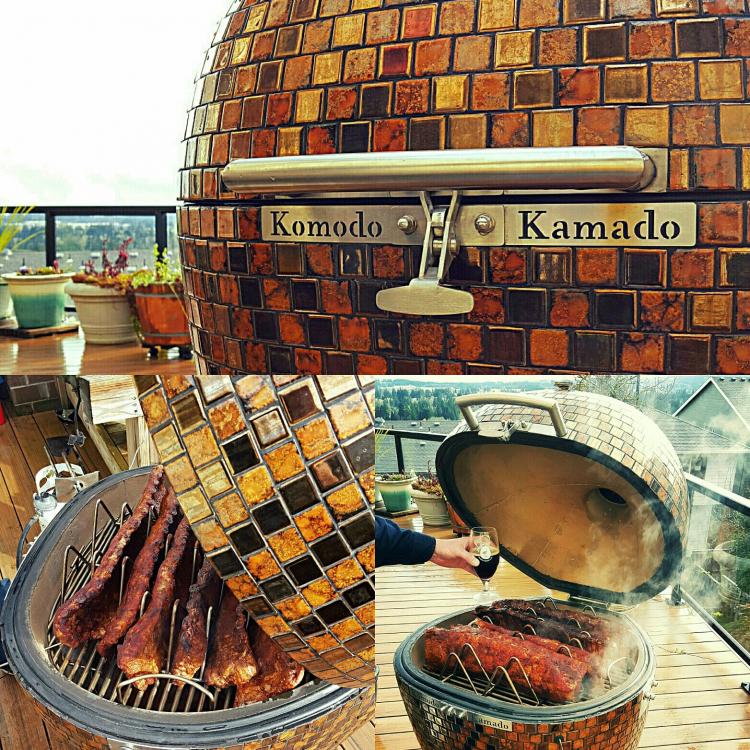
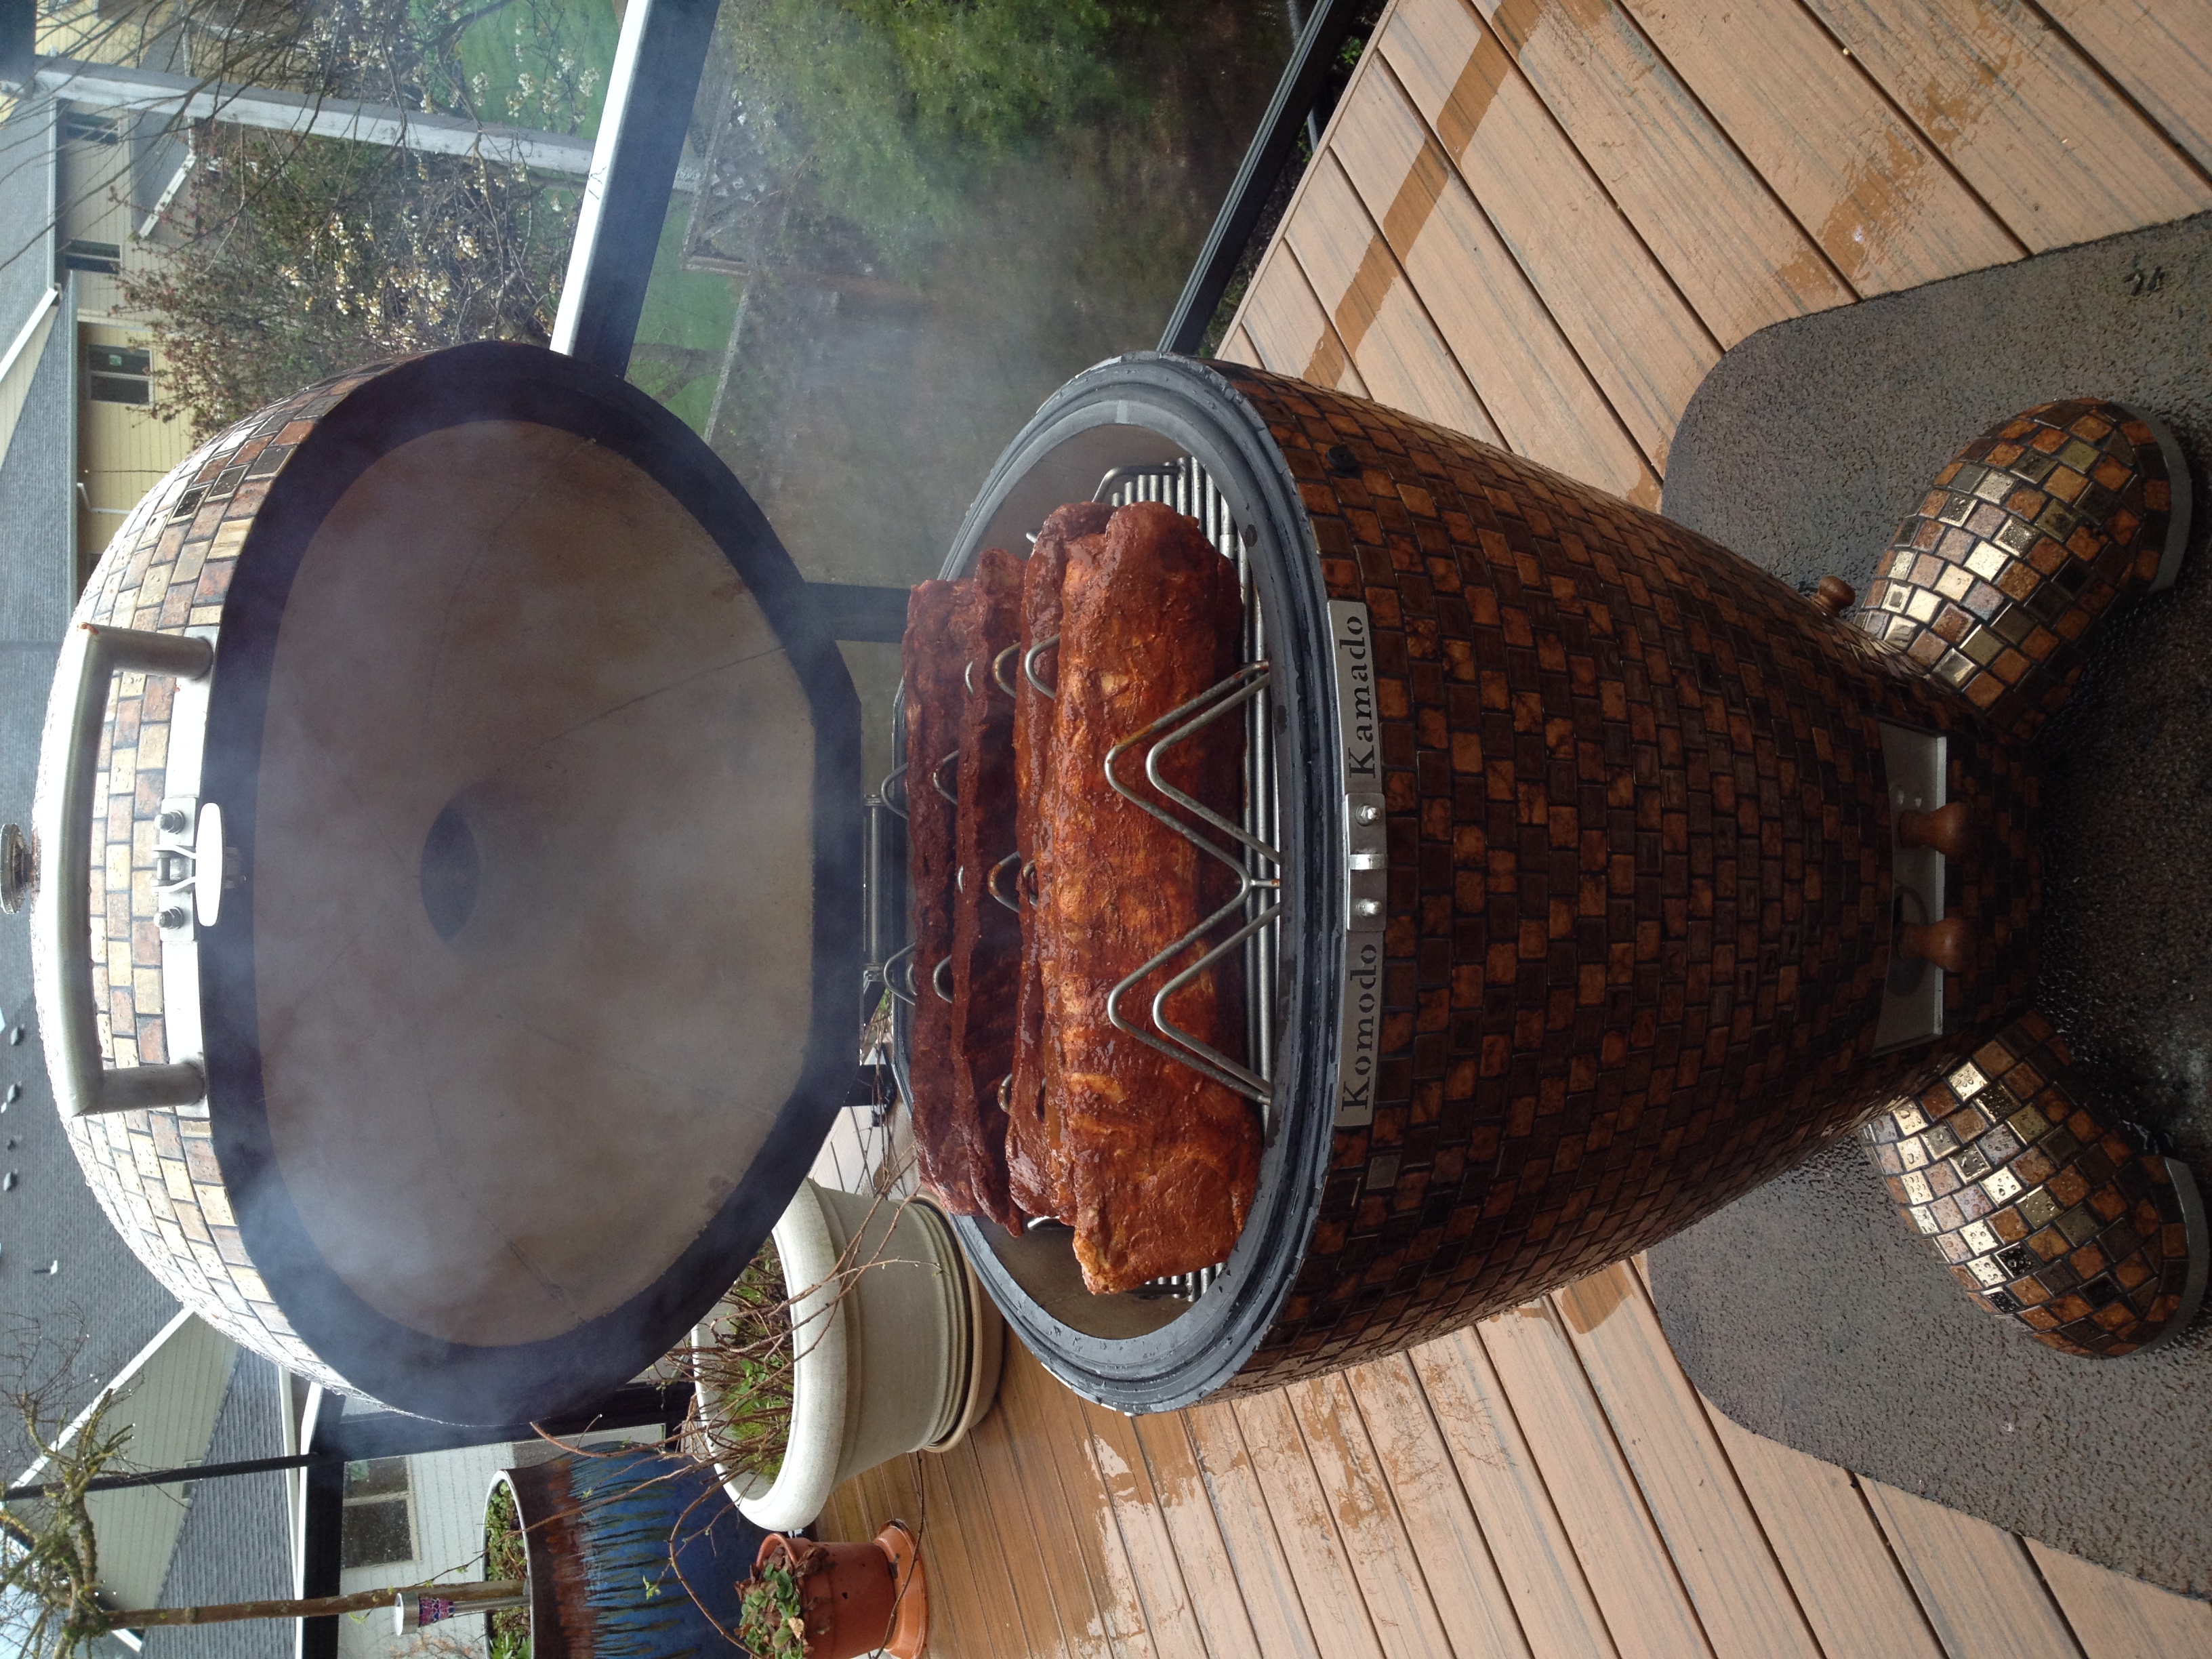
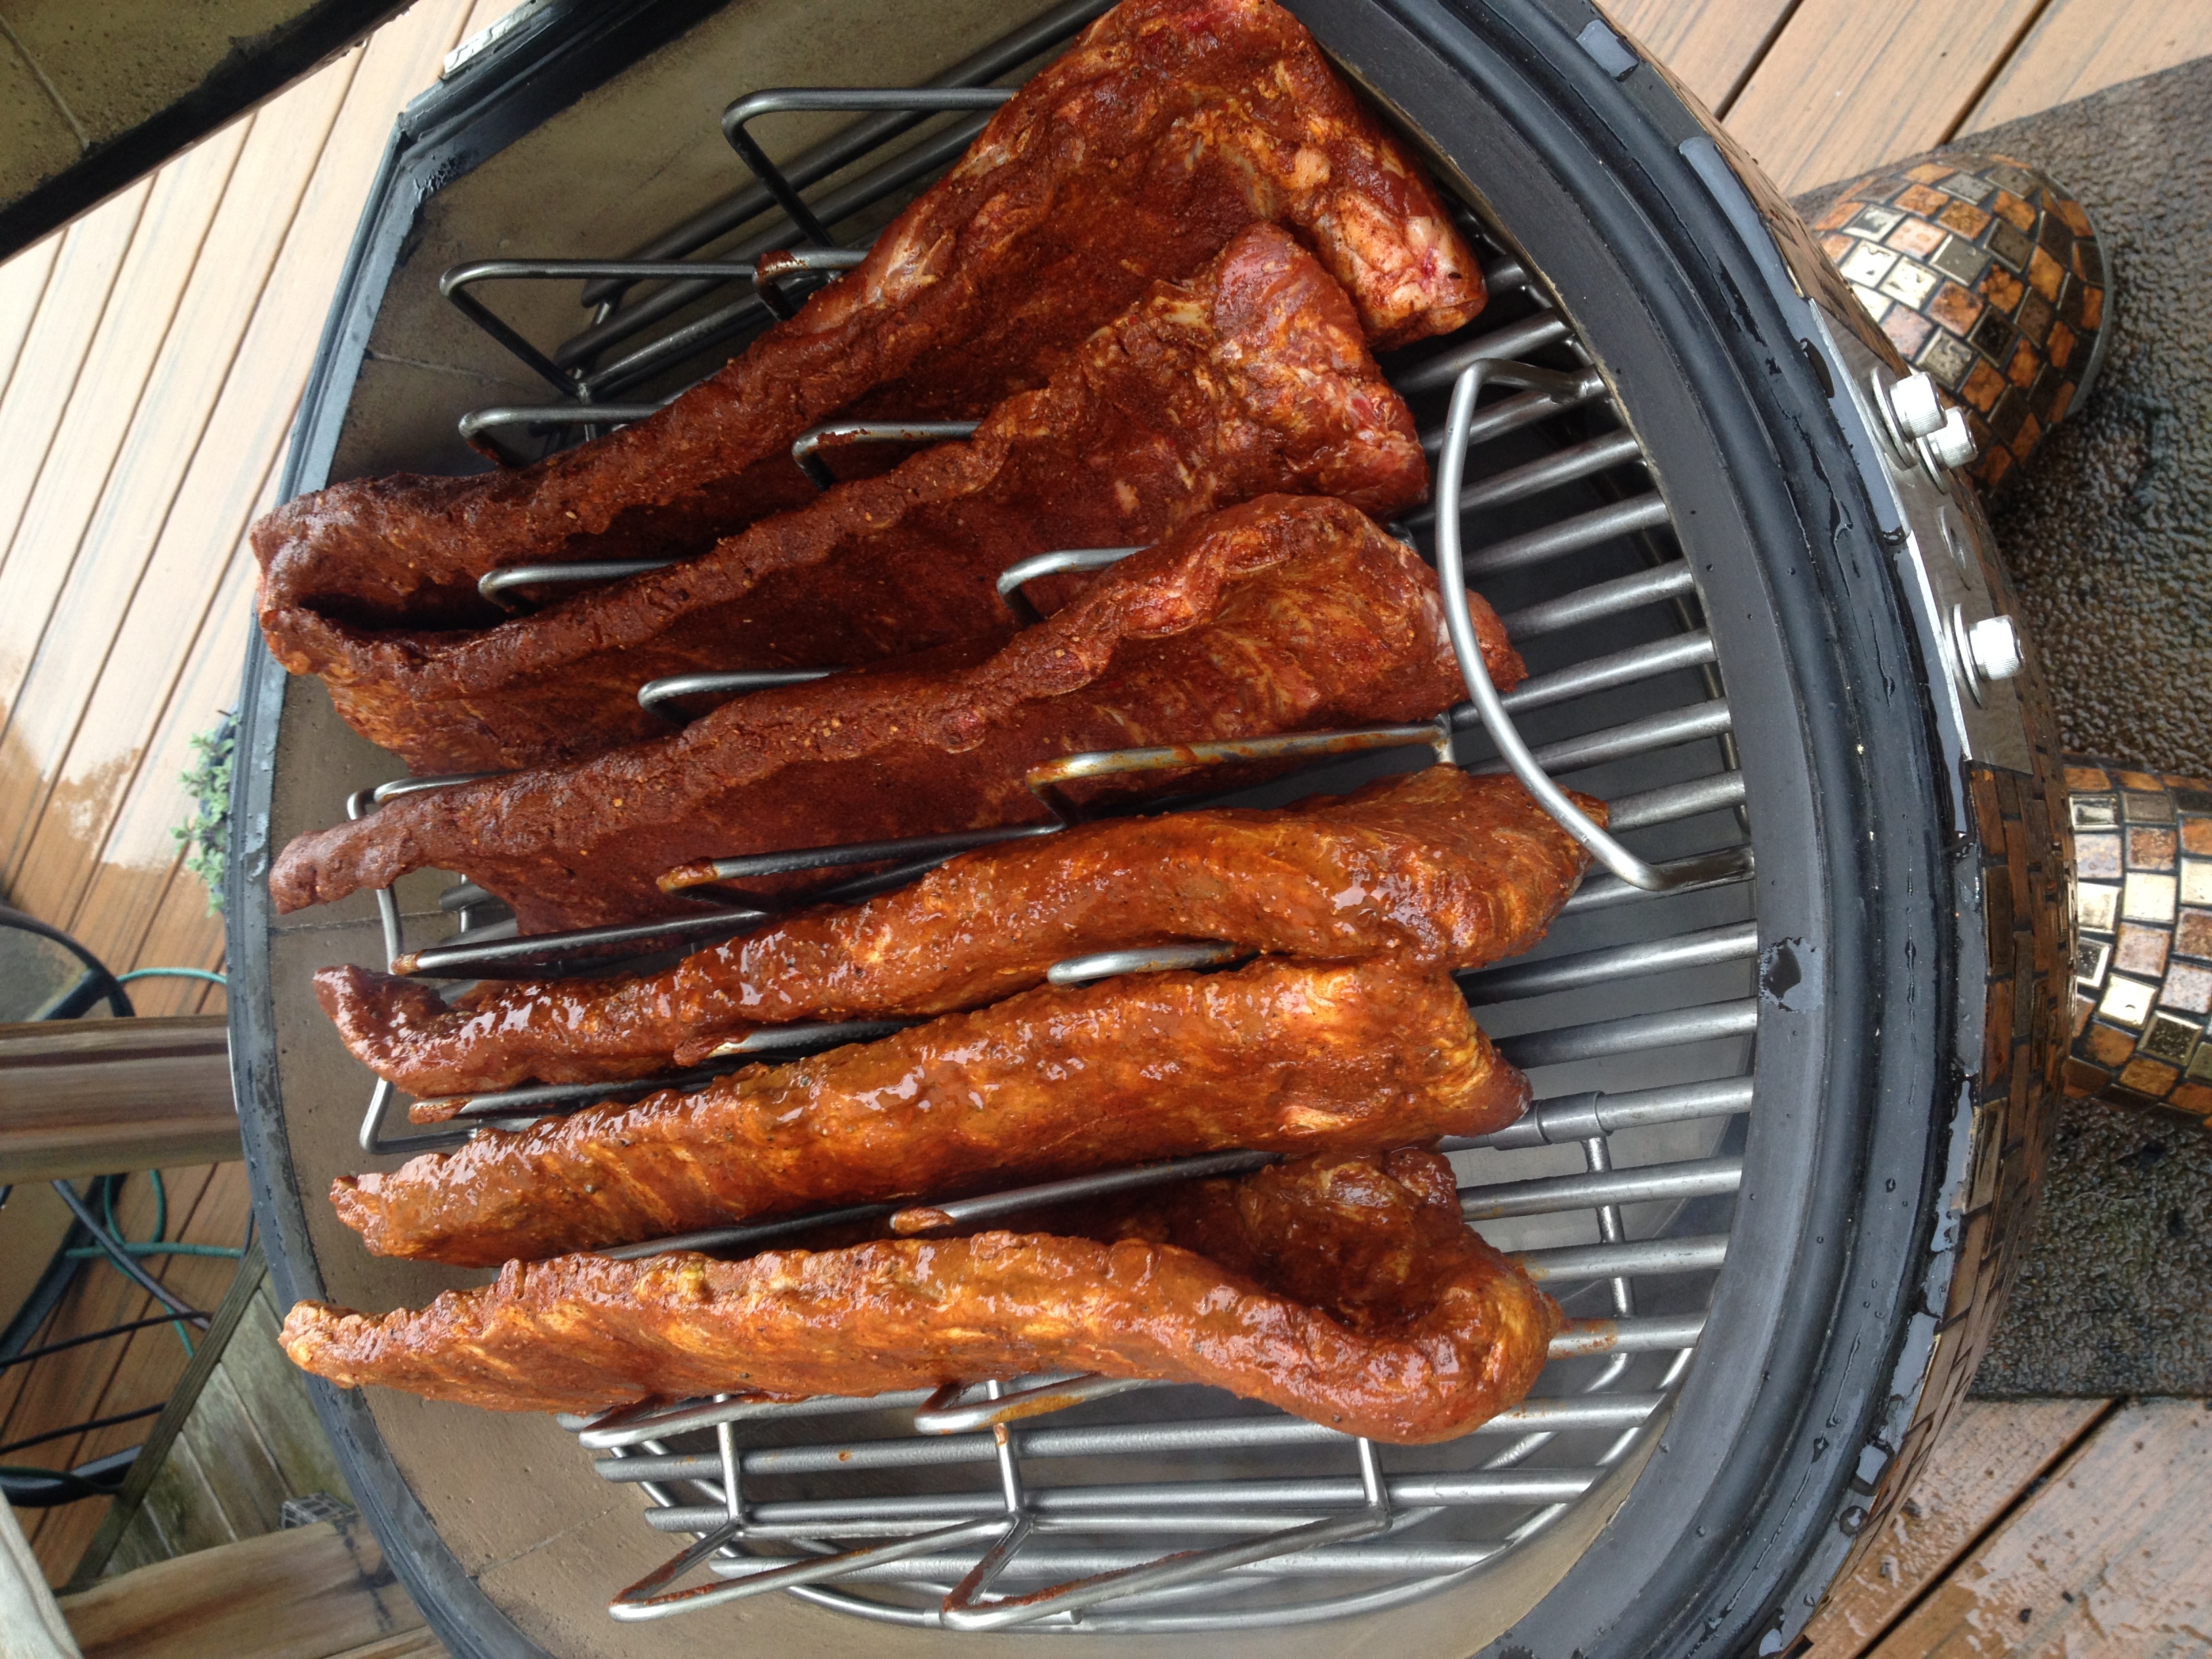
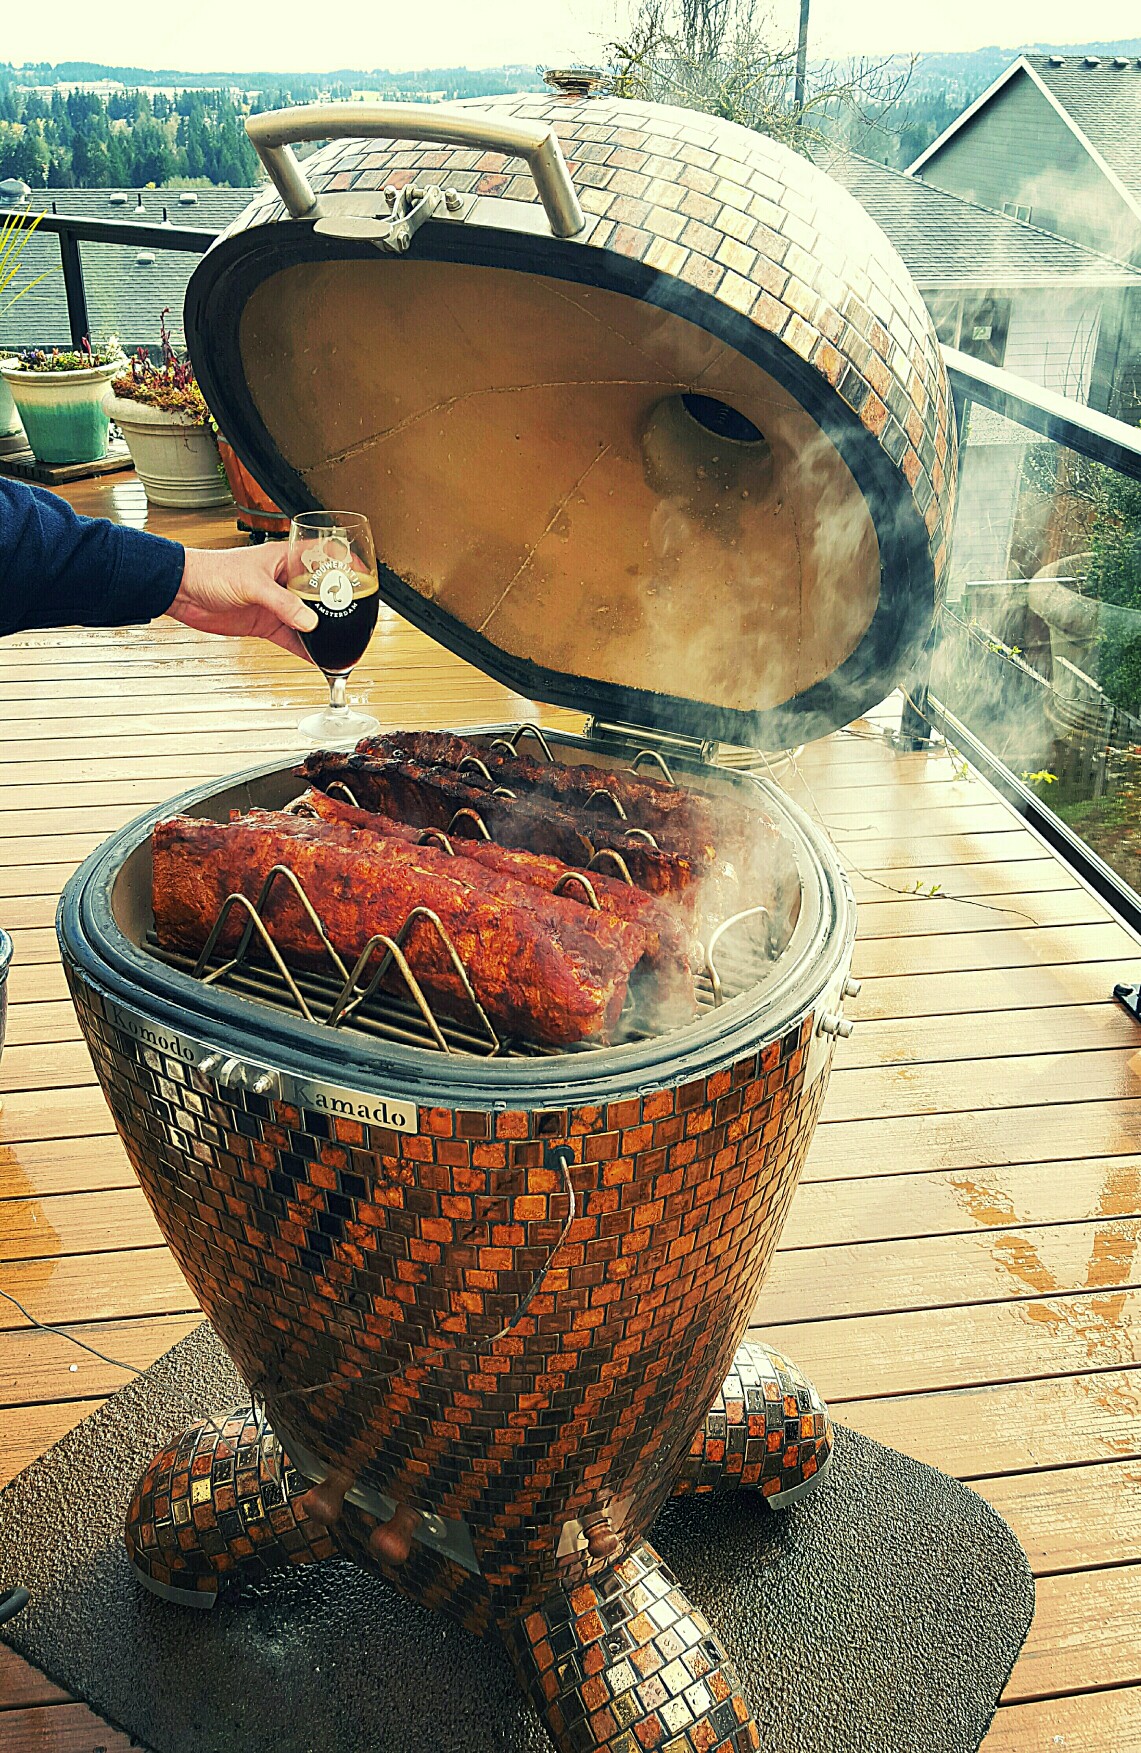
Great job on the ribs. I love those rib racks. So far they are my favorite accessory.
And... very cool idea on the hanger. I have never tried that sort of thing, but I bet with the high tops that could be done without to much trouble.
Again.. congrats.
--
Rick
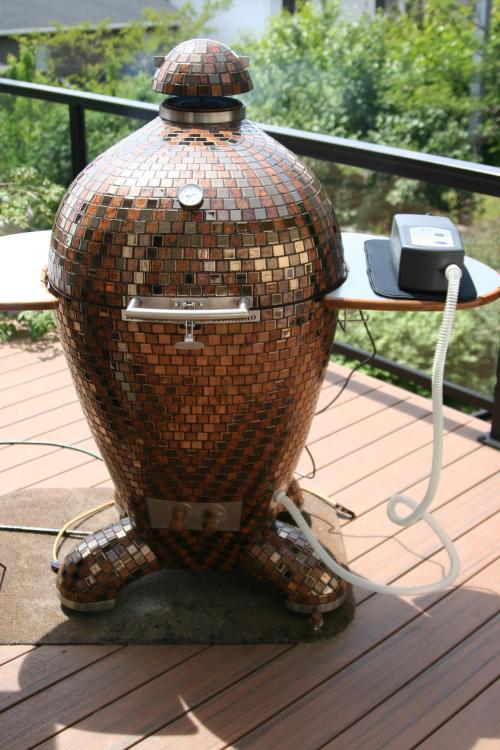
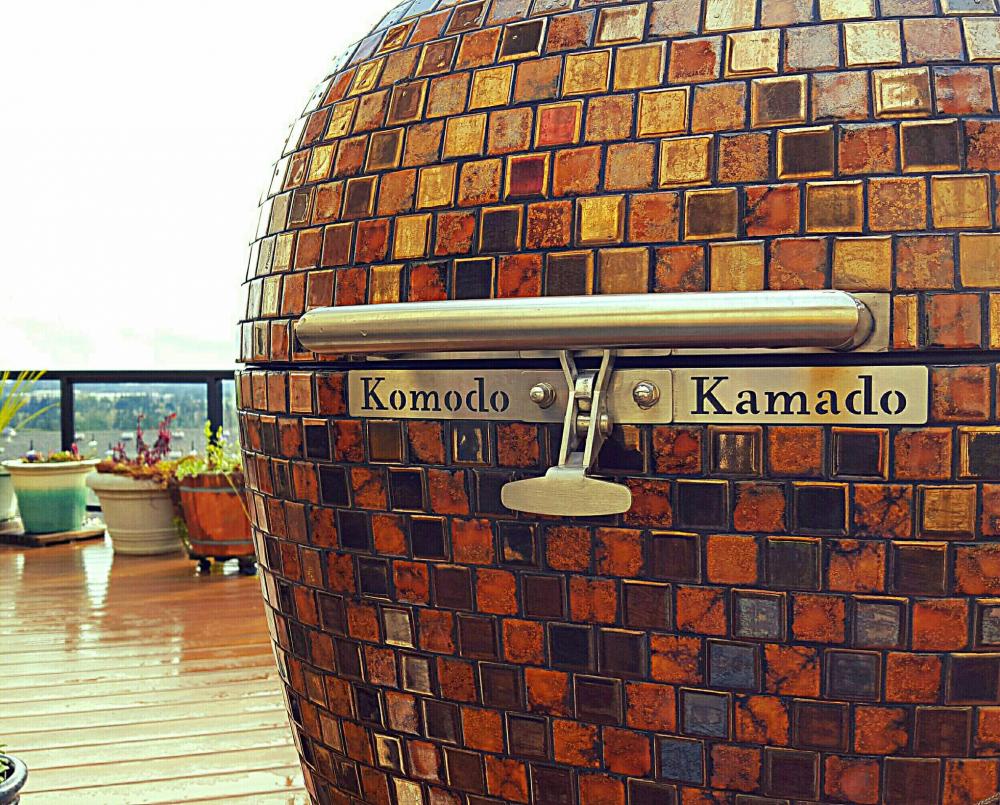
Thanks! The tiles actually change like a chameleon with the sunlight (and camera flashes) so it stays interesting.
-
Expand
That's what I was thinking buy why not extend it down to the lower grate, something you already have (it would have to be taller to go down to the lower grate). I think the 3rd position idea would be ideal. A side to side half loop (oblong) then a 3rd brace going to the back.
Charles - Prometheus 16.5", Cassiopeia 19" TT
I can jury-rig something and will if I have to. It wouldn't be the first time
. My motivation for the post is to see if there's enough interest for Dennis to engineer and offer a new accessory that's both KK quality and just (or more) functional. I figure I've got to until Nov. 2016 - one way or the other.
-
1
-
-
Expand
That's what I was thinking buy why not extend it down to the lower grate, something you already have (it would have to be taller to go down to the lower grate). I think the 3rd position idea would be ideal. A side to side half loop (oblong) then a 3rd brace going to the back.
Charles - Prometheus 16.5", Cassiopeia 19" TT
The taller the half-moon support is, the more stout it'll need to be. Using the upper grill seat will minimize the elevation required and improve stability. The idea of building onto the lower grill is great, but I don't think that will provide as much vertical space as having no grill at all because the meat can extend below the seat of the apparatus if there are no grill rods. The #7 I had seems to have considerably more vertical space in the dome than the KK, which is also a relative reduction in the vertical real estate. Building off the lower grill can certainly work though, it just may not accommodate as big of bird.
Also, the spherical heat deflector (wok) provided more vertical space by design, and improved thermodynamics by luck
. It would be great to preserve that if it's practical.
-
Expand
Now, I understand, looks like a really neat idea .:) Thanks for posting the pix.:)
Thanks. I should have posted the pic first and probably under another topic, egh? If there's any interest, I'll post in the right place on the forum. A KK-quality version of this would be spectacular, in my (not so) humble opinion.
-
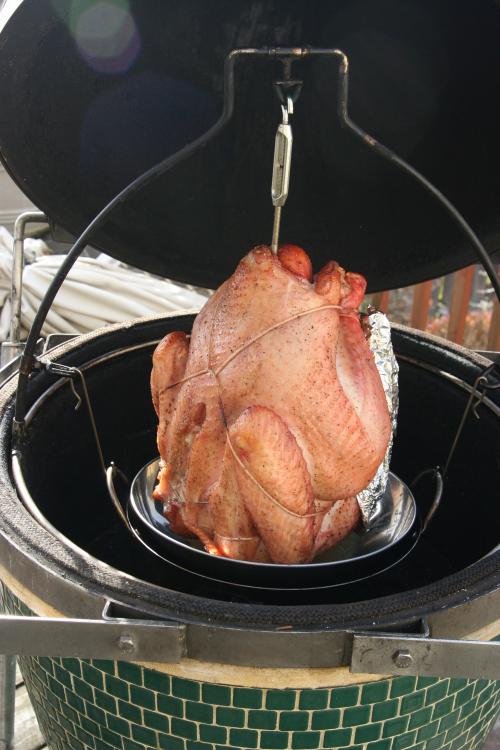
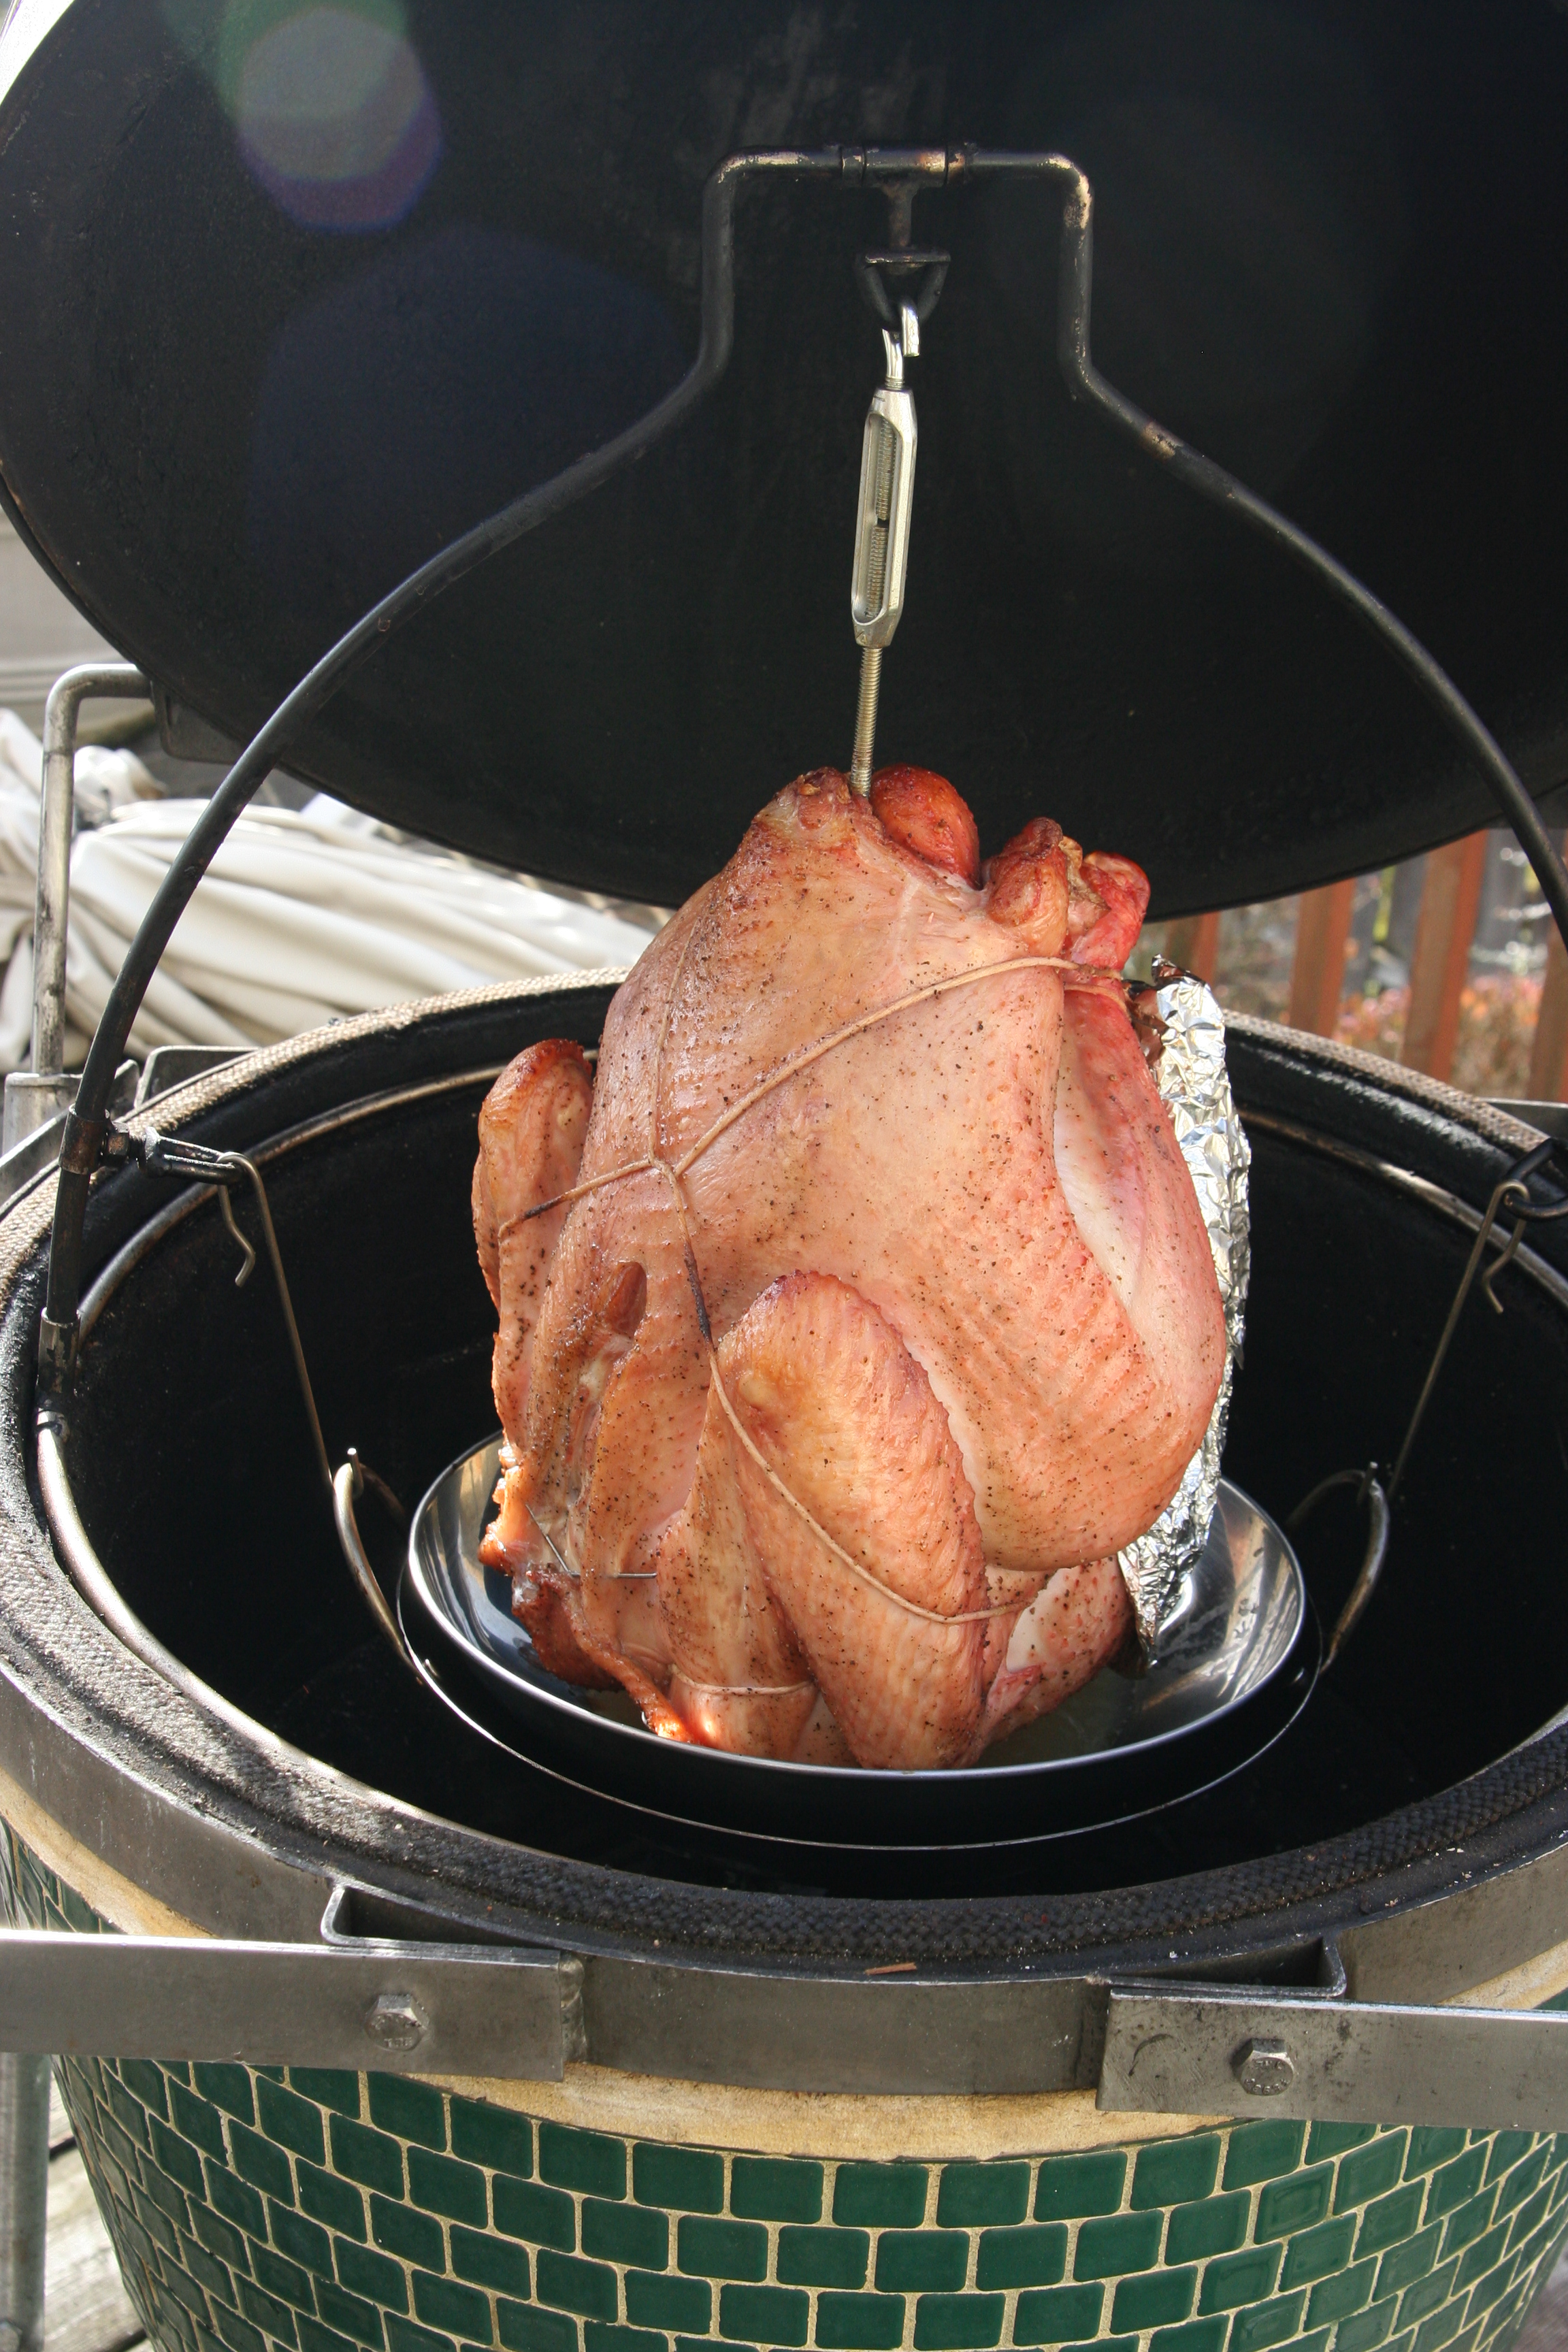
Here you go. This pick was taken shortly after the start of the cook (obviously).
The wok drip pan is something that I came up with because I needed something a bit lower than where the lower rack was because this bird was so big, but I found it helped convection much better than the heat deflector plus pan. I fashioned my own hanger with the turnbuckle because the included ones weren't long enough for this bird either. The swivel anchors holding the wok were intended to be used as hangers too and are height/latitude adjustable so you could hang 2 or 3 chickens or 4-6 game hens (stacked) or whatever. A third wok support wire was added for stability in subsequent cooks so it's not pictured. I hung a 14 lb. pork butt once for fun, but it's much better for fowl. I'm still anxious to hang tandoori style legs of lamb. Sorry I don't have a pic of the finished turkey - you'll just have to believe me that it looked like it would pop if stuck with a temperature probe
. It's a high resolution picture so you can zoom in and see a lot of detail
-
Expand
Okay.................I didn't ask what POSK meant but I will ask............what difference the "meat hanger" makes compared to having turkey (or other meat) sit vertical on the cooking grate?????
I'm soooo confused

That's a good question. I've done both the beer can style with a vertical roaster and the hanger and the advantages I've seen with the hanger are:
- Orientation of the bird. Most vertical roasters have you place the bird feet-down with the cone-shaped rack in the main cavity of the bird. When I use a hanger, I truss the bird and hang it with the cavity facing up. I have carefully measured temps and the breast and thigh meat get done much closer to the same time than when using the vertical roaster.
- Plumpness. I can't prove this, but I believe the head-down orientation on the meat hanger also contributes to the plumpness as gravity is causing the meat to relax toward the thicker parts of the bird as it cooks. This could be conceptualized and/or tested by taking 2 turkey legs and cooking each with an opposite vertical orientation and seeing if one gets plumper than the other (i.e. sag toward the foot or sag toward the thigh or not at all). Having the cavity facing up also makes it easier to stuff the cavity compared to a vertical roasting stand. I typically add a quartered orange, onions, apples, etc. (depending on the recipe) and very lightly pack them rather than using dressing. This too may contribute to the even cooking but I do it primarily for added moisture and seasoning.
- Consistent browning. Using the same cooker, although not a KK yet, I've achieved better consistency in the 360 degree browning of the bird on a hanger than I do with a vertical roaster. I hang a wok under the bird and meat hanger to serve as a the heat deflector and invert the lid of the wok into the wok base to catch drippings for gravy. The air gap between the inverted lid and the wok prevents scorching of the juices. So there are no grills or other flat surfaces in the cooker - just the bird and the curved wok hanging below. In my old #7 Kamado, this provided more even temperatures all around the bird throughout the cooking cycle much like you'd get with a horizontal motorized spit. If I did want to rotate the bird for pictures or to even up the browning, it was effortless because the hanger is installed on a swivel. It's a single naked finger operation rather than two-handed gloved operation, even for a 23 pound bird.
- It's simple. The apparatus is really simple and collapses for easy storage. The only things to clean are the vertical rod, the star-shaped retainer upon which the bird rests, and the wok lid. I also find it much easier to transport the finished product than when using a vertical roaster. You don't have to worry about it falling over and don't need to even touch the bird.
- It looks super cool. Aside from the practical advantages, there's something about opening the grill and seeing no grill at all. Just a beautiful piece of meat suspended in mid-air.
I'm not sensing much excitement about the idea so far and that's ok. I don't want Dennis to put efforts into this if there's such limited interest from owners. I'll have decide if it's something I'll take on myself. If I could get Dennis to sell me a main grill frame without the grilling bars, it's a pretty simple project. Bending the hanger's base to the unique shape of the grill seat is the only challenge that would drive up the cost if I were to use a local fabricator.
-
Expand
I was on that Raks moving day. 4 strong friends is an understatement....
The issue with raks delivery was user error. We had two guys standing up on the deck (approx. 2' off the ground). We had two guys standing on the ground.
When we put the 2x4s in on each side, the two guys on the deck lifted a the same time as the two guys on the ground. This caused the angle at the front to be too high and hence causing the kk to come crashing into my chest. We regrouped and the two guys standing on ground lifted up first and the guys up top only lifted a bit so that the 2x4s were level.
Another alternative is to take the lid off. I can't help with that but know that ckreef has done that in the past. Just be careful placing it down as the tiles around the bottom that have a slight over hang will be holding all the weight of the lid and could likely damage. Personally have some food and beers ready and get 4 to 6 of your closest friends to help you lift and move using the blue ropes and two 2x4s. Its heavy.... but the 2x4s and the extra hands will help lift where it needs to go.
Removing the dome and replacing it was a cinch, so I recommend it. I thought about the possibility of slippage of the ropes and had an idea of marking the rope location on the 2x4's with a trial fit and then drilling a 1/2" hole as close to the edge as possible, and then carving or chiseling out the edge-facing 1/4-rounds to create cradle for the ropes. I didn't end up doing this because I was only going up and down small steps, each with a landing area big enough to set the KK down. But I do think the cradles would work well if going up any sort of staircase or big elevation. The ropes could be secured in the cradles by capping them with pieces of scrap wood and couple of wood screws.
-
Expand
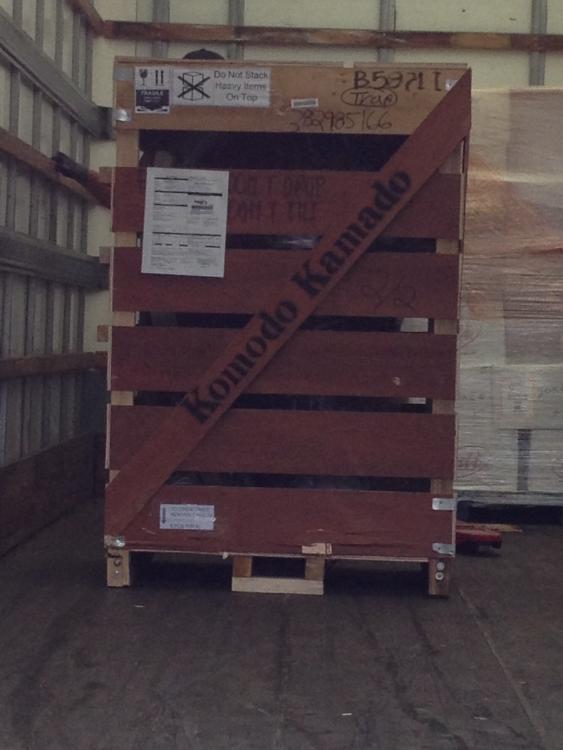
I had a lot of steps to go up from my garage to my living room and out onto the deck. I built a ramp for it and the 5 of us pushed/pulled it up the ramp and rolled it out onto the deck. I took the top off to lighten the load and to keep it from being top heavy going up the ramp. It's not that difficult to take on and off, with a couple of folks (it's pretty heavy for one guy to carry). The top of the crate is a ramp for rolling the KK off the crate. Since you only have a couple of steps, this might be enough to do the trick for you?
One thing in your post, you mentioned removing the firebox - DO NOT DO THAT!!
 It's not meant to be removed and you could severely damage it if you try.
I did remove the firebox before moving the unit. It came out easily and went back in easily too. I read in the owner's guide that removing the firebox should only be done when the unit is new/unused but never after that.
-
Expand
Echo the others - beautiful grill and a tasty rack full of ribs, too! Well done, sir!
But, inquiring minds like ours really would like to know - what did you do with the POSK?
Thanks for the post.
Well, if POSK stands for what I think it does (piece of s#!+ Kamado), then I have to say it wasn't a lemon like some. It was/is a fabulous cooker with thousands of hours of cooking under it's dome and it produced exquisite meals for nearly 20 years now - longer than KK has been around. Cold smoked cheese, jerky, smoked steelhead, crown rib roasts, briskets, 100's of Papa Murphy's pizzas (on the cardboard), prime rib, rib-eyes, beer wort, turkeys and even chocolate soufflé - it was all awesome. I took good care of it and it reciprocated.
Within the last few years it started dropping tiles from the cap and the cap recently developed a rather large crack in the refactory cement. There is some delamination of the tile sheeting on the dome, although no tiles haven't fallen off the dome - yet. The base is still in great condition.
The only reason I got rid of it, really, is that I've been drooling over the KK since it was released, but I already had 3 working Kamados. So my desires, passion, a good bonus last year and my wife's permission triggered the transaction
. I sold my #7 to my brewing buddy for $1,200 with a bounty of accessories. I still have 2 original Japanese #5 Kamados in working order, including the first one I got from my dad in 1985 (I couldn't convince him to give me his).
My friends and family would never label the Kamados as pieces of s#!+, nor would I, but so far everyone's been blown away when they see the KK. If it lasts as long and works as well as the Kamados have, then it'll be the last one I'll ever need (not want). I would like to solicit everyone's help to convince Dennis to offer a meat hanger for the KK though. I already miss that accessory. It works like a vertical rotisserie without the hassle of a basket & motor and cooks the plumpest turkeys I've ever laid my eyes on, or sunk my teeth into.
If POSK means something else, I'm sorry. If not, you just called my old baby ugly and you should be sorry
.
-
Hi folks,
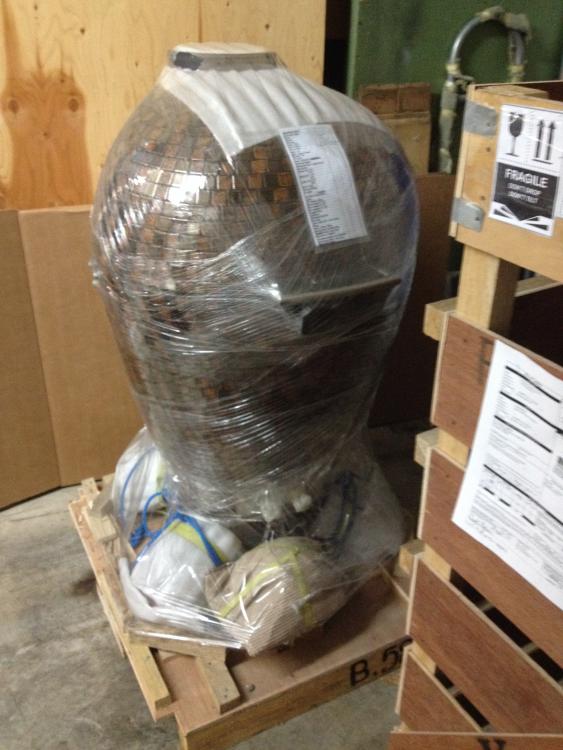
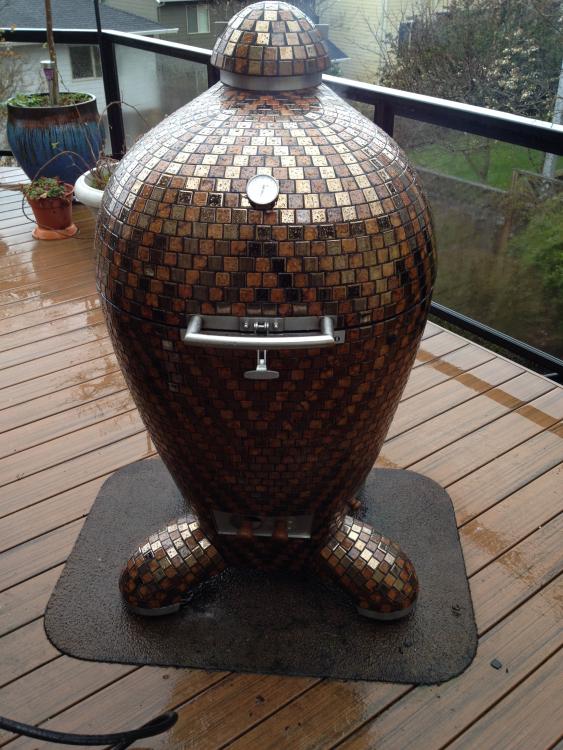
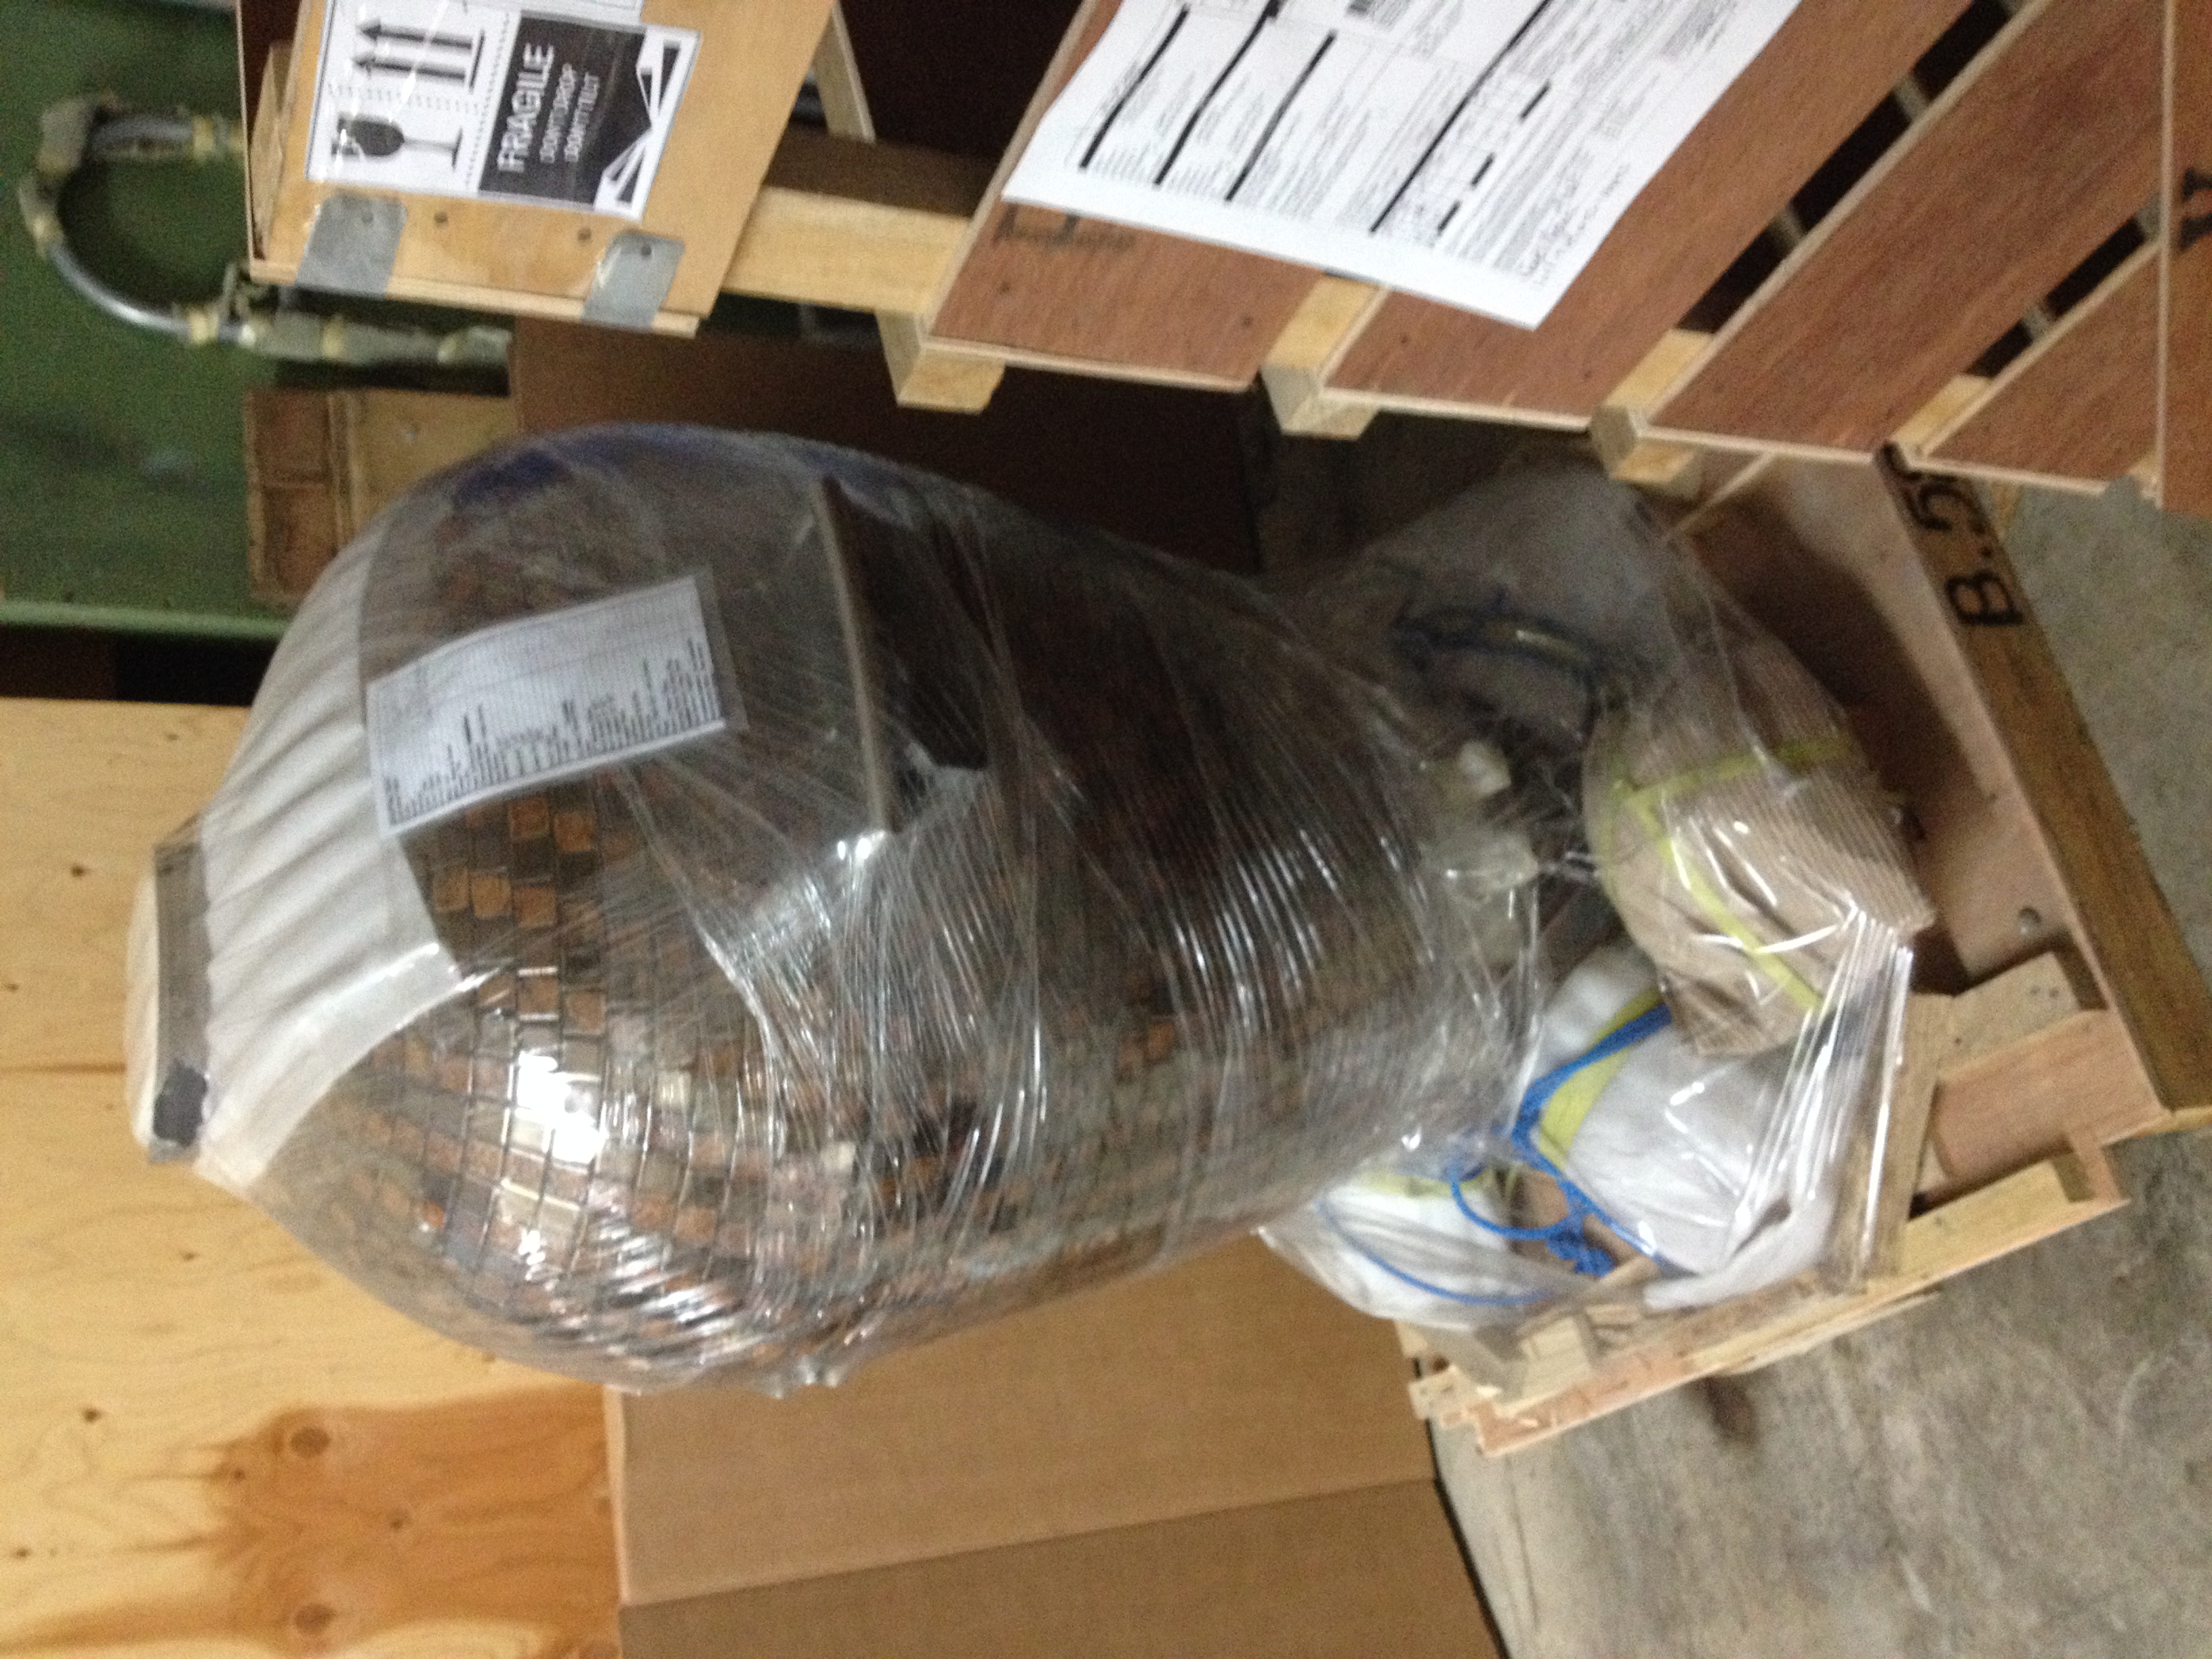
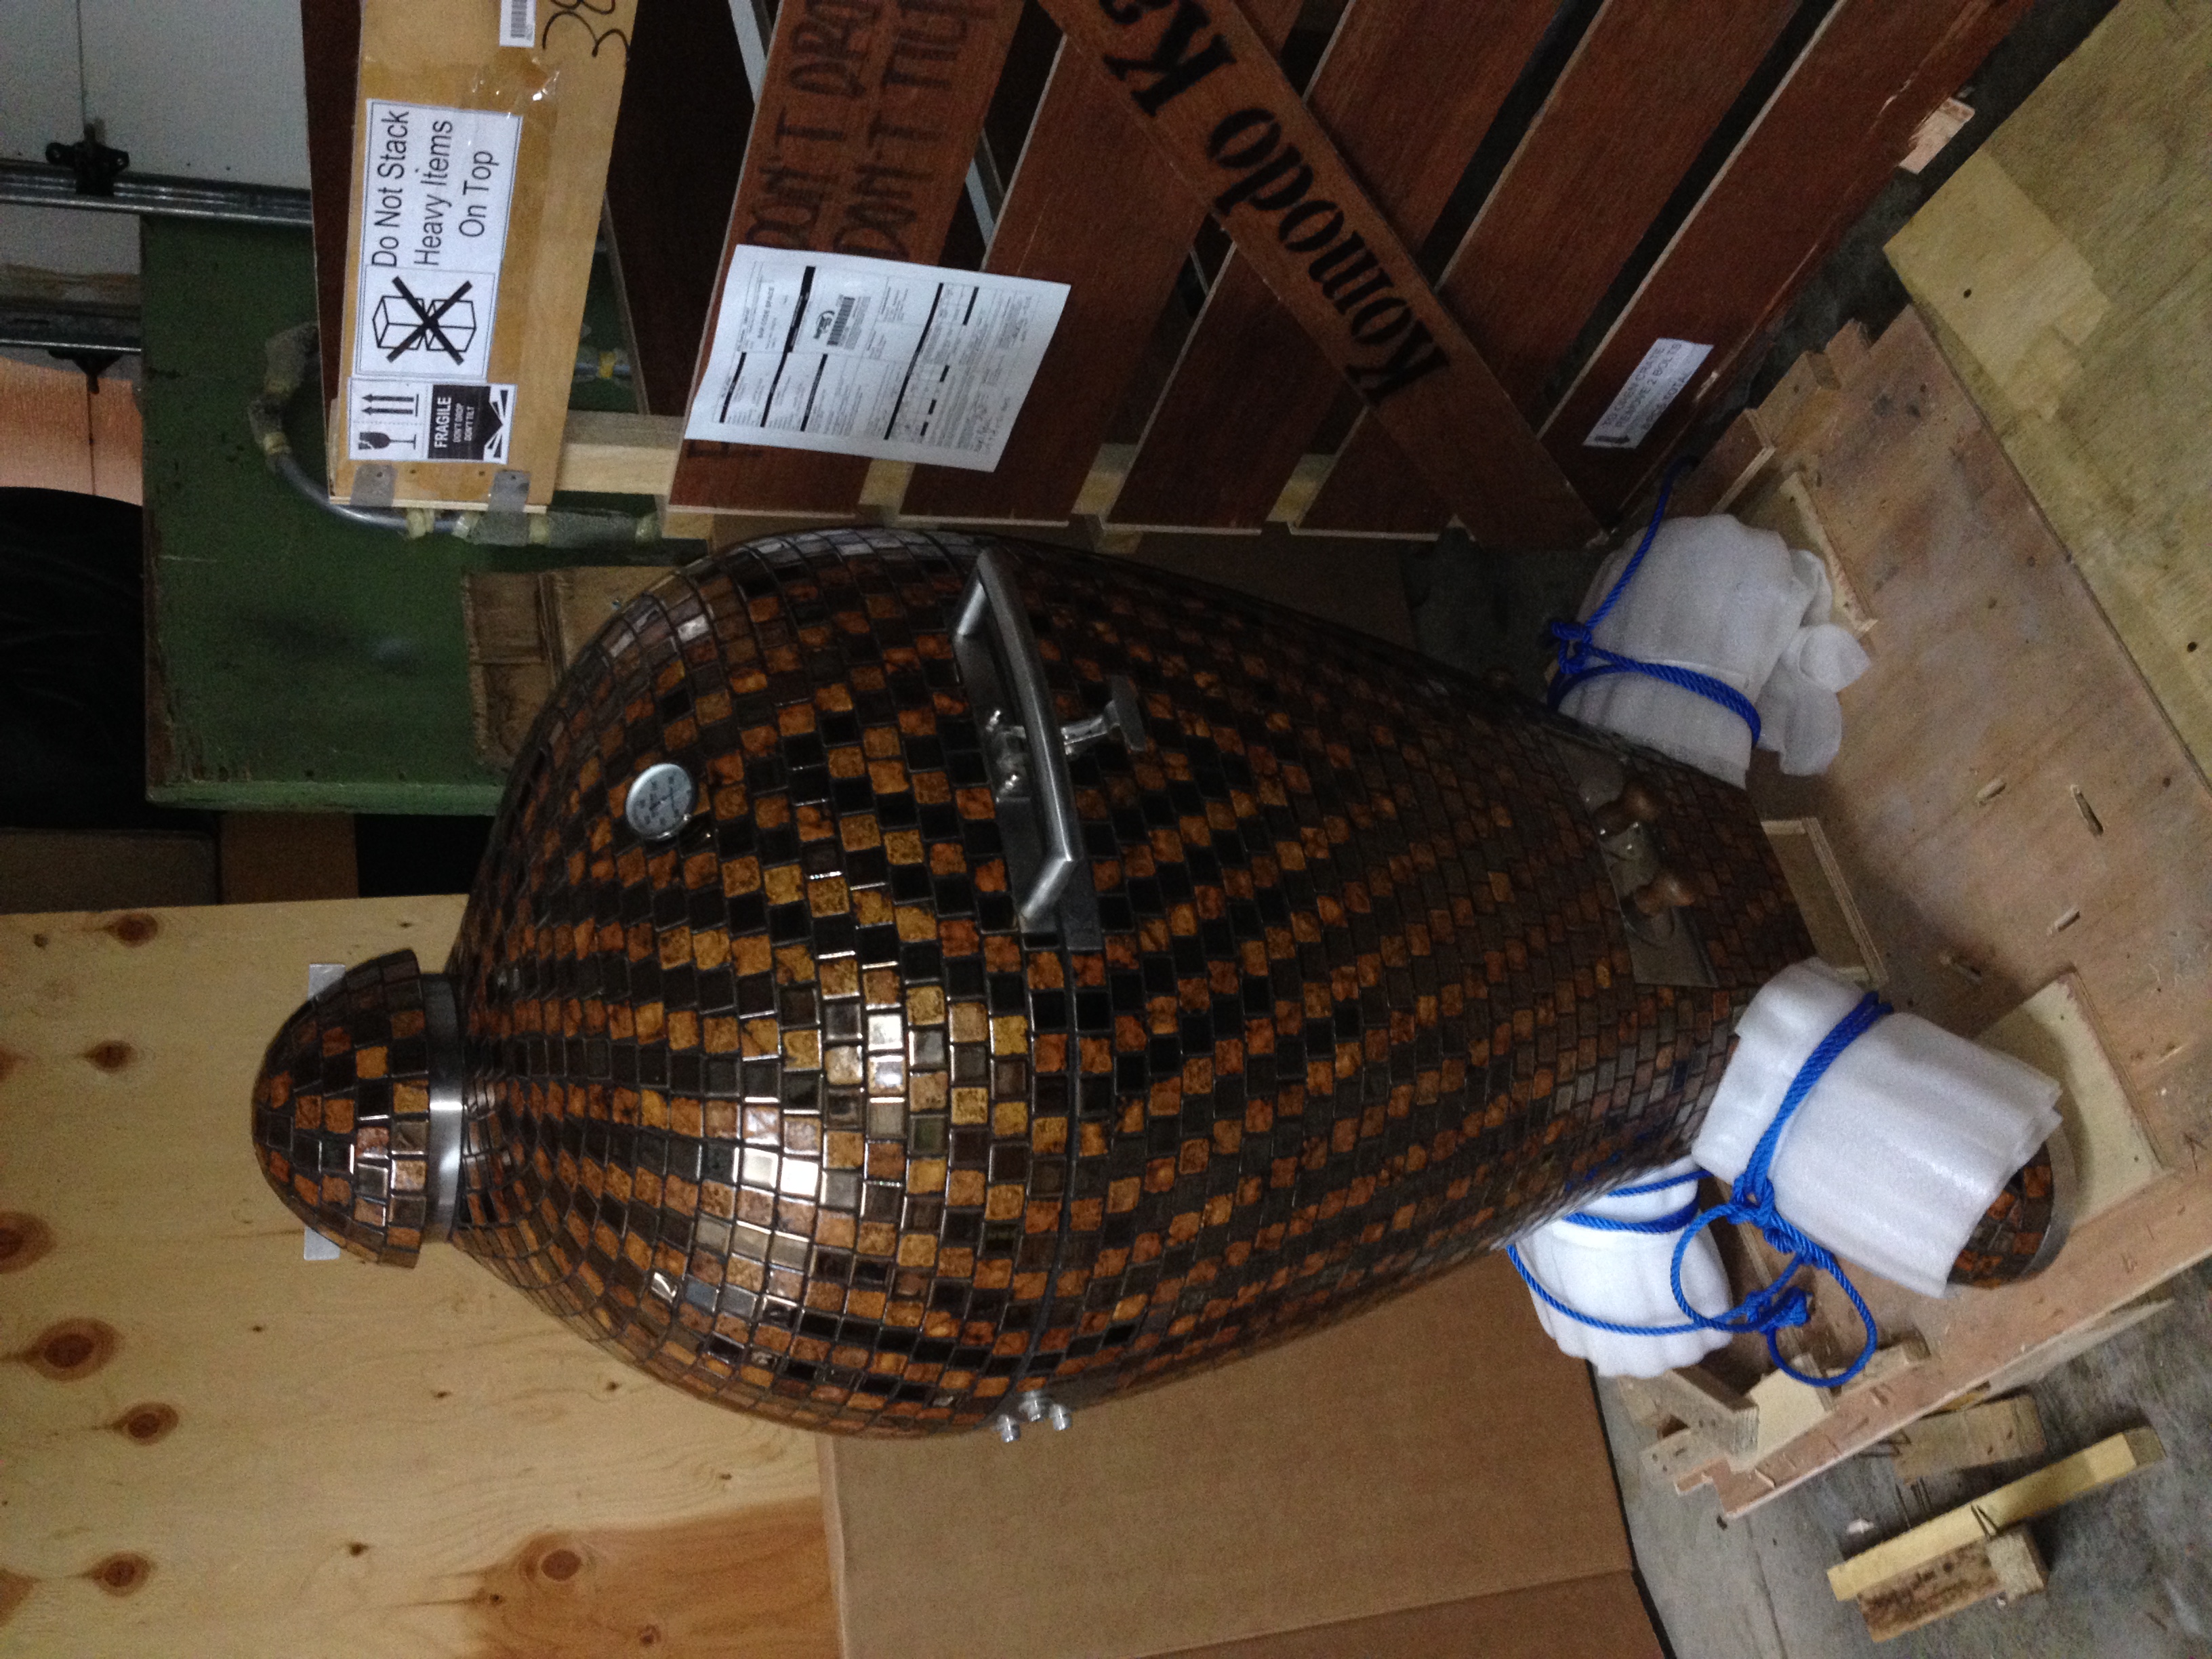
This is BBQKaeding, or you can call me Joe. I live in the Portland, Oregon area and just took receipt of my first Komodo Kamado - a 23" Dark Autumn Nebula Metallic Bronze Tweed. I noticed that many owners name their Komodo Kamado, so I did too: Nimoy. She's a real beauty and really shines in natural sunlight. I purchased the SS side tables and most all of the accessories too. It was like Christmas in March. I probably spent 3-4 hours opening all the accessories and preparing the KK for it's move to the deck the following day. Opening some boxes made me smile and most made me grin. The workmanship is top notch and far beyond what Richard's Kamados sported. I was blown away when I saw the top of the dome with the spider assembly - WOW! Actually, I never get gifts this nice at Christmas!
Like many have said before, the impression in person is one of awe. Great pictures and complimentary write-ups don't come close to the personal meeting.
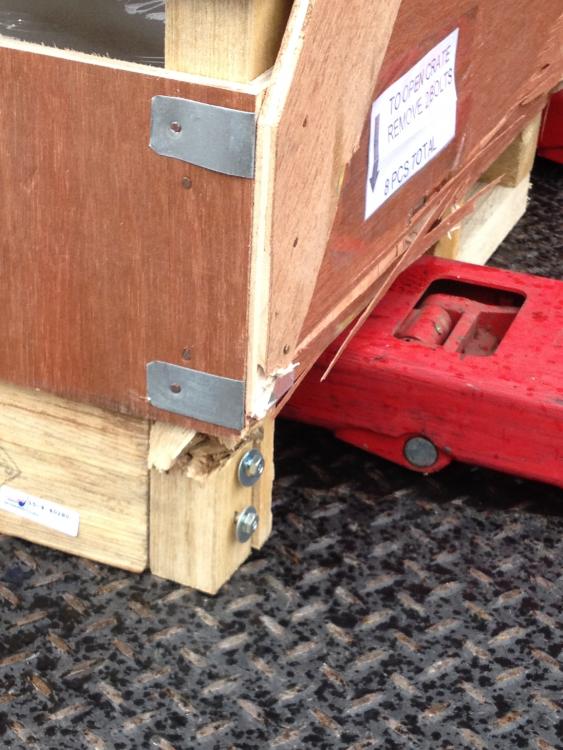
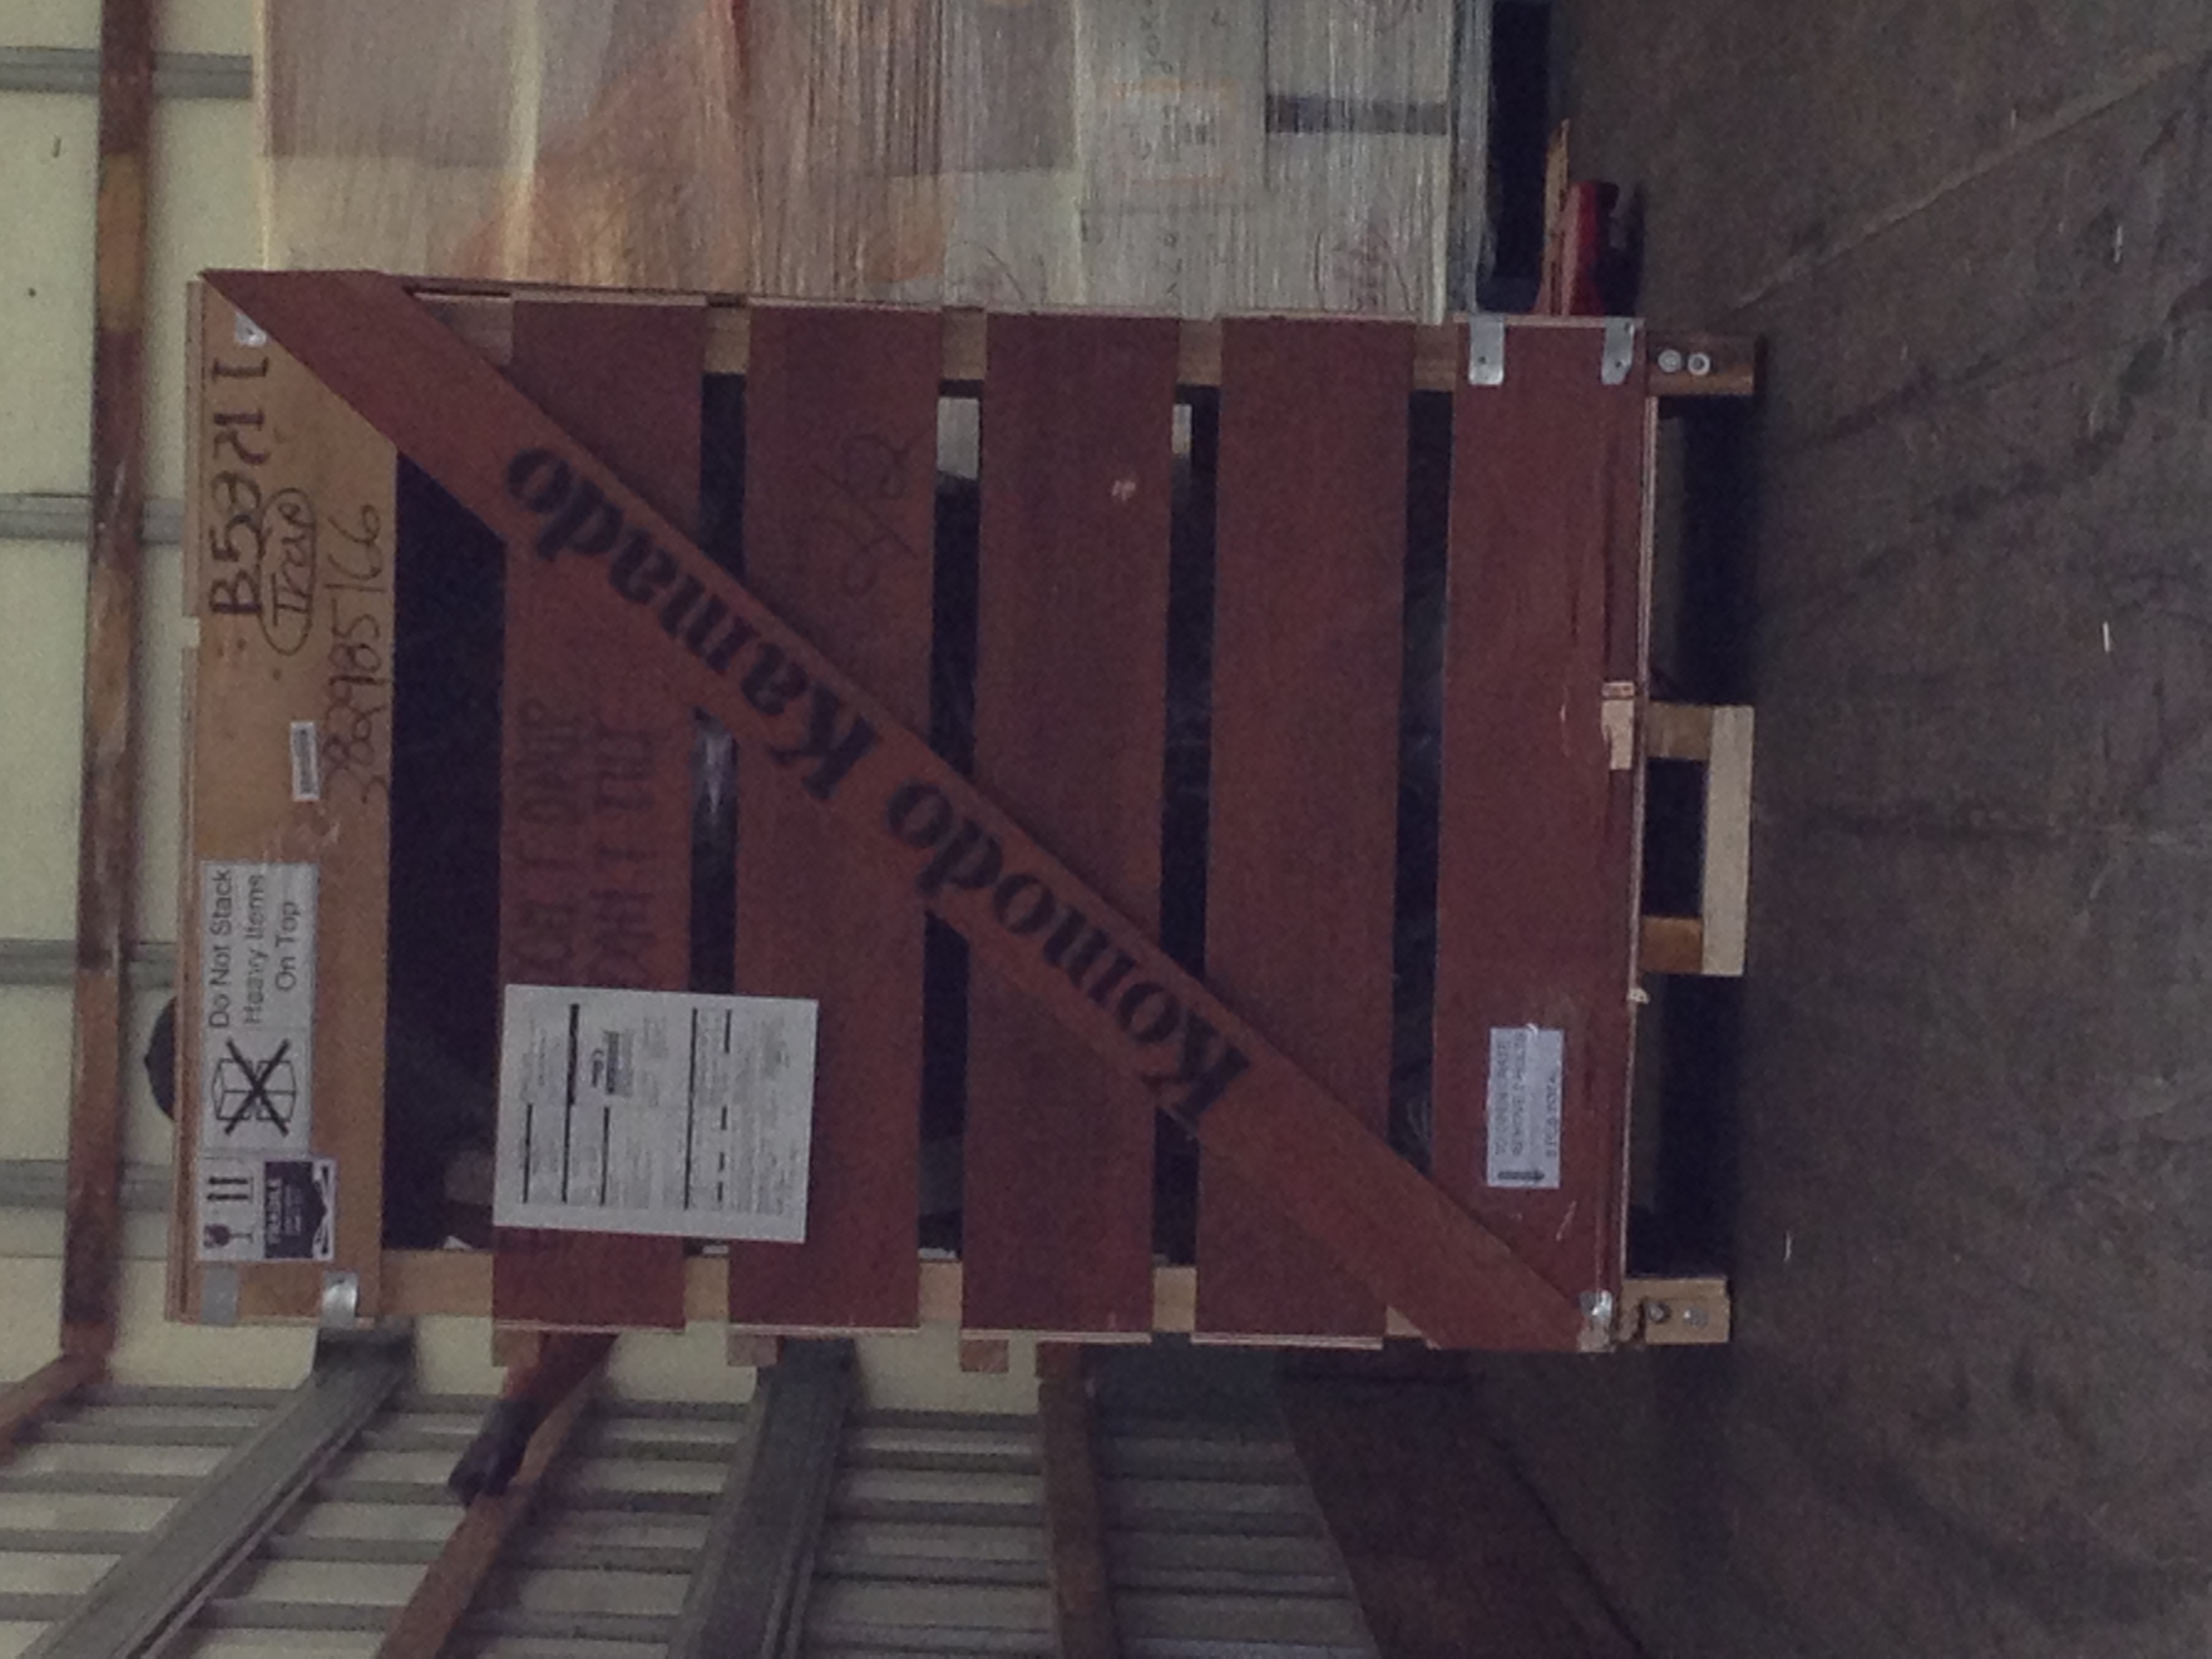
I had some anxiety about moving this unit and getting my old #7 Kamado off of the deck, but it was unwarranted. Dennis engineered this process to be simple and it was indeed straight-forward. My crate had a corner post damaged at the bottom and the ramp that was installed in the top of the crate was too weak and brittle to handle the load, but the ropes and 2x4s worked awesome so we were able to just lift it out of the crate after removing the dome and anchors. I was especially pleased at how easy the dome was to remove and reattach - but you will want a ratchet for the spring tension bolt because you're going to be so anxious to get cooking. We had to navigate a few steps in the process but it was simple enough. One piece of advice is to survey the path and cut the 2x4's to a length that will allow you take any corners and still get 4 able bodies on the ends. Having the bodies on the inside with the cooker will allow you fit though most doorways.
I've attached some pictures of Nimoy for your viewing pleasure.


-
1
-
-
Assuming you have structural integrity, any denting of the PVC would only be subject to its density and that varies by manufacture. In any case, I do recommend a grilling mat as that will help distribute the load in terms of the area under each caster. It'll also help prevent burns or melting when or if hot embers escape the unit which is pretty normal with most brands of lump charcoal. I have a Kamado #7 on my composite deck and haven't had any problems, but it'll be replaced with a 23" KK on Saturday
so I'm crossing my fingers. I'm mostly concerned with rigidity of the composite deck boards as they will warp over time if under load. If you have beams under the deck boards, it's best to place the casters as close to directly over the beams as possible.
-
DaveyR - You mentioned the Smokia in your post. I've been looking at that unit and am curious if you attach it to your KK, and if so, how you make the attachment. It seems the BBQ Guru port would work fine for the outlet pipe, but can't think of an elegant way to secure it so it doesn't fall out or rotate.
-
Hi folks!
My name is Joe Kaeding. I've been cooking on Kamados for about 35 years and just ordered an Ultimate Komodo Kamado to add to my collection. It should be at my home next Friday. I am a PNWBA BBQ judge, but am not too active with judging recently. I got certified primarily to improve my own product. I've added some "about me" content to my profile if you're curious.
I'm a little stressed about getting the KK onto my deck. I have to go down one step onto my sidewalk and up two steps to take the unit though the front door of my house and onto the back (elevated) deck. I only have a 1/2" clearance for the crate with the front door removed, so I think I'll need to un-crate it first. Any tips, tricks or postings of such for moving this beast would be appreciated. I'd prefer not to remove the dome if I can avoid it, but I am curious if I can remove the interior fire box assembly to lighten the unit some.
Also, I ordered the 8" rotisserie basket accessory but it seems that getting the right motor and other stuff is either a black art or a trial-and-error proposition. Is there any current reliable recipe for getting this right the first time? The guy I talked to from One Grill denied that he had a reliable solution because of the rotation direction issue.
Thanks!
Joe


Grill Cleaning
in Techniques
Posted
After reading this thread, I want to point out that you DO NOT want to use a PBW soak in an aluminum container, such as a water heater pan. PBW does not get along with aluminum, although OxyClean does. You could line an aluminum pan with a large plastic garbage liner or sheet of plastic though and use PBW.
Depending on your grill size, you might be able to find a plastic potting tray at your garden supply store or nursery that will fit your grills and work with most any cleaner. I have one that's 24 inches wide and 6 inches deep that looks like it was used under a half-barrel planter or for a large root ball. If you have a Big Bad 32 then my only suggestion is looking for a pet wading pool at your local pet supply store. The ones I've seen are about 3 feet wide and 6 inches deep.
I'll mention again that PBW is an awesome cleaner but it's super expensive for large volume soaks ($10 for 1 pound, $30 for 4 pounds or $55 for 8 pounds locally). I bought a 5 gallon bucket of it for $185 for my brewery use but I still don't use it for soaking kettles or fermenters - just parts and hop sacks. OxyClean requires more concentration and a longer soak but it's far less expensive. I've seen OxyClean for as little as $40 for 30 pounds in restaurant supply stores.
Hope that helps!