-
Posts
3,021 -
Joined
-
Last visited
-
Days Won
12
Content Type
Profiles
Forums
Events
Posts posted by Firemonkey
-
-
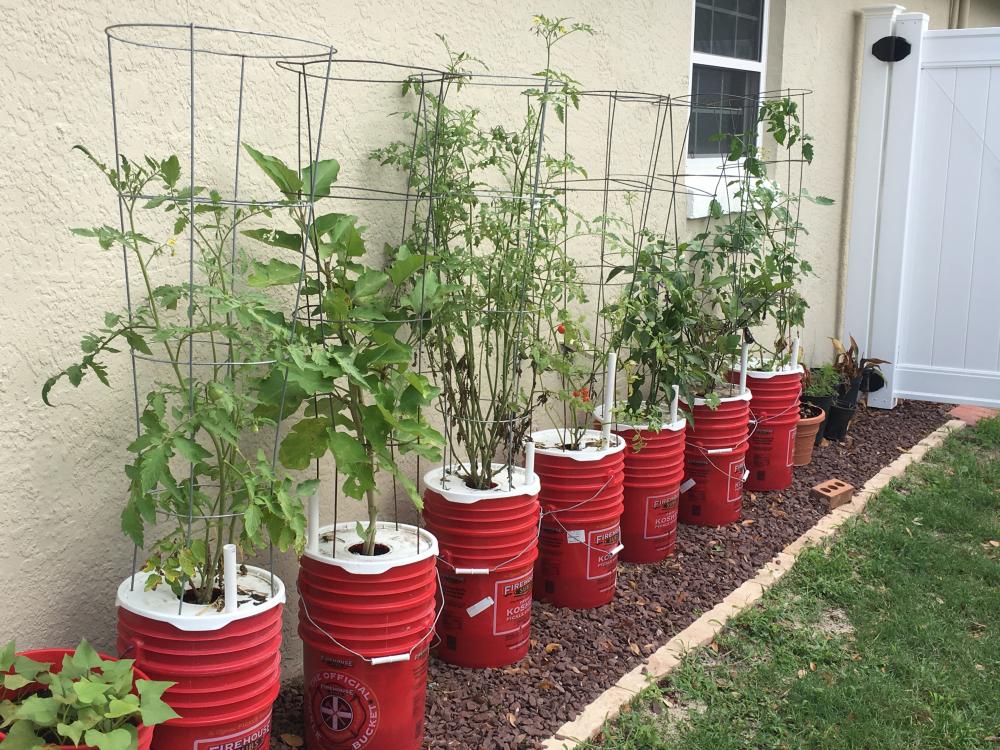
Here's the clippings and pruned off plants from a couple months back. Already fruiting. $4 donation for 2 food grade buckets is the best bargain ever
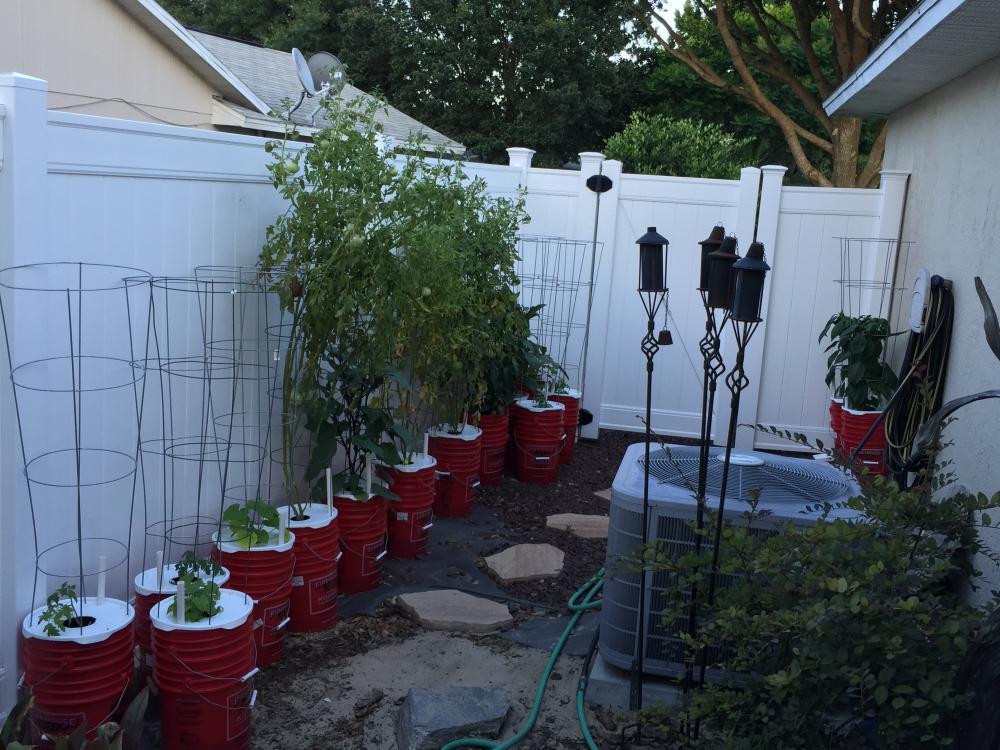
I moved all these to the south side of the house for winter after I reset them... More sun and they're more hidden over there too

Now, how do I get Mr Reef down here to lay a flagstone hardscape around my fire pit

-
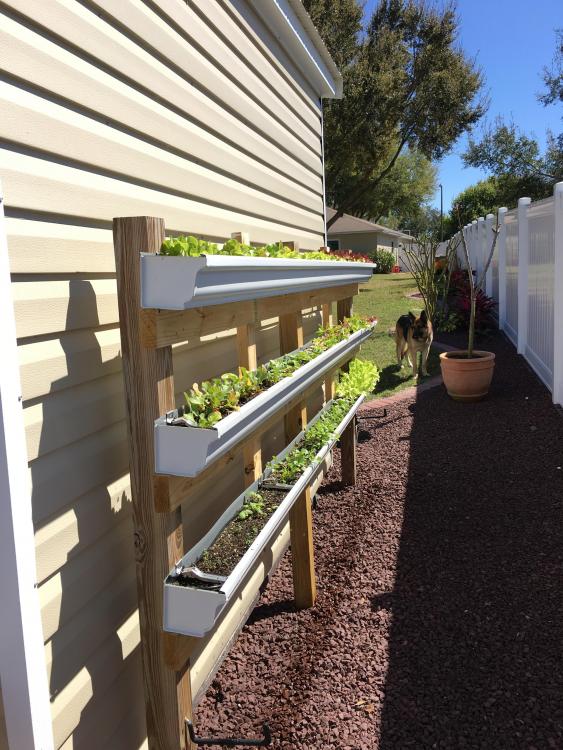
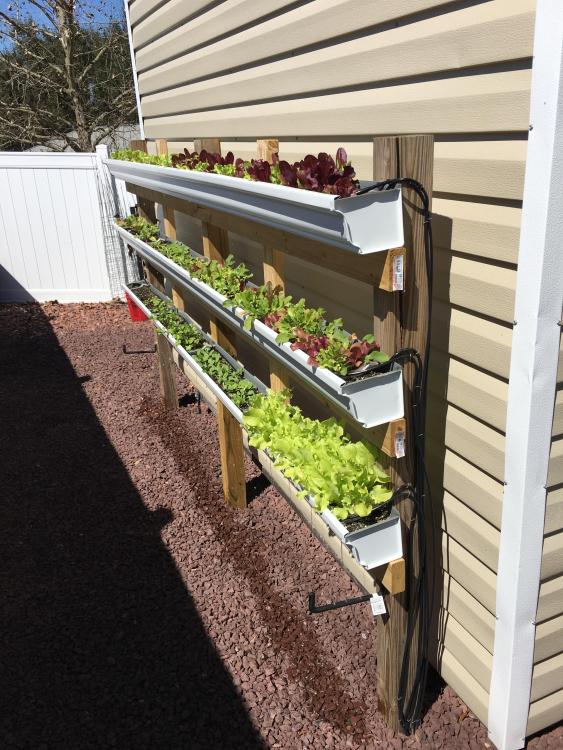
I've been impressed with how well the gutters worked, and how much you can grow in such a small footprint and what was basically unused space. All that white vinyl fence used to be wooden privacy fence - if it still was I would have 3-4 rows of gutter all over it. Those are 6" aluminum gutter, so basically anything you can grow in a 5-6" pot will grow in there. I'm thinking about putting another few sections somewhere else in the yard for strawberries.
Automatic irrigation of some sort is pretty much a necessity with the gutters, or they will dry out and you'll be out there with a hose daily once it warms up. Mine are filled with moisture control potting mix, and get saturated (holes drilled in bottoms for drainage) every other day right now. If you can keep them wet automatically, they are zero maintenance growing machines. Lots of killer ideas out there if you google for "gutter garden".
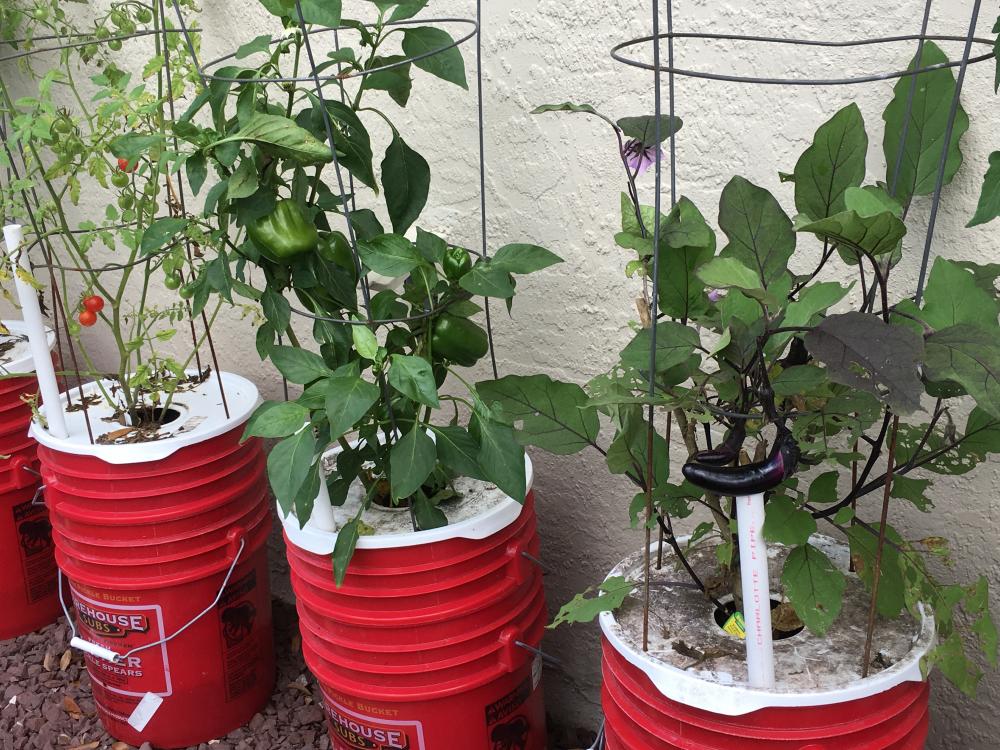
@cschaaf That sucks that you didn't get any usable tomatoes. The plants in the self watering pots i built from the FireHouse pickle buckets produced like crazy - especially the eggplants. The tomatoes were all heirloom varieties, hence they get really long and out of control, and eventually start dying off. This winter, I tried something new, and just took 8-10" clippings from a couple of the better producing plants, and stuck them in a little pot of dirt. Sure enough, in a few weeks they rooted so when I took the buckets apart to replant a fresh crop, the clippings became my spring tomato crop. I also just pruned back the eggplants and they took off again with new growth.
I LOVE the self watering buckets. They're ugly, but I can move them to various "out of the way" spots in the yard based on seasonal sunlight differences and plant needs. The key is using good, loose, well draining but spongy potting mix. Mix some organic fertilizer into the soil at planting (and add a little lime for tomatoes) and then just keep the bottom bucket filled with water through the pipe on top.
-
 1
1
-
-
If you're going to reattach the leg on the firebox, maybe drill a hole in each piece, so you can set some stainless rod to help hold the two pieces together?
-
 1
1
-
-
Does the gasket leak, or you just want to replace it because it got greasy?
You can get braided fiberglass wood stove gasket, and glue it down with high temp RTV silicone. The last time I needed to fix up a kamado with fiberglass gasket, the braided fiberglass was gray instead of white, which helps it not show charcoal dust as much. You can scrape off all the old gasket and silicone, then cut a new piece to fit. Before you do any glue down, you might want to take off the spring on the back of the grill, and loosen the nuts on the hinge plate to make sure the lid is sitting flush to the base. Tighten up the nuts, re-tension the spring, and then you can lay down a bead of high temp silicone on the base. Put the gasket on top of the bead of silicone, and close the grill up for a few hours until it cures. That should seat everything straight and tight.
Don't press down on the lid any more than required to close the latch while the silicone is wet. You want the bead to stay thicker and help close any irregularities in the mating of the two surfaces.
Your latch looks like it took a sideways ding? Does it still catch tight? If not, get that straightened up first, so that you'll be able to make a good seal.
As for the tile work - see if you can find some color matched caulk from the tile section at your local Lowes or Home Depot. You should be able to find some sanded caulk that matches your existing grout color, and just use that to both adhere the tiles and fill the gaps between them. When I have done that, it was with high temp black silicone so I didn't have any concerns with heat. You should be fine as well, but if you're worried about the heat go with some regular thinset. People that have used regular thinset on... ahem...other...grills have have excellent results.
-
 1
1
-
-
What do you have the grates hanging on under the tables? Are there hooks under there or just hanging on the bolts attached to the grill?
-
What's wrong with the firebox? Those things were built like a tank. The legs are like 3x6 cement posts, and even though it looks like one of yours is broken, it still works fine to hold all the weight. You could patch it back together with some kiln repair cement, but I don't know if I'd even bother with that. Just leave it in place like you have it and try not to take it out any more than you have to. You can use a shop vac with a drywall filter to suck out all the ash when its full.
It looks like you are just missing the charcoal basket that went inside of it. I think the baskets on the current models are deeper and have straighter sides than the old ones which were more dish-shaped, but Dennis might be able to help you out with one that fits it. Otherwise, in a pinch you could get a replacement charcoal grate from a Weber Kettle and just set it in the bottom to cover the hole. You wouldn't have the convenience of a basket to pick up and take the charcoal out, but that's not a big deal. You could still poke a stick down in there and knock the ashes off to get ready for the next cook, which is all I do with my basket between cooks anyway.
-
On 2/21/2016 at 4:37 PM, twolken68 said:
Thanks for the information Robert. I bought mine from a private owner in Davenport IA, I found it on ebay of all places. A gentlemen ordered it and he passed away and I bought it from his daughter who had been storing it for a year in a garage.
How cruel can the world get?!? You order a KK and kick the bucket before you even get to light a fire in the thing

Note to my family: If this should ever happen to me, i expect you to shove my body into that grill and invite everyone over for a BBQ. Just be sure not to get the grills mixed up when its time to eat!
-
 1
1
-
-
Wow! That's a great looking herb garden. You've got plenty of room in there for all kinds of container crops. Maybe an earthbox or two? (I won't suggest homemade self watering buckets since it's the front yard
 )
)
I went purely functional with my herbs/greens. Hid them beside the shed in the same footprint as my extension ladder, which hangs below the gutters. This keeps the edibles up away from the rabbits and other thieves.
-
Wow...that's a really old one. I haven't seen one of the legged fireboxes in years.
Looking at the pictures, and comparing the evolution to today's KK shows how far Dennis has come.
firebox...latch...flexible grout and thinset....beveled lips.... 2 layer construction
That grill is probably 12-13 years old. Can't wait for Dennis to chime in with who the original owner was (assuming they were ever part of the forum)
-
 1
1
-
-
Good deal the ribs are still attached - I just saw the tag that said something about being cut from the bone and tied for easy carving. I guess that's impossible without opening the cryovac.
Just stopped by Publix and grabbed an 18+ pounder. Not a huge fat cap, but I had the kid bring 3-4 out and picked the best. At least it has mostly full coverage, but none were very thick.
-
Somebody also mentioned SV wings - you all are going to make me want a SV
That's another one I can't get my head around. To me, wings have to be crispy, and it takes time on the grill to render all that skin.
-
I was going to ask you if you planned to just trim all but the bone side, or cut the bones off after it was dried, but then I looked closer and saw that they already cut it off the ribs for you. Nice of them, huh

$6.99 is a deal - I should check my publix ad. For that price I'll go for a rib primal for a change.
-
I think I'm going to find a cheap hygrometer to stick in there, just to see what it says. Of course, none of the "experts" can agree on what the ideal RH is, so it would be purely informational.
The serious eats article linked above also found no difference between a consistent 80% RH, wildly fluctuating 30-80%, or unregulated ambient RH in three different types of refrigerators. More interestingly, is what they determined regarding waste:
That sure sounds counter-intuitive, but makes things easier on us, by removing some of the voodoo from the process.You can see that the layer of dried meat in a 4-week aged piece of beef is as thick as one aged for over 8 weeks. No matter how long I aged the steak, the waste was about the same
-
Well, I dismissed my need for an immersion circulator after the discussion of SV steak. Now, this has the pendulum swinging the other way

-
Whoa! Hang on now.
Some of us are still waiting for fall/winter. We've only had like 3 days where the daytime temps stayed in the 70s so far. Looking at upper 80s on Christmas.
Sure would like these 91 days to be im 68-75 range!
-
Just used one again to bundle up a bouquet garni for the black bean stew I made in the pressure cooker - imaginary for now; no pictures.
-
This might be the article your remembering:
http://www.seriouseats.com/2013/03/the-food-lab-complete-guide-to-dry-aging-beef-at-home.html
I do all my aging in the beer fridge in the garage. A sheet pan with a wire rack that offers a few inches under it (like you use for cooling off cookies). Sometimes with an open pan of water near the blower, sometimes not, and I can't discern any difference either way. Because this is Florida, and the fridge it out in the garage, it runs enough to negate the need for a circulating fan.
Interesting theory about the impact of self defrost. I know the defrost cycles doesn't affect my temps, as I have a recording thermometer on that fridge - it stays down around 34 degrees. But having had to replace the heating element for the defrost on that fridge before, I know it's easily reachable. I wonder if adding a bypass switch on either the element or the thermistor, turning the fridge into a manual defrost, would impact aging results? My hunch is that trying this would decrease the cooling efficiency and drive up interior temps to the point of failure as the coil iced over- which is the symptom you get when those parts fail. I've certainly never experienced low humidity levels in there (nor grown mold because it's too damp either) so perhaps Florida has enough ambient humidity that it stays self regulated? Opening the door does result in a quick layer of condensation inside the fridge.
The key to success, IMHO is to have a fridge that doesn't need to be opened frequently. Despite being a full sized side by side, my beer fridge in the garage fits that description - getting opened no more than once or twice a day when the kids grab a drink to take for their lunches. If I'm grabbing beer- I'll grab 6 at a time and move them to the inside fridge.
Everyone should try aging a chunk of beef. It can seem intimidating at first, with $100 plus of meat at stake, but it's about as forgiving as a pork butt on a KK - it takes a catastrophic mishap, or a series of smaller ones, to lose your meat, and some basic awareness and a decent thermometer can prevent all of that. Another similarity- 10# of meat will result in only 7# of dinner

The biggest concern for using a "regular" fridge, especially the one that stores the rest of your fresh food, is the cheese-like smells that accumulate. After about 10 days,the fridge gets a pungent smell, sort of like sharp cheese. Not a big deal when everything in there is sealed, but no way you want that circulating with your fresh vegetables, butter, and stuff like that. I've accidentally left potatoes in the produce drawer while aging, or a spare pound of butter in the snack drawer, and they picked up the flavor. Any yes, the smell goes away from the fridge within a couple of days after your done aging.
-
This is my favorite open air taco joint. AMAZINGLY good tacos al pastor, and a huge spread of fixings accompany your order.
It's definitely low-brow, but where else can two people walk in with your own 6 pack (they don't mind because they don't sell any beer) and have 3 - 4 tacos etc each for under $10. The smells rolling out of this place alone are worth half that sometimes.
-
Is that chamuyo?
We go to Cabo for for birthday bash in October

-
Amazon says I purchased them in sept 2012. I've used the same one probably 30 times on chickens on the grill. At least I think it was the same one, I can't really tell the used vs unused apart after it gets washed and put back in the package. I just grab the red one on top each time. Most of them haven't been used yet, because I've never broken one.
The ones I used in the garage, holding plastic boxes of toggles/fasteners closed after the snaps broke off the plastic are still stretchy, and not dry rotted at all, and it's been a couple of years stretched around the boxes.
As long as you don't put them in direct flame, I think the biggest hazard to them is cutting them off the food like twine, out of habit. I almost did it tonight before I stopped myself.
-
Thanks for picking up the slack

We used to have a saying around here;
"Pics or it didn't happen!"
-
I bought a package of these silicone "rubber" bands on a whim in Sept 2012.
http://www.amazon.com/Architec-Stretch-Cooking-Package-Assorted/dp/B000RODBZK
They've been one of the best $7 I have ever spent on a kitchen trinket. Not only in the kitchen, but in the shed too. Sometimes I need a rubber band to hold things shut, and rubber dries out and crumbles in short order around here. These things are still good as new after years.
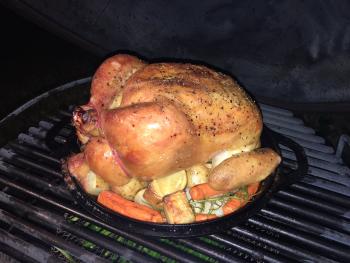
In the kitchen, their typical use is to truss a chicken, like they did tonight. Simple roasted chicken with carrots and potatoes. I slid a screen of asparagus on the main grate underneath the chicken for the last 10 mins of the cook. I've used the same 1 or two bands scores of times - just put them in the dishwasher after use.
-
yep - that's me. Only the security blanket strangled me while i slept this time.
-
I'm 61. I turn around and look back and I'm astonished how quickly I went from being the youngest kid in the room to that old fart sitting in the corner!

Ahhh... so at 46 I might still be the youngest kid in the room? At least this room




Reef's Herb Garden
in Komodo Photos
Posted
Did you use nested bins to make a true self watering container (with a reservoir in the bottom, or just plant in a bin full of soil?
these are nested. The top bucket has drainage holes, and a "mesh pot" (home made with a Dremel and plastic cup) that hangs down to the bottom of the bottom bucket. The pvc pipe allows the bottom bucket (the reservoir) to be filled.