


wilburpan
-
Posts
781 -
Joined
-
Last visited
-
Days Won
28
Content Type
Profiles
Forums
Events
Posts posted by wilburpan
-
-
Agreed on that last part especially. Dennis and I had a good discussion around this same issue. Although I burned for almost three hours at a very steady 510-520 range, and had a fair bit of outgassing, i may not actually be done with the process yet. So, I am doing another sustained 510 burn right now. Dennis also shared some specifics about the acrylic hide of the pebble tile finish, and how it behaves a bit differently from the square tiles.
Can you elaborate on this?
I had a few areas of bubbles with Smaug. Over time, they have pretty much all resolved, even some areas on the back side towards the bottom that I didn’t notice until after a few months.
One thing that I think makes the pebble finishes different from the square tiles is that it appears that there’s more grout involved with the pebble tiles, which is to be expected since the pebble tiles don’t line up nice and even with each other. That could easily lead to differences in the break in process.
-

Here she is, don't know why she is a "she," probably because she is so pretty.

Congratulations, PJ! Looking forward to seeing your cooks.
-
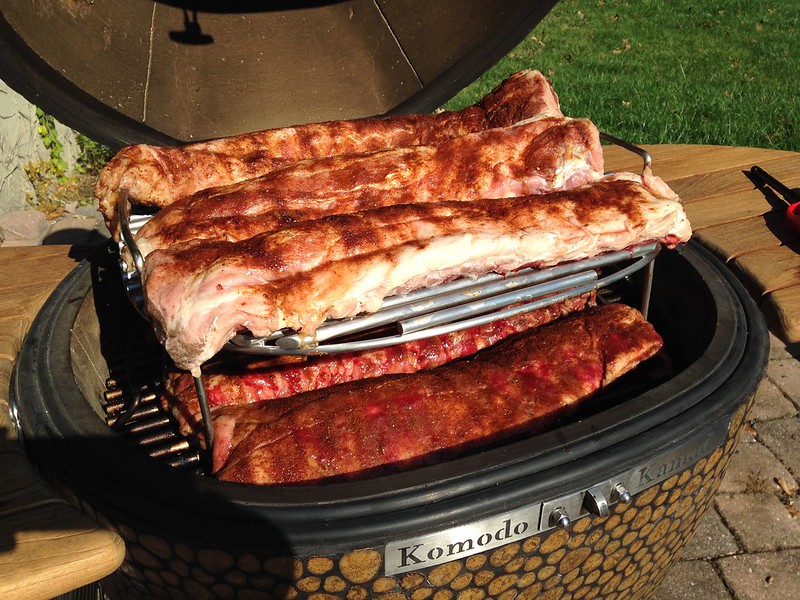
Doing six racks was a learning experience for me. I’m not sure that I’ll ever do that again, either.

What was going on that day was that we had friends over for ribs. I was trying to guess how many racks we would need. I knew that I could eat a full rack of ribs whenever we went out for BBQ, and based my buying decision on that. What I didn’t count on was how much meatier ribs are when you get them from a butcher as opposed from a restaurant. We were using leftover rib meat for meals for days.
-
thanks for the link and the motor is now ordered
I confirmed with Dennis today that he will add a rotisserie to the order.
Now the only thing that I didn't order was a rib rack. Anyone want to convince me on that LOL!!!
I can do 6 racks in Smaug without a rib rack: three on the upper rack, and three on the main rack.
With your twins, that means 12 racks. If you think you’ll need to do more, then I would get a rib rack. For me, that’s the one accessory I don’t think I’ll need.
-
Congrats on the purchase, Bosco! Do we call this the bifecta?
Definitely get a rotisserie. It’s great for cooking poultry. Once you figure out the way the rotisserie is implemented with a KK grill, you’ll see that it’s far better than the Joetisserie.
-
Wow from the pics autumn nebula looked more orange.
I think I am down to three colours
Olive gold, harvest, autumn nebula. So many decisions and they all look close
Hi Bosco,
Those options are pretty close to each other. What I did when trying to decide on which exact KK grill to get was not to focus so much on the name of the color, but on how they looked in the photo in the online store page. One autumn nebula, for example, isn’t going to have the exact shade of brown as another KK grill in autumn nebula.
-
Just to clarify, what are you grilling that made you decide that you needed the space that a KK 32†provides? Is it that you cook for a large number of people on a regular basis?
-
What was it that tipped you over to a KK 32"?
-
The usual answer to the “What size should I get†question is, “What kind of grilling do you plan on doing?â€
What I can say is that in the time that I’ve had Smaug, I’ve cooked as little as four hot dogs on it, and prepared enough pulled pork for a dozen people. In neither case did I think that Smaug was too big or too small. For our family of four, it seems to be a perfect size.
If you don’t mind my asking, what do you plan on doing with the 23 + 19 combo? Especially since you already have other grills to use?
-
That looks amazing!
What temperature was your grill at for this cook?
And how did you slice the pork belly into bacon strips?
-
Welcome! And congrats on your new KK grill!
-
Yep, I've given plenty of thought about moving that sucker to it's final resting place. I plan to grease the delivery dude's palm to help me get it into my shop. I appreciate you filling me in about OSB too. Picking that up today. If we can get it over the 4-5" slab, I've got it made.
Here’s a tip on getting the crate up over your step. Besides just putting down the OSB, take a couple of 2x4’s and place them under the OSB to add extra support. Put one down flat, and the other on its side, like this.

The support from the 2x4’s will stiffen up the ramp, and prevent it from flexing when the crate is riding up over it.
-
I can’t cover all the questions, but I’ll do the best that I can.
When purchasing the kamado itself, Robert explained that I get the grills, deflector stone included. Then I see that the side tables are an extra. I would think the half basket, and baking stone is really all that I would need extra to get started.
The accessories that I got included the baking stone, the side tables, the basket splitter, and the rotisserie.
Now 2 zone cooking... how does one achieve that with the ultimate and 19" high top? I understand the deflector stone is solid one piece, can you order a split divider stone for true 2 zone cooking???
The basket splitter is different from the KJ basket splitter. Besides just splitting the basket, there’s an additional metal piece that overlays the basket on the side that you don’t have any charcoal. Here’s some pictures.
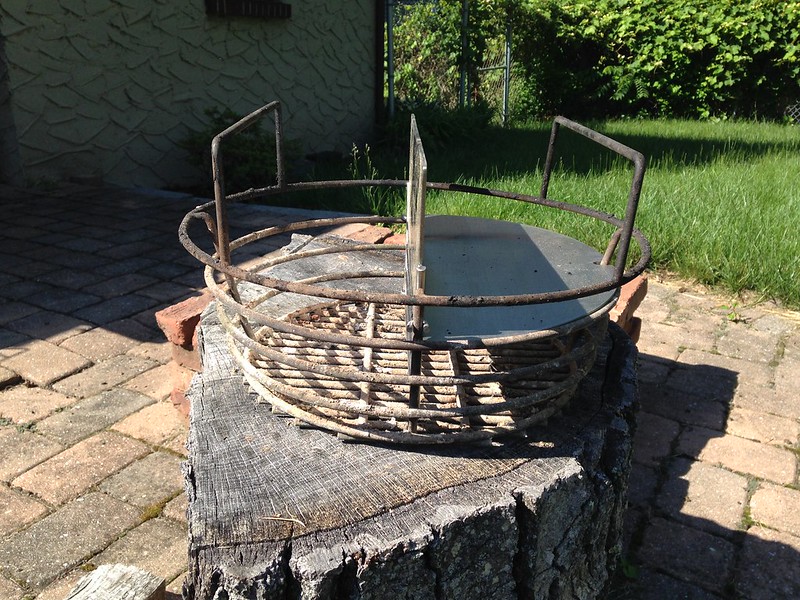
The reason that I set up the divider this way is to use with the rotisserie. With this set up, the chicken that I’m cooking only gets heat from the side with the charcoal.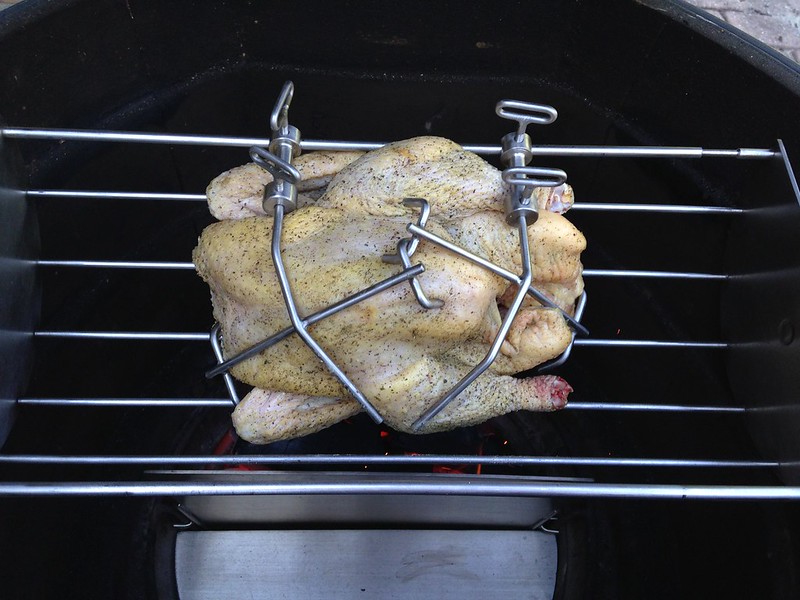
If you place the divider with the lid so that it runs from the front to the back of the KK grill, you’ll essentially duplicates the KJ D&C function. Instead of a half stone, you have a stainless steel deflector at the level of the charcoal basket.
One other thing to remember is that the design of a KK grill in the firebox area is different in that all the air that comes through the vent is forced through the firebox, which should make the dual zone effect more efficient with a KK grill. KJ grills (and others) have a gap between the firebox and the outside shell that allows air to bypass the firebox by flowing around the outside.
When you place your order how do you pay?
I talked to Dennis on the phone and finalized the order. He sent me an email with a link to 2checkout.com, which is an online credit card processing service. I entered my credit card information there, and that was that. You can also wire a payment directly from your bank.
How long does it take usually from order date to delivery date?
It depends on where your grill is. If you order a grill from the website that’s in Indonesia, or in transit from Indonesia to Los Angeles, it will take longer. If you order a grill that’s already landed in North America, it should take less time.
My grill was on the boat when I finalized the order. It got to Los Angeles one month later. Then there was that delay because of the fire at the port. After the grill left Dennis’ L.A. warehouse, it took 6 days for it to be trucked across the country to me in New Jersey.
Who arranges shipping from over seas and ground transportation from the port to my house?
Dennis took care of all of that stuff for my order. As the truck got closer to my house, he emailed me instructions on what to tell the trucking company when they called to confirm a delivery time.
How does warranty work?
Call Dennis. The good news is, it is highly unlikely that you’ll have to file a warranty claim for a cracked firebox.
When ordering accessories after purchase, how much is it usually to ship products? Or is there a north america distribution??
As far as I can tell, accessories and parts are in the L.A. warehouse. If not, Dennis is sending containers to the U.S. on a frequent basis. Put it this way: I’ve only had inventory problems with one kamado company, and that was with Kamado Joe.
I have narrowed down my design to pebble finish... I really loved CC black beast, however, after more research I am really drawn to harvest and gold pebble. Can anyone post their cookers with these finishes so that I can see them. I have seen Wilburpan's which is beautiful but would also like to see a few more before choosing.
Harvest Gold was my second choice. SWMBO liked the Olive Gold better, so that’s what we went with. -
If this will make you feel any better, I went from Father’s Day, which is when I decided to buy a Kamado grill, until the beginning of October, which is when I took delivery of my KK grill. Most of that time was a delay in delivering the first Kamado grill. The second part of the tale, which is when I finally decided to order a KK grill instead, went pretty smoothly. Except for this.

See? It could always be worse.
If you want to read the whole story, it’s here: http://komodokamadoforum.com/topic/5007-my-ordering-and-unpacking-experience-with-a-kk-23â€-ultimate/
If nothing else, it will help you kill some time while waiting for your grill to get here.
Be patient. If I’m asked how long it took for my KK 23†to get here, I always say, “I don’t care. The grill is that awesome.â€
-
Bosco is a terrific food pornographer.
Wait. That didn’t come out quite right.
I think that a KK 23†in olive gold pebble is a great choice. But you knew I would say that.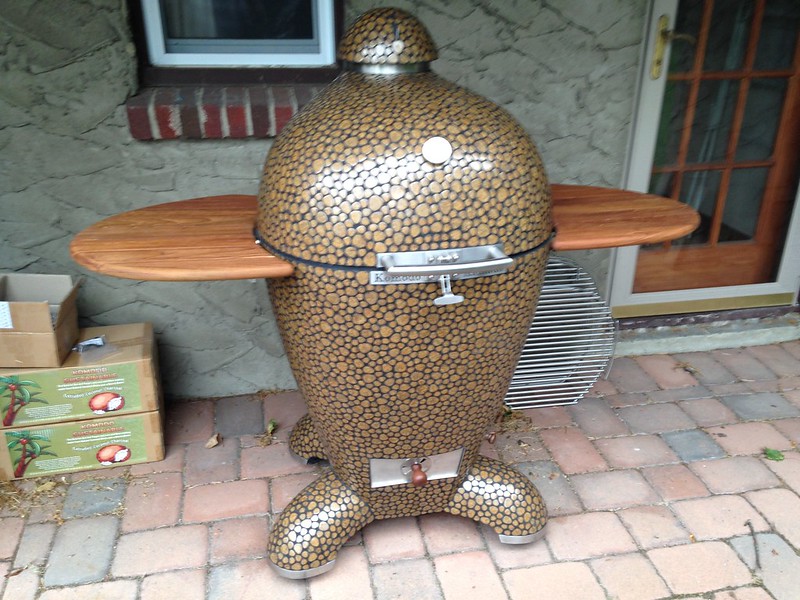
One other benefit to having a KK grill is that you can get a rotisserie that isn’t vaporware.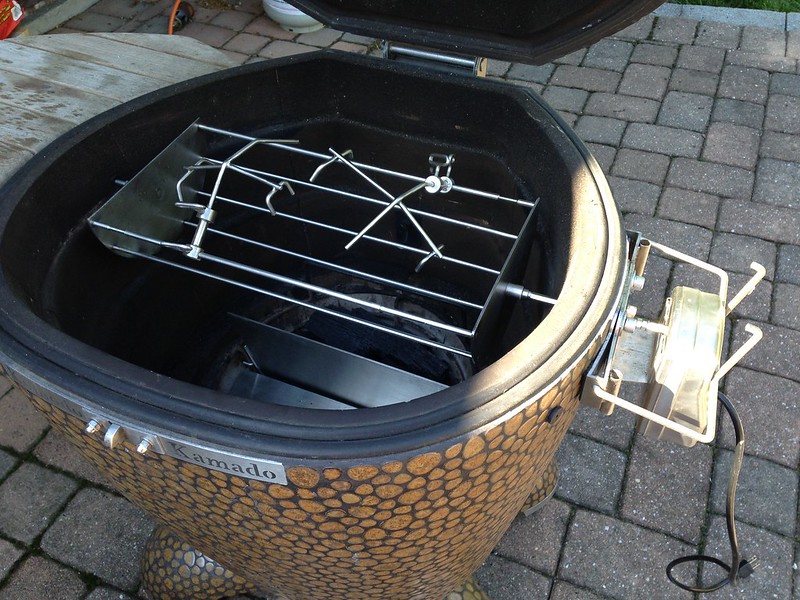
Anyway, welcome to the KK family in advance!
-
When I ordered my KK 23â€, I picked up the tables, baking stone, basket splitter, and the rotisserie.
Rib racks can be useful, but it depends on how many racks of ribs you’ll be cooking. I can get 6 racks of ribs into Smaug.
The other thing to consider is where you’re getting your ribs from. The cook seen above was for us and another family. I figured that since I could put away a rack of ribs at a restaurant, I needed 6 racks altogether. As it turned out, I way overestimated the amount of ribs I needed. When you start getting your own ribs, they will be much meatier than what you see in a restaurant. The local butcher that I use has ribs that are so meaty that I can barely finish a half rack. These days, I’m only cooking two racks of baby backs for my family, and we expect that there will be leftovers. -
It looks great Wilbur. You have certainly proven Murphy is alive and well. Think ya might consider a controller now? It looks like, in this case anyway, had your temp stayed at 225° as planned, it would have been perfect.
I may try a controller at some point, but for now I want to see how much I can do in manual mode.
-
So the brisket turned out pretty good. I thought it was a bit overcooked, but all our friends said it was great. I didn’t disagree with them.


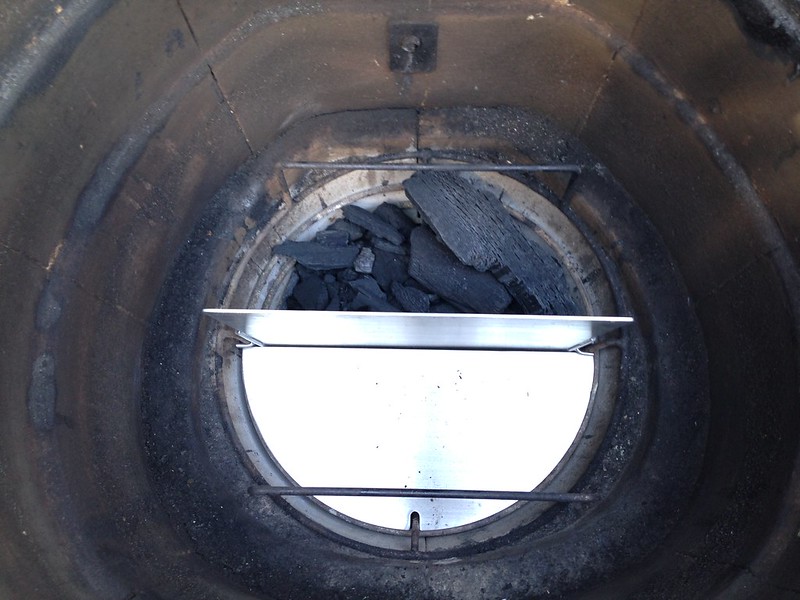
As the time grew closer to our friends arriving, I took the brisket out of the oven. It was warm, but not as warm as I would have liked. I noticed that Smaug was still sitting at 200ºF from residual heat, so I put the brisket back in to warm up a little. Looking back, that may have caused it to lose some moisture.The other thing I thought of that might have made this cook more problematic was that I started with a full basket of charcoal, but most of the charcoal was half-used charcoal from other cooks. If I had started with a full basket of fresh charcoal, I think the charcoal would have burned slower, and I would not have gotten the temperature rise phenomenon. The reason I didn’t store the used charcoal was that the basket was mainly full with partially used Dennis’ Cocochar, and I’ve found that partially used Cocochar is pretty fragile if you try to move it around. Maybe I should get a spare charcoal basket.
The parts of the brisket towards the middle were amazing, and the fatty end was good throughout. The flat was a little dry on the inch at the end, but most of it was good, with a real good beefy flavor.
I’m really looking forward to my next brisket cook. There are two things I want to try in the future, but I’m not sure what I want to try first: using a select brisket instead of the choice brisket that I used for this cook, or to try the wrapping thing.
-
Great looking steaks!
And the inside of your grill still looks way too clean.
-
Last time I did pulled pork and had friends over, the pork wound up taking longer than I expected, which was a great example of the first principle of timing a cook for a party: cooks take longer when you have guests waiting.
Today, we’re having people over, and I decided to make a brisket. I started the cook last night in anticipation of finishing around lunch time. The cook itself was straightforward. The rub was a 50/50 mix of black pepper and kosher salt, I put the brisket in Smaug, who decided to settle in at 225ºF, and let it run overnight. My plan was an IT of 203ºF, because 5698k said so.
Here are some pics.


The strip on the side was a piece that I trimmed, put some rub on, and cooked as an experiment. Ultimately, it cooked way too long, and was dry as well cooked bacon. I tossed that part.
So I woke up this morning, expecting that I would have been most of the way through the cook, and went to check the brisket to see whether I should bump the temperature up or not. This is what I was greeted with.


It certainly looked done. It was probe tender all over, and the IT was 204ºF.

Perfect, right? Except that our friends won’t be here until lunchtime, a good 5-6 hours from when I took the brisket off the grill.
So this is the second principle of timing a cook for a party: cooks go way shorter when you plan ahead.
I put the brisket on a platter, wrapped it in foil, and stuck it in the oven. I’ll see whether I need to reheat it when your friends get here. It sure smells good, though.
The brisket was 12.5 lbs. I guessed it was going to take 15 hours or so to cook, especially since I started at 225ºF. This morning, the thermometer was reading 300ºF. After I got the brisket out and checked the basket, enough of the charcoal had burned so that the airflow through the basket would have had less resistance than the full basket I started with. In other words, as the charcoal burned away, the airflow through the grill increased even without touching the vents. This is the same phenomenon I saw with my last pulled pork cook.
-
 1
1
-
-
I agree — wait until your grill shows up, set it up, and the right name will come to you.
I went with a dragon name because of the pebble tiles on my KK 23â€. They look like scales. Plus, there’s the komodo dragon thing, and my kids love dragons.
But pick whatever name feels right for you.
-
Dang, Tony, between you and Robert, I really wish I had some butcher paper now. Especially since I just put a brisket on Smaug earlier tonight.
-
It looks like you’re already convinced, but for what it’s worth, we have a family of four, and we got the KK 23â€. It’s been perfect.
The only way I would have gotten a different model would be if I was getting two KK grills, a bigger one and a smaller one, but I knew that we would only be getting one.
-
Welcome and congrats! I'm looking forward to seeing what you cook on your new KK grill.

annoying new guy questions...
in Komodo General
Posted
I would say that is exactly the reason, and it’s not just paranoia. One only has to look at events like what the emerald ash borer has done to the ash tree population in North America to understand why these restrictions are in place.
It’s not just insects that can travel in untreated wood. Fungus can travel via the same route.