


wilburpan
-
Posts
781 -
Joined
-
Last visited
-
Days Won
28
Content Type
Profiles
Forums
Events
Posts posted by wilburpan
-
-
On 9/9/2015 at 1:00 AM, bosco said:
buddy what a great post!!
I only wished that I listened to you a year ago... and I wouldn't be waiting for mine to be made!!!
It is a truism that the only bad thing anyone says after buying a KK grill is that they wish they had done it sooner.

(I'm remembering our discussion from a while ago about the USD/CAD dollar exchange rate. Not so much of a concern after all, right?
)
-
Nice! I see that you put the butts on one side of your KK 32â€. Did you use the basket splitter as well?
-
This is what Smaug looked like when he arrived last October.
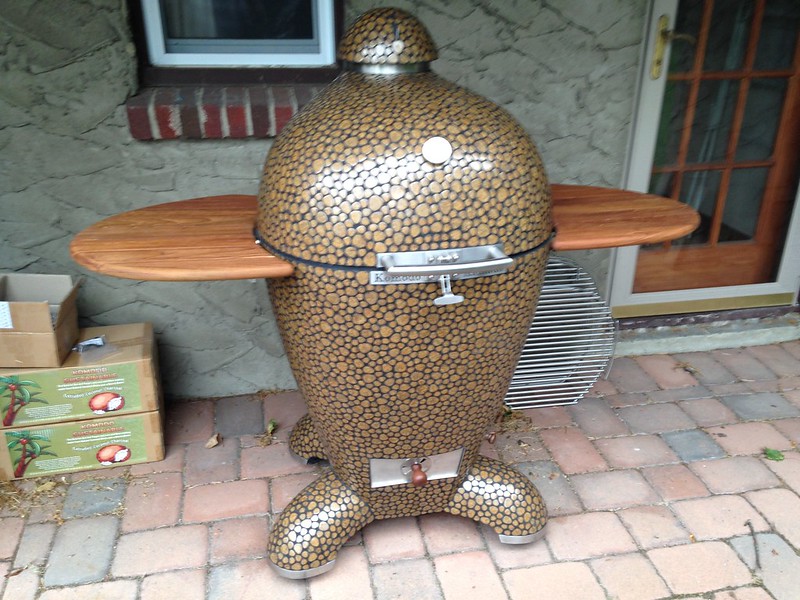
Since then, I've been getting a lot of use out of him. I was going to wait until a full year went by to write this, but I think that now's as good a time as any to share my experience with him.
There's plenty of information available on the Komodo Kamado website as to what you get out of a KK grill that you don't from the ceramic grill companies (BGE, Primo, KJ, etc.). For me, here are the salient points.- Made of refractory cement instead of ceramic. Heat deflector and baking stones are also refractory cement instead of ceramic.
- Better insulation, which means that you can maintain temperature with less air flow, which means less moisture loss during cooking, which means that your meat will lose less moisture during the cooking process.
- Better insulation also means that you don't have to worry as much about burns if you touch the outside of the grill during a cook. Without exaggeration, I can touch the outside of my KK 23" with the thermometer above 600ºF without fear of a burn.
- Tiled on the outside instead of glazed ceramic.
- Food grade silicone gasket, which is more durable than a felt gasket, and not prone to failure from dripping sauce on it.
- 3/8" stainless steel rod grills instead of 1/4" rod.
- Stainless steel hardware all over.
- Stainless steel charcoal basket instead of ceramic firebox.
- Firebox is a two piece design instead of one piece, which reduces the chance of it cracking from heat.
- Design of firebox forces all air through the charcoal, unlike other brands where the air can circulate around the firebox, reducing efficiency.
- Superior hinge and latch mechanism to other brands.
- Incorporation of hinge into the body and lid means never having to worry about a lid falling off or having to maintain band tightness.
- Easier to open, even with a heavier lid.
- Bottom vent truly airtight.
- Vent cap design prevents rain from getting into grill and is rust proof.
- Vent cap design also prevents change in setting when opening grill.
- Set up for rotisserie cooking out of the box. No need to wait for a rotisserie add on that’s still not on the market.
It's true that a KK grill is more expensive than the KJ/BGE/Primo grills for sure, but it's still in line with and even less expensive than many high-end stainless steel gas grills, and I would argue that it is more durable and more flexible than a high-end stainless steel gas grill. I would also argue that it's more durable than the BGE/KJ/Primo grills as well, given the reports of hinge and band failures, gasket failures, firebox cracking, vents that are not quite airtight, and so on.
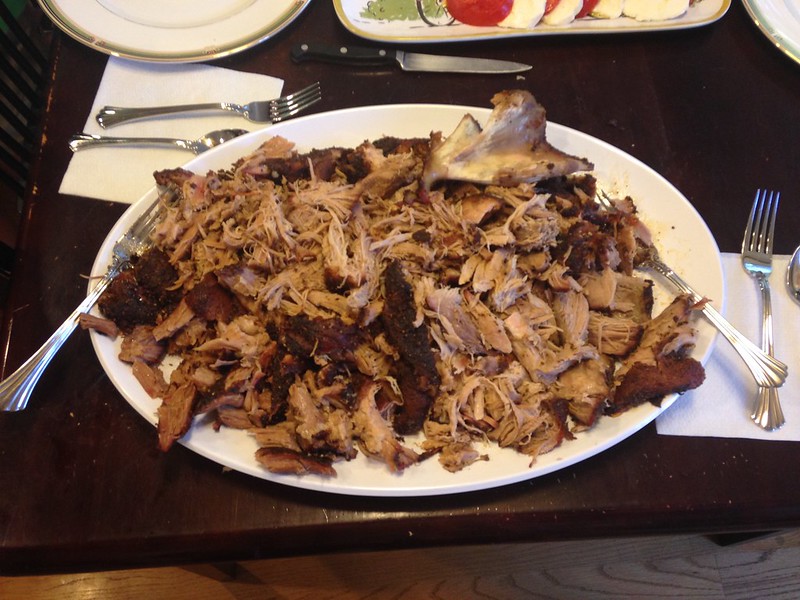
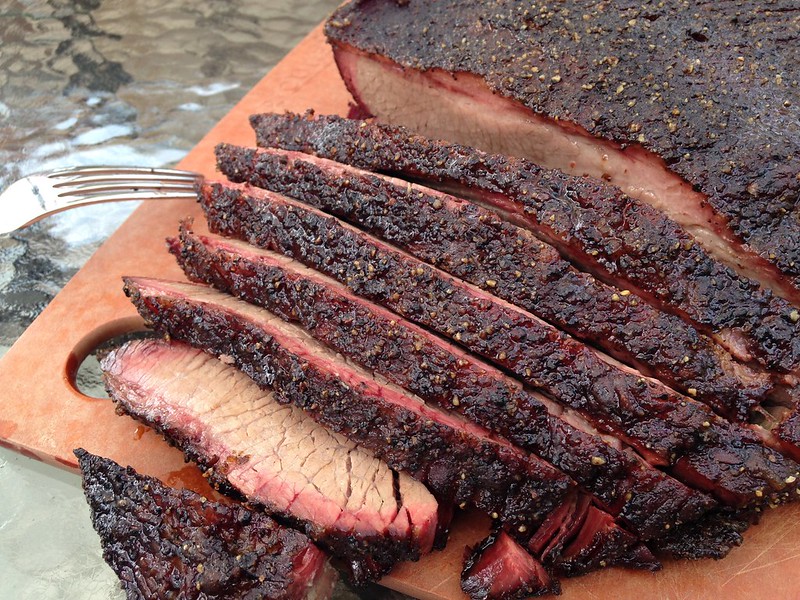
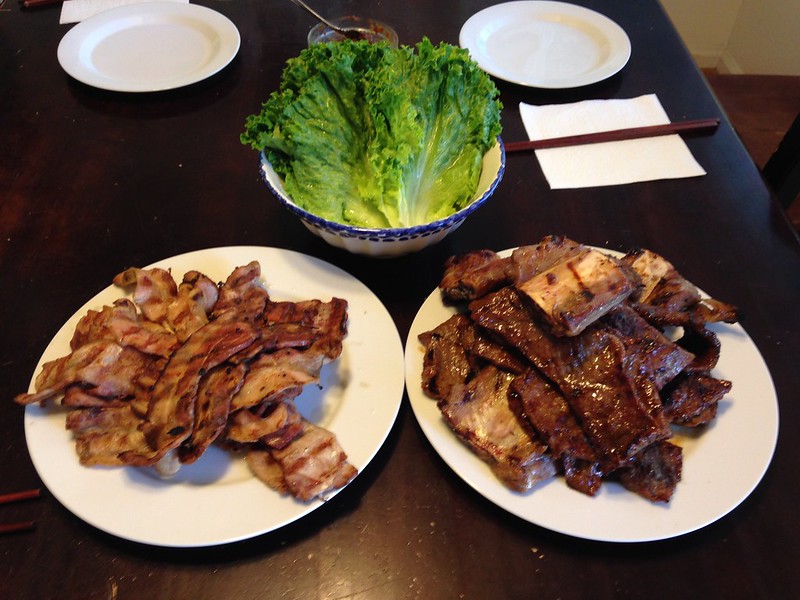
But even better than the feature set of a KK grill is what you can cook with it. Here's some of the food I've made with Smaug since he arrived.Pulled pork.

Brisket.
Ribs.

Korean BBQ.
Leg of lamb.
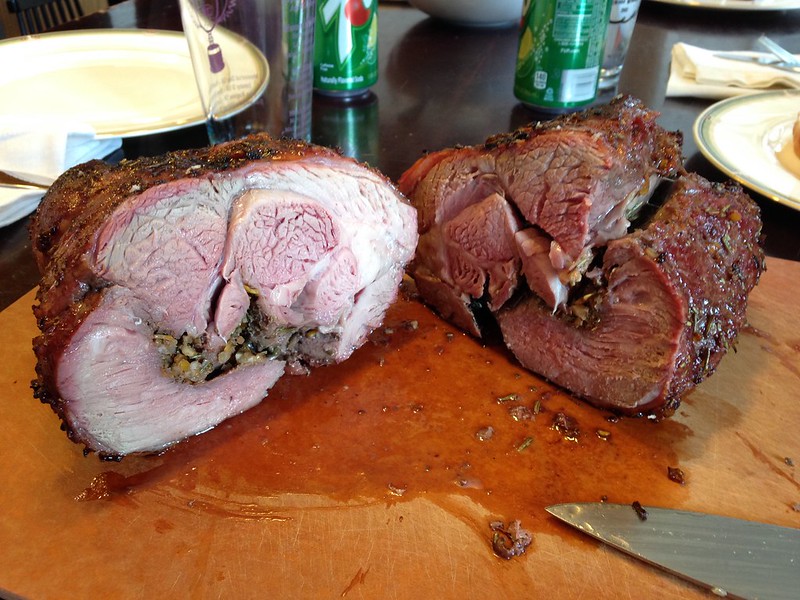
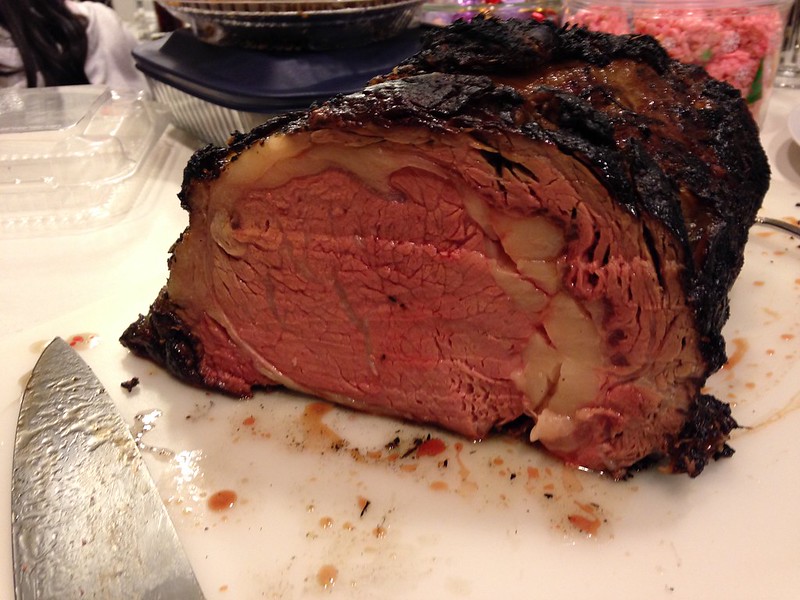
Prime rib roast.
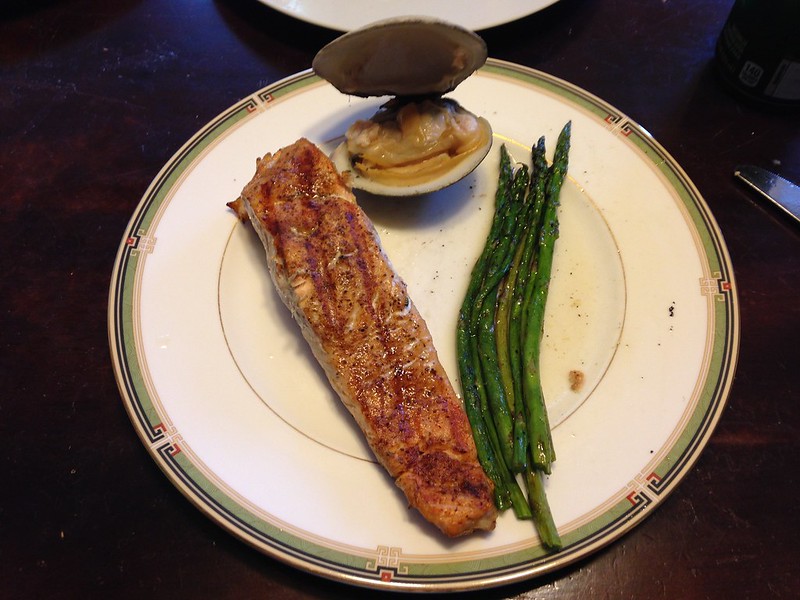
Grilled salmon and asparagus.
And steak, of course.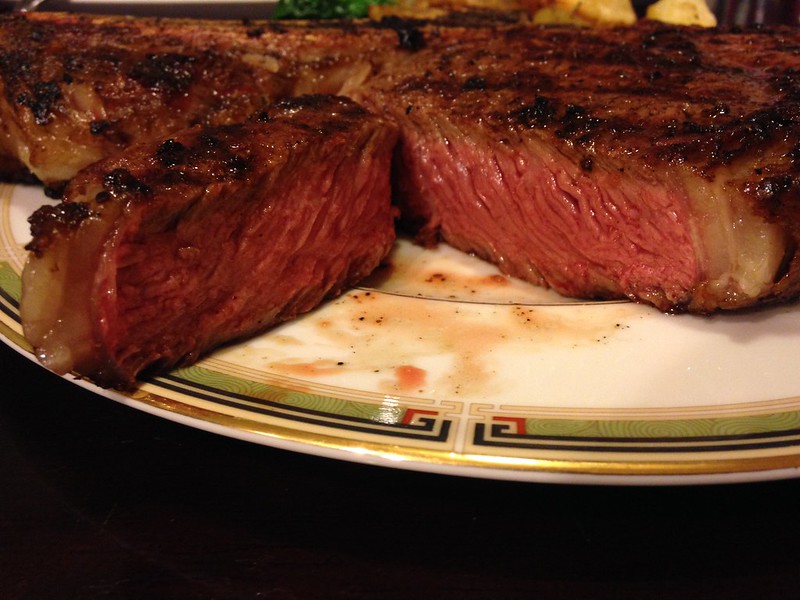
But beyond the great food that Smaug has helped me make, I have to emphasize this key thing from my experience with a KK grill. I was able to do this despite the fact that I had no experience with low and slow cooks prior to getting my KK grill. Everything I have tried has been a huge success, even though it was the very first time I've tried smoking brisket, ribs, pulled pork, a prime rib roast, and so on.
I often read people say that it's not the grill, it's the chef, and that the food tastes the same regardless of what grill is used. I'm not so sure about that. I have to believe that the ease of temperature control of the KK grill is a factor in my success. I've had the chance to try out a BGE, and the ability of a KK grill to control air flow and temperature is so much nicer and easier. I doubt that I could have nailed these cooks the way that I did if I had a BGE, KJ, or Primo grill.As I mentioned, prior to getting Smaug, I had zero experience with low and slow cooking, and I've had fantastic results with a variety of low and slow cooks. So either it is the grill that's making a difference, in which case that shows that it's worthwhile getting a KK grill, or I'm a really amazing BBQ genius, in which case you should listen when I say that a KK grill is completely worth buying.
And it's only been 11 months. I can only imagine what the next 20 years will be like.-
 4
4
-
Looks great Wilbur. Did you pull it off at a certain temperature or do it by touch?
So here are the annotations for each step.
1. I made up a little more than 1/2 cup of a rub based on Aaron Franklin’s approach to rub making: mainly a 50/50 mix of salt and pepper, with a little granulated onion, granulated garlic, paprika, ancho chile powder, dry mustard, and brown sugar.
2. This hunk of pork butt was about 7 lbs.
3. I put some olive oil on all sides of the pork butt, then hit it with the rub. I don’t have wall-to-wall coverage with the rub, but I’ve observed that folks who do that are using rubs with a fair amount of sugar in it. Those rubs stick to themselves, just like how brown sugar clumps up in the bag. The rub I made doesn’t do that, since it’s mainly spices, and doesn’t really stick to itself.
In addition, this rub packs a ton of flavor since it’s mainly spices, so I’ve learned to ease up on the application. One time when I made ribs, my kids said that there was too much rub.
4. Smaug was set at 225ºF to start. He crept up to 250ºF over the course of the day.
5. The pork was taken out when it hit an IT of 195ºF. Total cook time was 9-1/2 hours. It was probe tender throughout.
6. Proof that it was probe tender: I was able to shred the entire thing with a pair of dinner forks. No need to buy a set of bear paws!
-
One.

Two.
Three.
Four.
Five.
Six. -
Looks great! I love those huge shrimp.
-
And for the love of Pete, don't get ribs with "up to 12% solution added" or "8% patented solution added"...just say NO to enhanced ribs and other pork. If you accidentally buy some, brine them overnight to get help get rid of that awful goo they put in the packages. Just sayin'.
Really nice cook! Those ribs look delicious.
Where do you find ribs that haven’t been enhanced? All the local grocery stores seem to have that label on the ribs that they sell.
-
Welcome, Mike! Looking forward to reports on future cooks. You do use your KK 32†for more than brisket, right?
And most importantly, what color did you get?
-
Welcome! Looking forward to your cooks.
-
I "think" the 23 Ultimate would be best for my family, but I want to make sure. I'm sure this is a very popular question here on the forum, as it is on all kamado related forums.
I read an earlier post from Rak relating to cooking capacity with pictures from tinyfish and wilber on cooking racks of ribs. Seems to me the KJ Big Joe can easily handle 3 racks of ribs on the main grate, but since the 23 Ultimate's circumference isn't round, the fit is a bit more snug. That by no means is a bad thing, just trying to figure things out. I assume you guys have zero trouble with that?
We’re a family of four: me, my wife, two growing boys. We’ll have friends over for dinner on a reasonably frequent basis. I think a KK 23†is perfect for us.
Three racks of ribs on the main grate of a KK 23†is completely doable, unless you’re sourcing your ribs from some mutant giant pig farm.
The time I cooked 6 racks of ribs all at once, the main grate had three racks laid out going left to right, as did the top grate. The ribs overhung the top grate a little, but it wasn’t a problem at all. And if you need more capacity, you can always get a rib rack.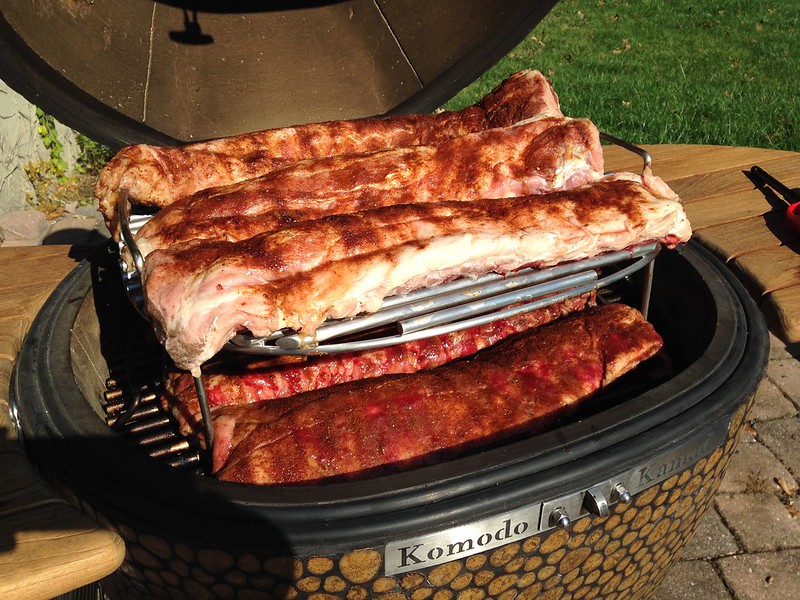
The KK 23†main grate is a little smaller than the main grate of a Big Joe. Where the KK really shines in terms of capacity is the top grate. You can get a grill expander for a Big Joe, but it’s not nearly the amount of real estate that you get with the top grate on a KK 23â€. I don’t think I could get three racks of ribs on a Big Joe grill expander.
Oh, and welcome to the KK forum! Keep asking questions, and we’ll keep answering them. One thing to keep in mind: it seems that the only regret anyone has ever had form buying a KK grill is wondering why they didn’t place the order sooner.
-
Awesome! Which size did you get?
-
I’m so happy that you got your KK 32†set up and running. Good job getting it in place!
-
Given that I went with a dragon name, I’d vote for Saphira as well.
And your grill is gorgeous!
-
Those ribs look terrific, and your outdoor kitchen area is wonderful!
-
I love using the rotisserie for roasting a whole bird. Nice job!
-
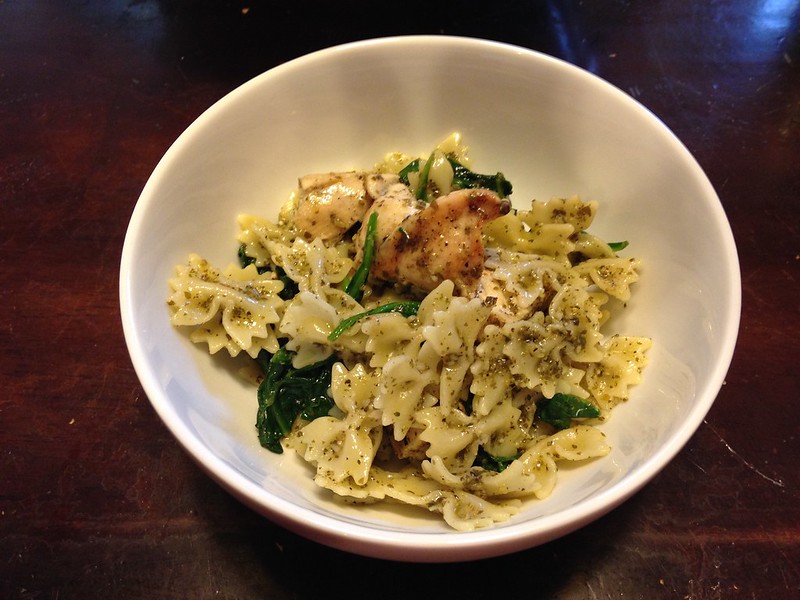
Yet another beautiful cook, Wilbur!
But hey, only 2 chicken breasts? What did you do with the Munchkins? Grandma and Grandpa's house?
There was plenty of pasta, pesto, and spinach to take up the slack.
-
I use a combination of doing a high heat burn at 500ºF or more for about 10-15 minutes after cooking, a Weber grill brush, and Grill Floss, as needed. But I think that this is the key element:
Me thinks the only way is good old fashioned elbow grease.
Truth.
-
1
-
-
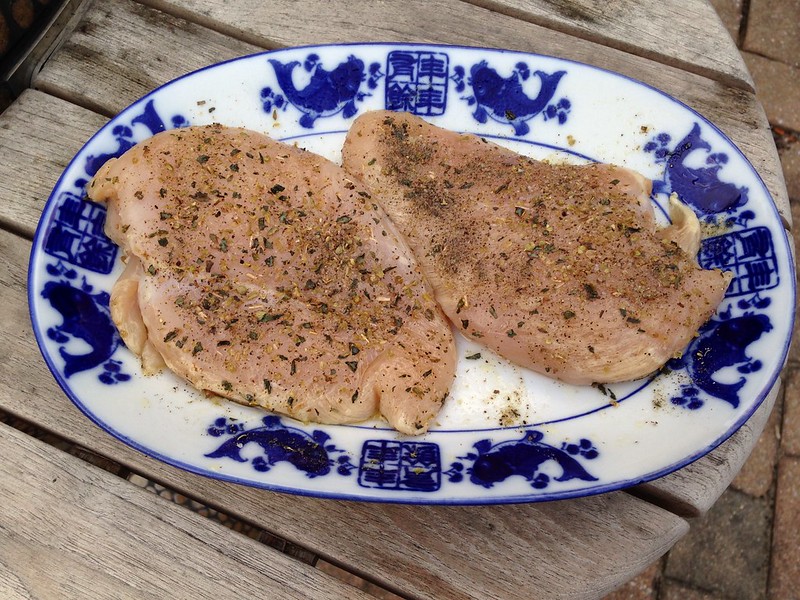
We made a quick dinner last night. I was in charge of the chicken. I took a couple of chicken breasts, drizzled them with olive oil, made a quick mix of equal parts salt, pepper, basil, and oregano, and sprinkled it on.
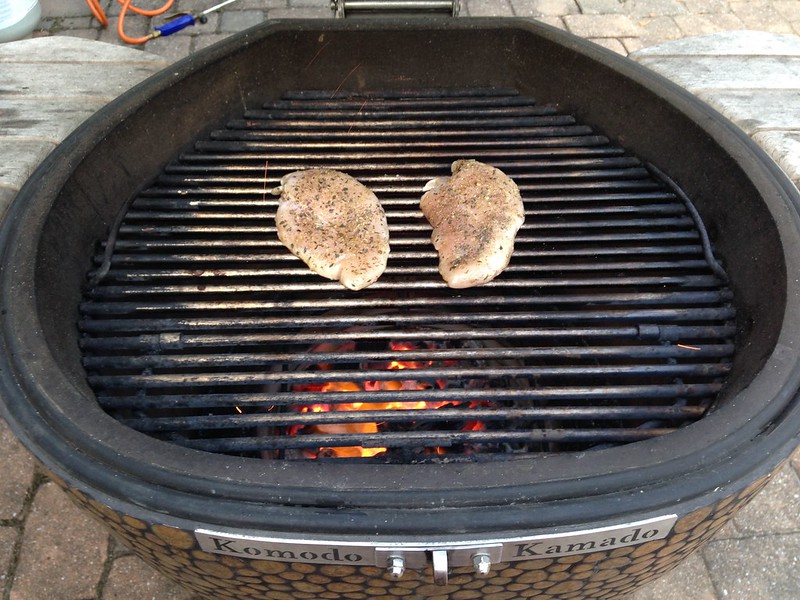
Into Smaug they went. 0-600ºF in 12 minutes last night.
Finished product.
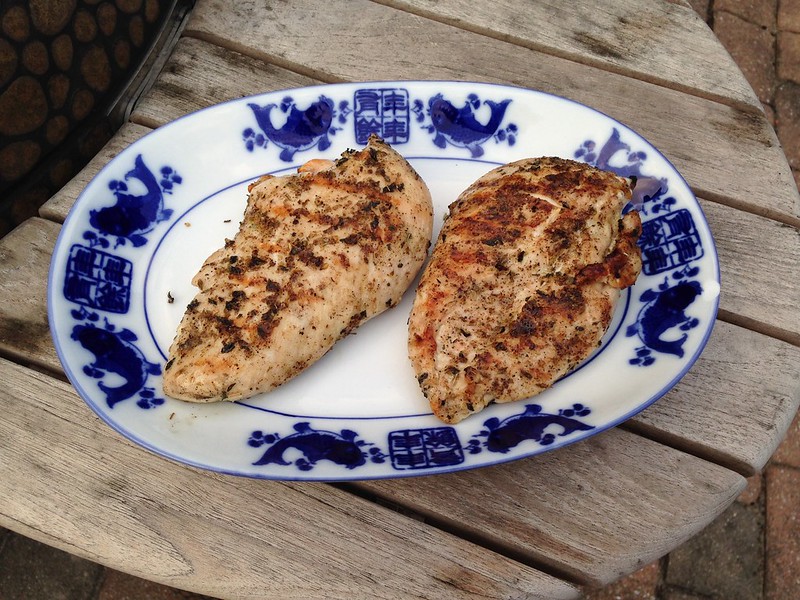
I brought the chicken inside, and sliced it into pieces, making sure I sliced against the grain. In the meantime, my wife had cooked some farfalle and spinach. We tossed it all together in a bowl with some pesto.
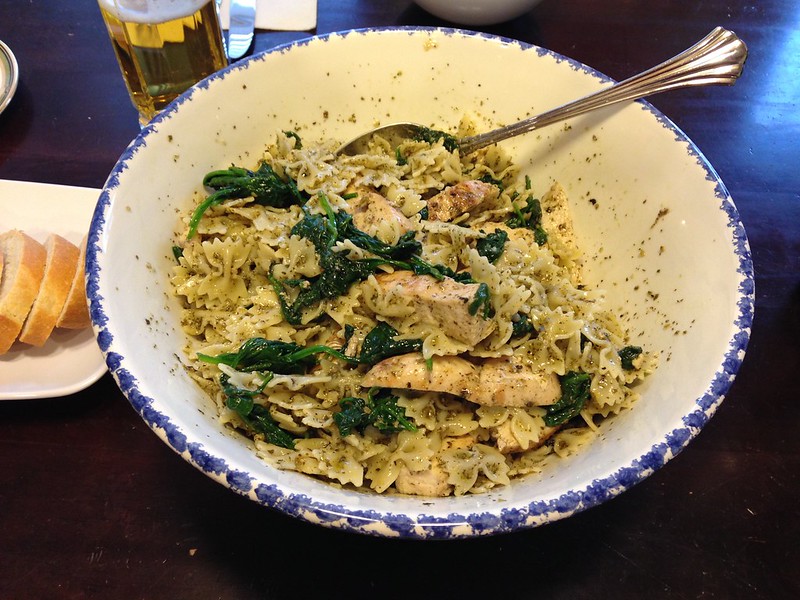
And plated. Or bowled, as the case may be.
Here’s the KK geek moment for this cook. There’s been some talk as to the utility of the back draft door. Although it’s designed to accept the gas burner accessory, and most of us probably won’t be using that particular add-on, I found it useful for bringing up the grill to temp faster. For the first part, I lit the grill as I normally would, with the bottom vent open as much as possible. When the temperature hit 300ºF, I opened up the back draft door. The temperature rise was significantly faster after I did that.
-
After getting my KK up to the desired temp I find when I lift the lid to put food on.... turn food over......,,The heat falls far and fast. Am I not heat soaking it long enough or is that something that is unavoidable?
Just reading between the lines, I’m guessing that you’re cooking something like steaks or burgers, where the fire is relatively hot and you’re direct grilling over the charcoal.
When I’ve done this, I’ll get the grill up to temperature as fast as I can, usually within 15 minutes or less. My dome thermometer is usually in the 600ºF range. If I open the lid to flip the burgers, and then close it, the thermometer can easily fall to the 200ºF range. The temperature does recover fairly quickly after I close the lid, getting back to 600ºF in about 15 seconds.
The ability of a KK grill to heat soak and then hold temperature is great, but I’m not sure it makes a huge difference in hot and fast cooks. Clearly, Smaug isn’t heat soaked after hitting 600ºF in 15 minutes, but then again, for steaks and burgers the main heat source is the fire itself, not the radiant heat coming from the walls of the grill.
I do heat soak as much as I can for low and slow cooks. I think that heat soaking is a bigger factor for that sort of cooking.
-
I am placing the 23" on the left side of the table, covering the access for the rotisserie. The 32" will be on the right, allowing for the roti to sit without having to move the table. I like the idea of the bigger roti so will be getting it for the 32" only.
Does the table need to be reconfigured since you switched from the KK 23†to the KK 32"?
-
If you combine my idea with Ken’s, that’s two KK 23’s and two KK 32’s. With tables, I’m sure.
Here’s a mockup of what Bosco’s patio will look like by the end of the year.

-
1
-
-
That is going to be one cool setup. I’m really looking forward to seeing how you put your KK 23†and KK 32†to use.
In the meantime, I’ll wait for the post where you announce that you decided to get the second KK 23†after all, and that your set up will be your KK 32†in the middle, flanked by two KK 23†grills and two tables in between on each side, with the stainless steel inserts, of course.
One question: if you’re still getting a rotisserie, are you going to get it for the KK 32†or the KK 23� I would get both.
-
What are you trying to accomplish with that information? If you’re looking to fit a table to the curvature of the KK 32â€, I would wait until it gets to you, and just transfer the curve off the grill.
I haven’t seen the KK 32†in person, but my KK 23†curves in a manner that’s not a true circle on the sides. From pictures, it looks like a KK 32†is the same way.
In any case, it’s far better to get measurements directly off your grill if you’re looking to fit a table to it.
-
Abuse? From where I sit, I simply led you to the promised land.
Hi...I'm hogsfan
in Forum Members
Posted
Welcome! It’s a lot of fun here. You’re going to have a great time with your new KK grill.