wilburpan
-
Posts
781 -
Joined
-
Last visited
-
Days Won
28
.thumb.GIF.006d23b9323146d2dd9055f4e195bc2a.GIF)


-
My ears are burning! 😄 Nice job on your refinish, Mike! It looks really good. You mentioned that you used a palm sander. If you are referring to a small hand-held orbital sander, I actually think that sanding by hand with a sanding block is easier for this task, as long as you sand along the grain lines. The sanding block conforms somewhat to the grooves made by the wood grain lines, so it can get in there. An electric sander, where the sandpaper moves in a circular motion, will have a harder time with that. Having said that, you can't argue with your results. And here's a picture of a recent cook, just to show that I still am putting Smaug to good use. Pulled pork from a picnic roast, which is the part of the shoulder that is below the Boston butt. My local grocery store doesn't carry Boston butt except on rare occasions, but they have picnic roast pretty regularly. And yes, KK grills are so good (How good are they?) that this pulled pork was so tender that I was able to pull it with those two small salad forks in the lower right hand corner.

-
I hope everyone had a great Thanksgiving. Sorry I haven't been around — I've been cooking on Smaug, but work has been crazy busy, so not much time for posting. And by "not much time", I mean zero time. Luckily, this is a holiday weekend. This year for Thanksgiving, I decided I wanted to try a turducken. For those of you who don't know, a turducken is a boneless chicken, stuffed inside a boneless duck, which is then stuffed inside a boneless turkey (except for the drumsticks and wings). There's stuffing between the layers, typically a cornbread-based stuffing. To me, a turducken is a quintessentially American idea, in that it's simultaneously outrageous, over the top, and seems to be based on a dare. To me, the main problem with a turducken is the layers of chicken and duck skin on the inside. We all know that we want the skin of a bird to be nice and crispy. The skin layers on the inside of a turducken have no chance of that while being cooked. In addition, it wouldn't be very appetizing if the extra fat in the duck skin came out as a layer. The problem is that typical instructions for cooking that come with the turducken say to roast the turducken at 375ºF or so for 4 hours. Based on talking to a friend that made a turducken before, and this Serious Eats article, I was pretty sure this wasn't the way to go. 375ºF at four hours would probably result in the turkey outside being too dry, the inside being too mushy, and the skin layers not being that great. In the Serious Eats article, they got around this by partially cooking the chicken and duck first, then assembling the turducken. That seemed to be way too much work for the first time I was trying this. Komodo Kamado to the rescue. I thought that by cooking the turducken low and slow, it would give the duck fat time to render out into the stuffing, while keeping the outside turkey layer moist. At the end I would cook the turducken briefly at a higher temperature to crisp up the skin. I ordered the turducken online. It came in a box, frozen in a vacuum bag. I timed the order so that it could defrost in my refrigerator for 6 days before Thanksgiving morning. On Thanksgiving morning, I started up Smaug, and he settled in at 200ºF. I put the turducken in with the heat deflector in place, and a roasting pan underneath to catch juices. My goal was an IT of 160ºF. I wasn't sure how long it would take. I was planning on an hour per pound, like for pulled pork. It finished sooner than that, about 7 hours later. We had Thanksgiving at a friend's house, so I took the turducken out at this point, and used my friend's oven at 450ºF for 15 minutes to crisp up the skin and warm it up a bit. To serve the turducken, you cut off the legs and wings, and then slice the rest of it like a big poultry meatloaf. It turned out pretty good. I was a bit surprised at how the end where the chicken/duck/turkey layers turned out. First of all, I didn't anticipate that all of that would be down at one end of the turducken. This turned out to be more half boneless turkey, half turducken. I also thought the layers would hang together more. This may be inherent to the turducken, or it may just be due to the company that I bought the turducken from. The turkey breast meat had a nice smoke ring (not important for taste, I know, but it looks pretty ), and was nice and moist. The turducken end was good. The stuffing was really moist and tasty, probably because it trapped all the duck fat. The pieces of duck and chicken meat turned out really good, moist and tasty. I was a little disappointed in how little duck and chicken there was relative to the turkey, however. Having done this once, I don't think I'll do it again. It was tasty, but overall my family doesn't eat turkey except at Thanksgiving. We'd rather just cook a duck, or two. We like duck way more than turkey. Happy Thanksgiving!
-
Glad to see that you are on the mend. Hope you're completely back on your feet very soon.
-
No doubt. My boys are already asking when I'm going to make brisket again.
-
I did use a heat deflector, and the drip pan. So this is what my grill looked like at that point of the cook, from top to bottom: Brisket Main grate Three racks of baby back ribs Bottom grate Drip pan Heat deflector Charcoal basket/fire The grate actually sat on top of the drip pan, but that was fine. The reason I used the bottom rack this time was that I wanted the brisket to just taste of beef, salt, pepper, and smoke, whereas I didn't mind if brisket drippings landed on the ribs, and the brisket was too big to fit on the top rack. Overall, I would use the bottom rack for low and slows as a last option. I usually do low and slows on the main rack, and then add the top rack if I need more real estate. But it is possible to do a low and slow on the bottom rack, as I found out the time I had to do eight racks of ribs all at once.
-
It's been a while since I've posted a cook. Here's grilled shrimps and scallops with pasta and pesto and grilled asparagus. No action shots, but here's the final product. So that covers the surf part. Here's the turf and turf. I was volunteered by my wife to make brisket for a friend's BBQ yesterday. Then I heard that they were going to cook ribs. I volunteered to smoke the ribs, because (1) it's really no extra trouble for Smaug to cook two things instead of one for a low and slow cook, and (B) I'm being selfish: I know I can make better ribs than my friends. The brisket was pretty straightforward. My wife picked up a 13 lb. brisket from our local butcher. I've found that one thing that makes brisket cooks more predictable is to keep the size of the brisket as constant as possible. I've been making sure that any brisket I make is around 12 lbs., and I try to stay within 10-15 lbs. overall. The rub was a 50/50 mix of salt and pepper. I set up Smaug, who decided that he wanted to be at 200ºF. The brisket went on at 9:30 PM Friday night. The goal was to have the brisket ready for lunch on Saturday, so I guessed about 15 hours of cook time. Early Saturday morning I prepped the ribs, using the Aaron Franklin rub method, except that I add brown sugar in for ribs. I planned to give the ribs about 6 hours of cook time before lunch. This is what the brisket looked like at that point (9 hours cook time so far). I decided to put the ribs on the lower rack. That's not the usual position for smoking ribs on a KK (or any other kamado grill), but I knew from experience that KK grills are so well insulated that the internal temperature is very even across all the racks. I wanted to keep the brisket flavor straight up beef, salt, and pepper, and I figured that the ribs might benefit from beef fat dripping on them. And then I put the main rack with the brisket back in position. I checked the internal temperature, and at the 14 hour mark the brisket seemed to be in the stall, at 165ºF. But it seemed like it was done, because it was probe tender everywhere I stuck the thermometer probe. Here's the money shot. I decided that probe tender beat internal temperature, and I was afraid of overcooking the flat, since it was considerably thinner than the point compared to other briskets I've cooked. So I took the brisket out, and checked on the ribs. By the bend test, they were not quite done, so I set them on the main grate to finish off. They were ready to go after another 40 minutes. Here's the rib money shot. And here's how they turned out. Brisket. Ribs. So here's my question. I've usually gone for a final IT of 195ºF or so for brisket, and it has been really good. But I think this brisket is the best one I've done so far, by a considerable amount. My theory is that Smaug really did sit in the 200-210ºF range for this cook, and there's something about cooking in this lower range that allows the brisket to get probe tender without getting to a 195ºF IT. My other theory is that when I trim a whole packer brisket prior to cooking, I get pretty aggressive about excavating that big pocket of fat on both sides of the point end. I take out so much of it that it's like the point is being held together by a narrow band of tissue in the center. (I don't have a picture of me doing this, so I hope that explanation made sense.) I haven't seen anyone else do this in the trimming stage of a brisket cook, not even Aaron Franklin. Maybe some of you all do this, and just don't mention it. I think that getting rid of all this extra fat could change the cooking dynamic compared to a typical brisket cook. The next time I'm making a brisket, I'll be checking probe tenderness more aggressively. Any thoughts on this would be appreciated.
-
Last week our local grocery store had a sale on "prime" rib roast. I used quotes because it really wasn't prime rib. The label said "choice". This isn't the greatest angle, but if you look at the center portion of the cut side, you'll see that there's really no marbling going on. Still, this was $0.77/lb. That's less than $5.00 for the whole roast. I made a rub from salt, black pepper, cayenne, rosemary, thyme, and minced garlic. I mixed up the rub ingredients well, smashing the minced garlic as much as possible, and applied it to the outside. I reverse seared this thing. Smaug decided to settle in at 250ºF. After about 4 hours, the IT was 130ºF (a little higher than I had planned). Here's what it looked like when I took the rib roast off at this point. I took out the main grate, drip pan, and deflector stone, put the main grate back in, and opened up the vents. I seared the rib roast long enough to put a little crust on the outside. I know that some folks like split set ups where one side is indirect, and the other is direct, but honestly, at low and slow temperatures, taking out the deflector is pretty trivial. It turned out a little more done than I like, but not too much so. Overall, this was a relatively easy cook. My main lesson from this cook was how much the initial quality of the meat can matter for your meal. The outside part of the prime rib roast was great, but the center part was not nearly as tender as real prime rib from real prime quality meat. I know I overshot my intended IT, but there was a distinct difference that I really can't attribute to the higher IT. Some might say that the price can't be beat, and it's hard to argue with $0.77/lb. vs. $15-20/lb. for real prime quality prime rib that my local specialty butcher would charge. On the other hand, I still had to put the time into the cook, and one could argue that if you're going to put the sweat equity in, you might as well spend the money on quality ingredients. For me, I think I'll go for the quality in the future. I actually learned this lesson a while back, when another local grocery store had ridiculously cheap prices on beef tenderloin. I thought I could buy a whole one and cut it up into filet mignons. What happened was that the filet mignons I cut out had this weird chemical taste that I didn't get with higher quality meat. You think I would have remembered.
-
It's been a while — twin pork picnic shoulder roasts
wilburpan replied to wilburpan's topic in KK Cooking
True, but my bet is that the Boston butts I've made in the past are also injected. Or, if they are not injected, the grocery store isn't advertising that fact very well at all. I have a good line on prime quality beef here in NJ. Quality pork for BBQ is harder to come by in these parts. There are some local farmers selling heirloom pork, but they tend to concentrate on chops, ribs, tenderloin and ham, not so much shoulders for low and slow. -
It's been a while — twin pork picnic shoulder roasts
wilburpan replied to wilburpan's topic in KK Cooking
I had to look back on posts I had missed out on when I was on my hiatus to see what this was about. Hope your finger is healing up well. -
It's been a while — twin pork picnic shoulder roasts
wilburpan replied to wilburpan's topic in KK Cooking
What's the skin like when it comes off? Crispy? Overall, I do like keeping the temp down in the 200-225ºF range for low and slow cooks of all types. When the weather is warmer, I find it a lot easier. My very first cook was a pork butt at 225ºF, and I had no problem having Smaug sit at that temp for the entirety of the cook. That's one of the great things about KK grills - they are much more "set and forget" than the other kamados out on the market. -
It's been a while — twin pork picnic shoulder roasts
wilburpan replied to wilburpan's topic in KK Cooking
He has this progressive rub recipe that's worked really well for me. It's all here in this video: I've made some adjustments to his approach. I don't worry about adding sugar if I'm doing pork, as I don't have the issues with burning that he's concerned with, and I'll go higher on the sugar if I feel like it. Having said that. he also cooks everything at 275ºF, where I like to go longer with lower temps. That's probably why he has issues with burning. I also don't add extra black pepper if I'm making ribs. I think there's plenty of black pepper in this rub method. One other thing: I aim to make a little more than 1/4 cup total when I'm making a batch of this rub. That's good for a pork butt, 2-3 racks of ribs, or a whole chicken. For a whole packer brisket, I'll make about 1/2 cup of rub. -
It's been a while — twin pork picnic shoulder roasts
wilburpan replied to wilburpan's topic in KK Cooking
You have no idea. -
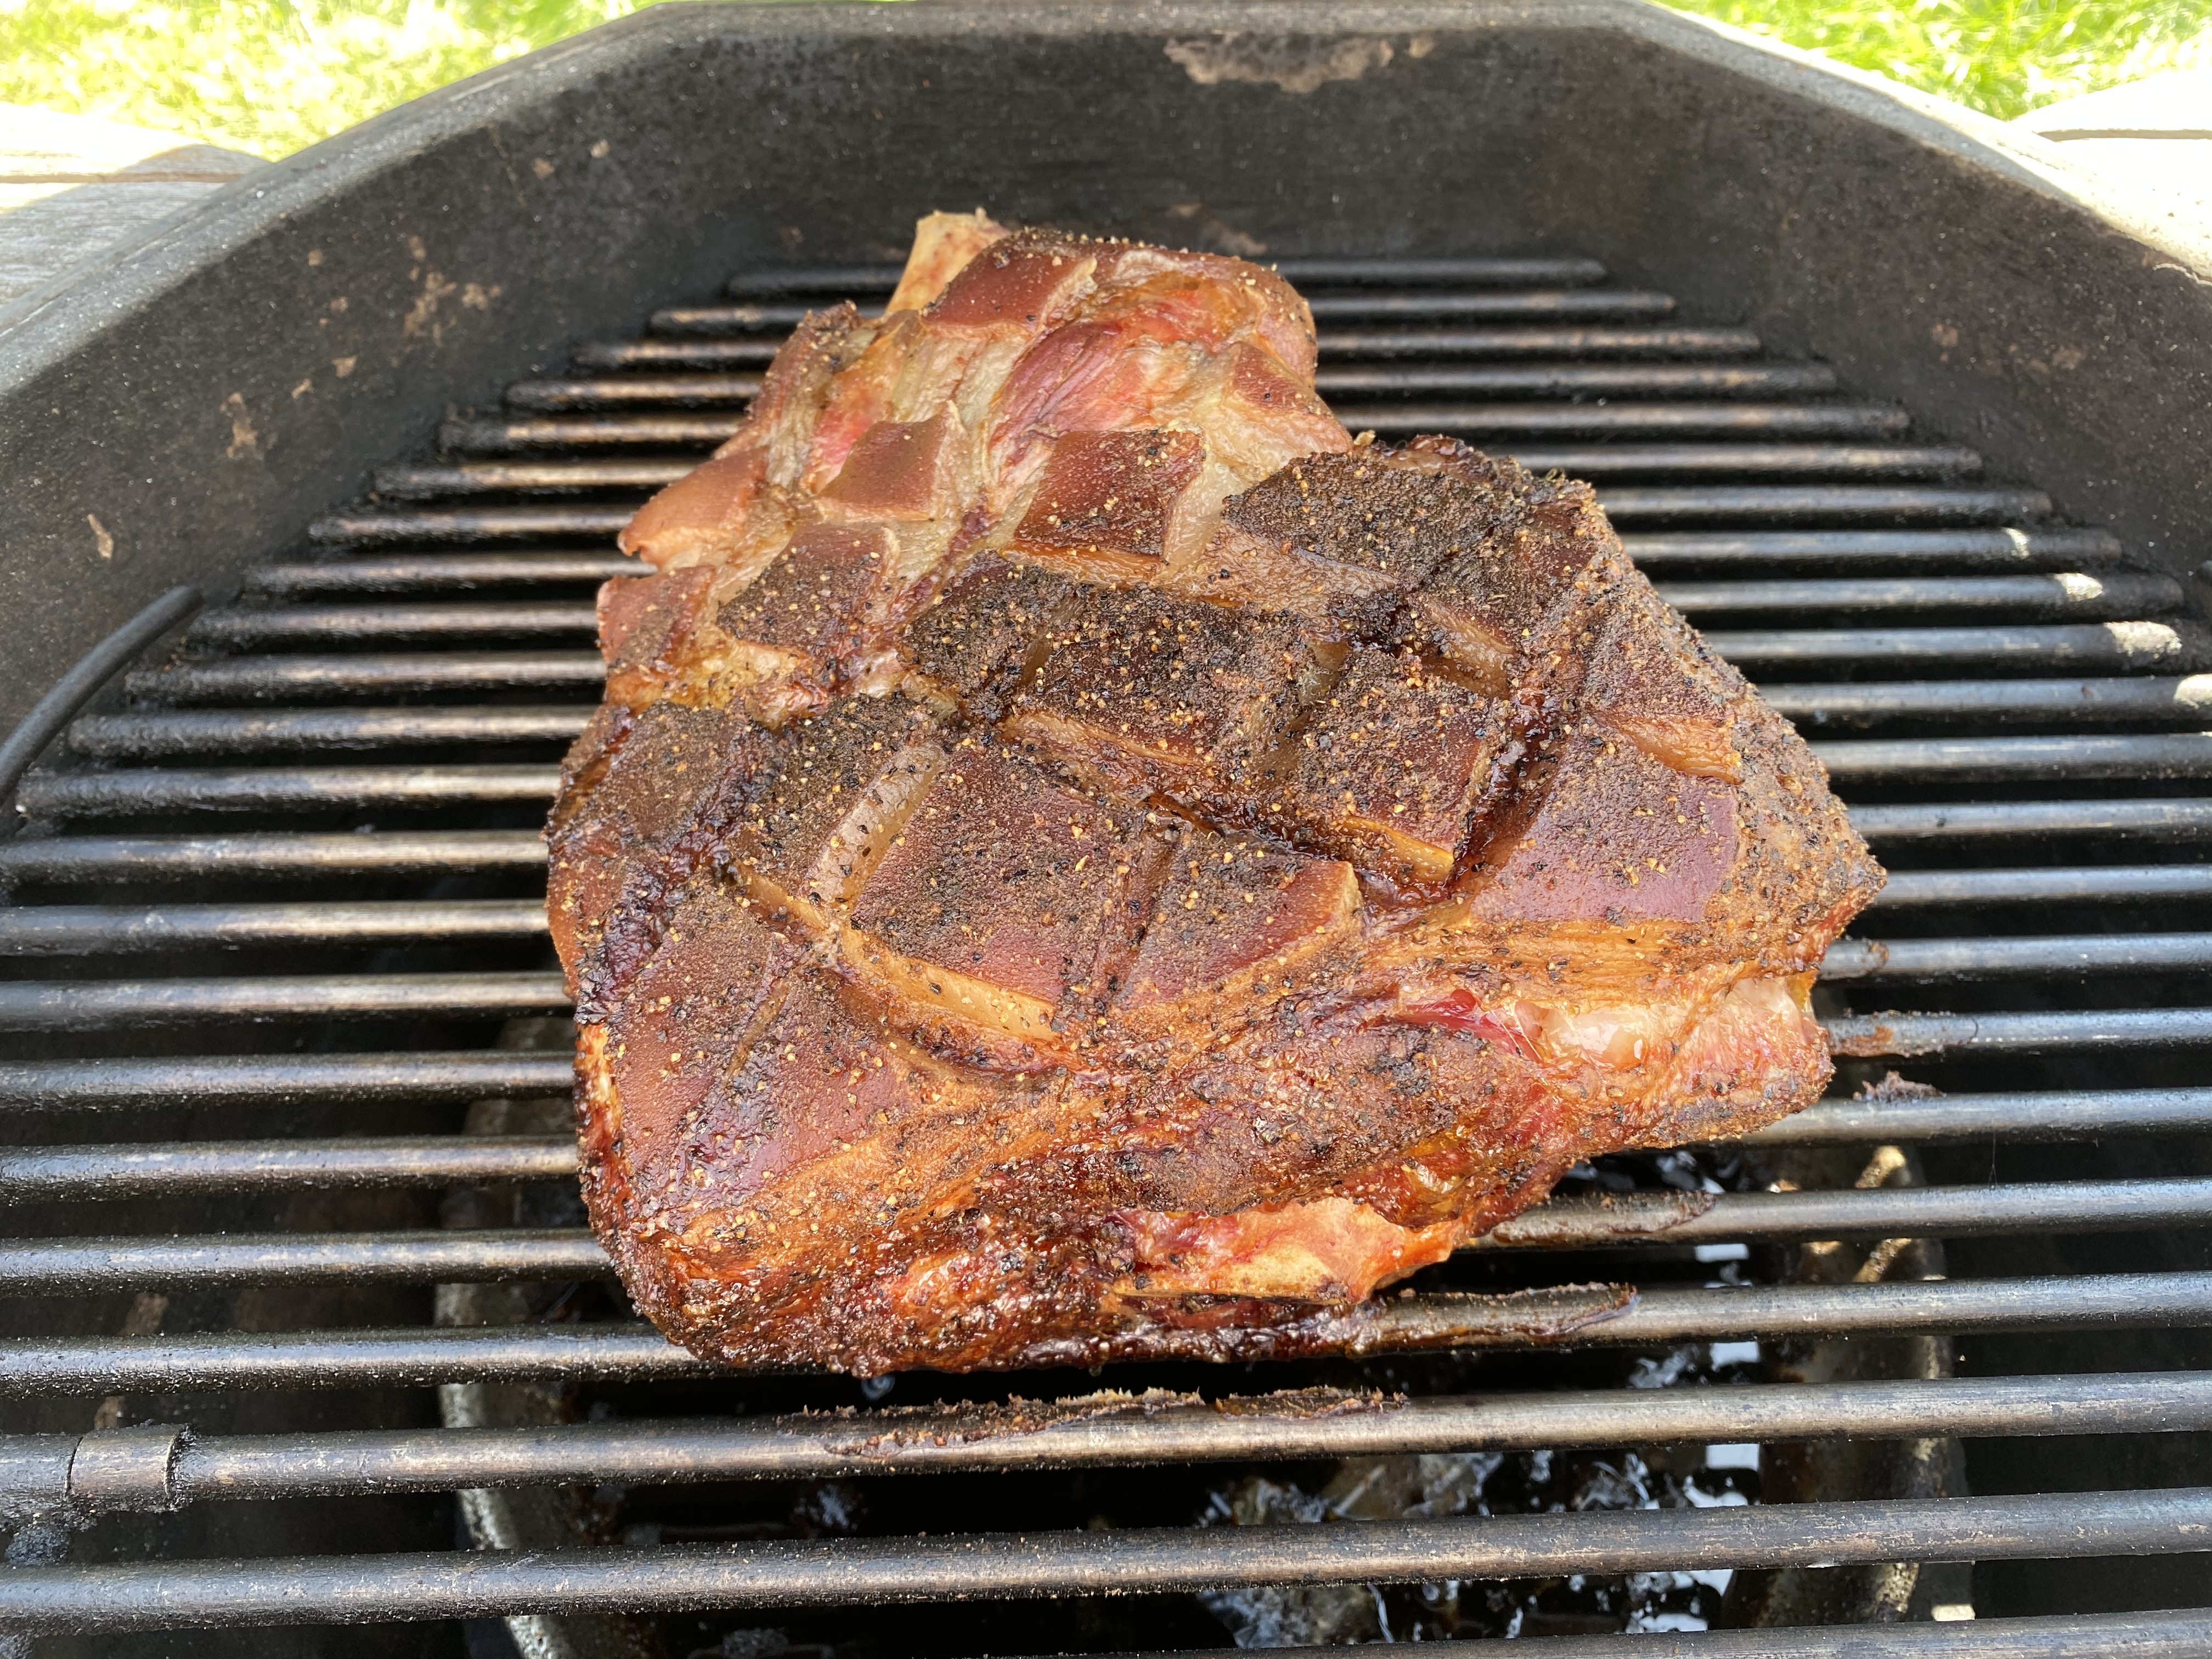
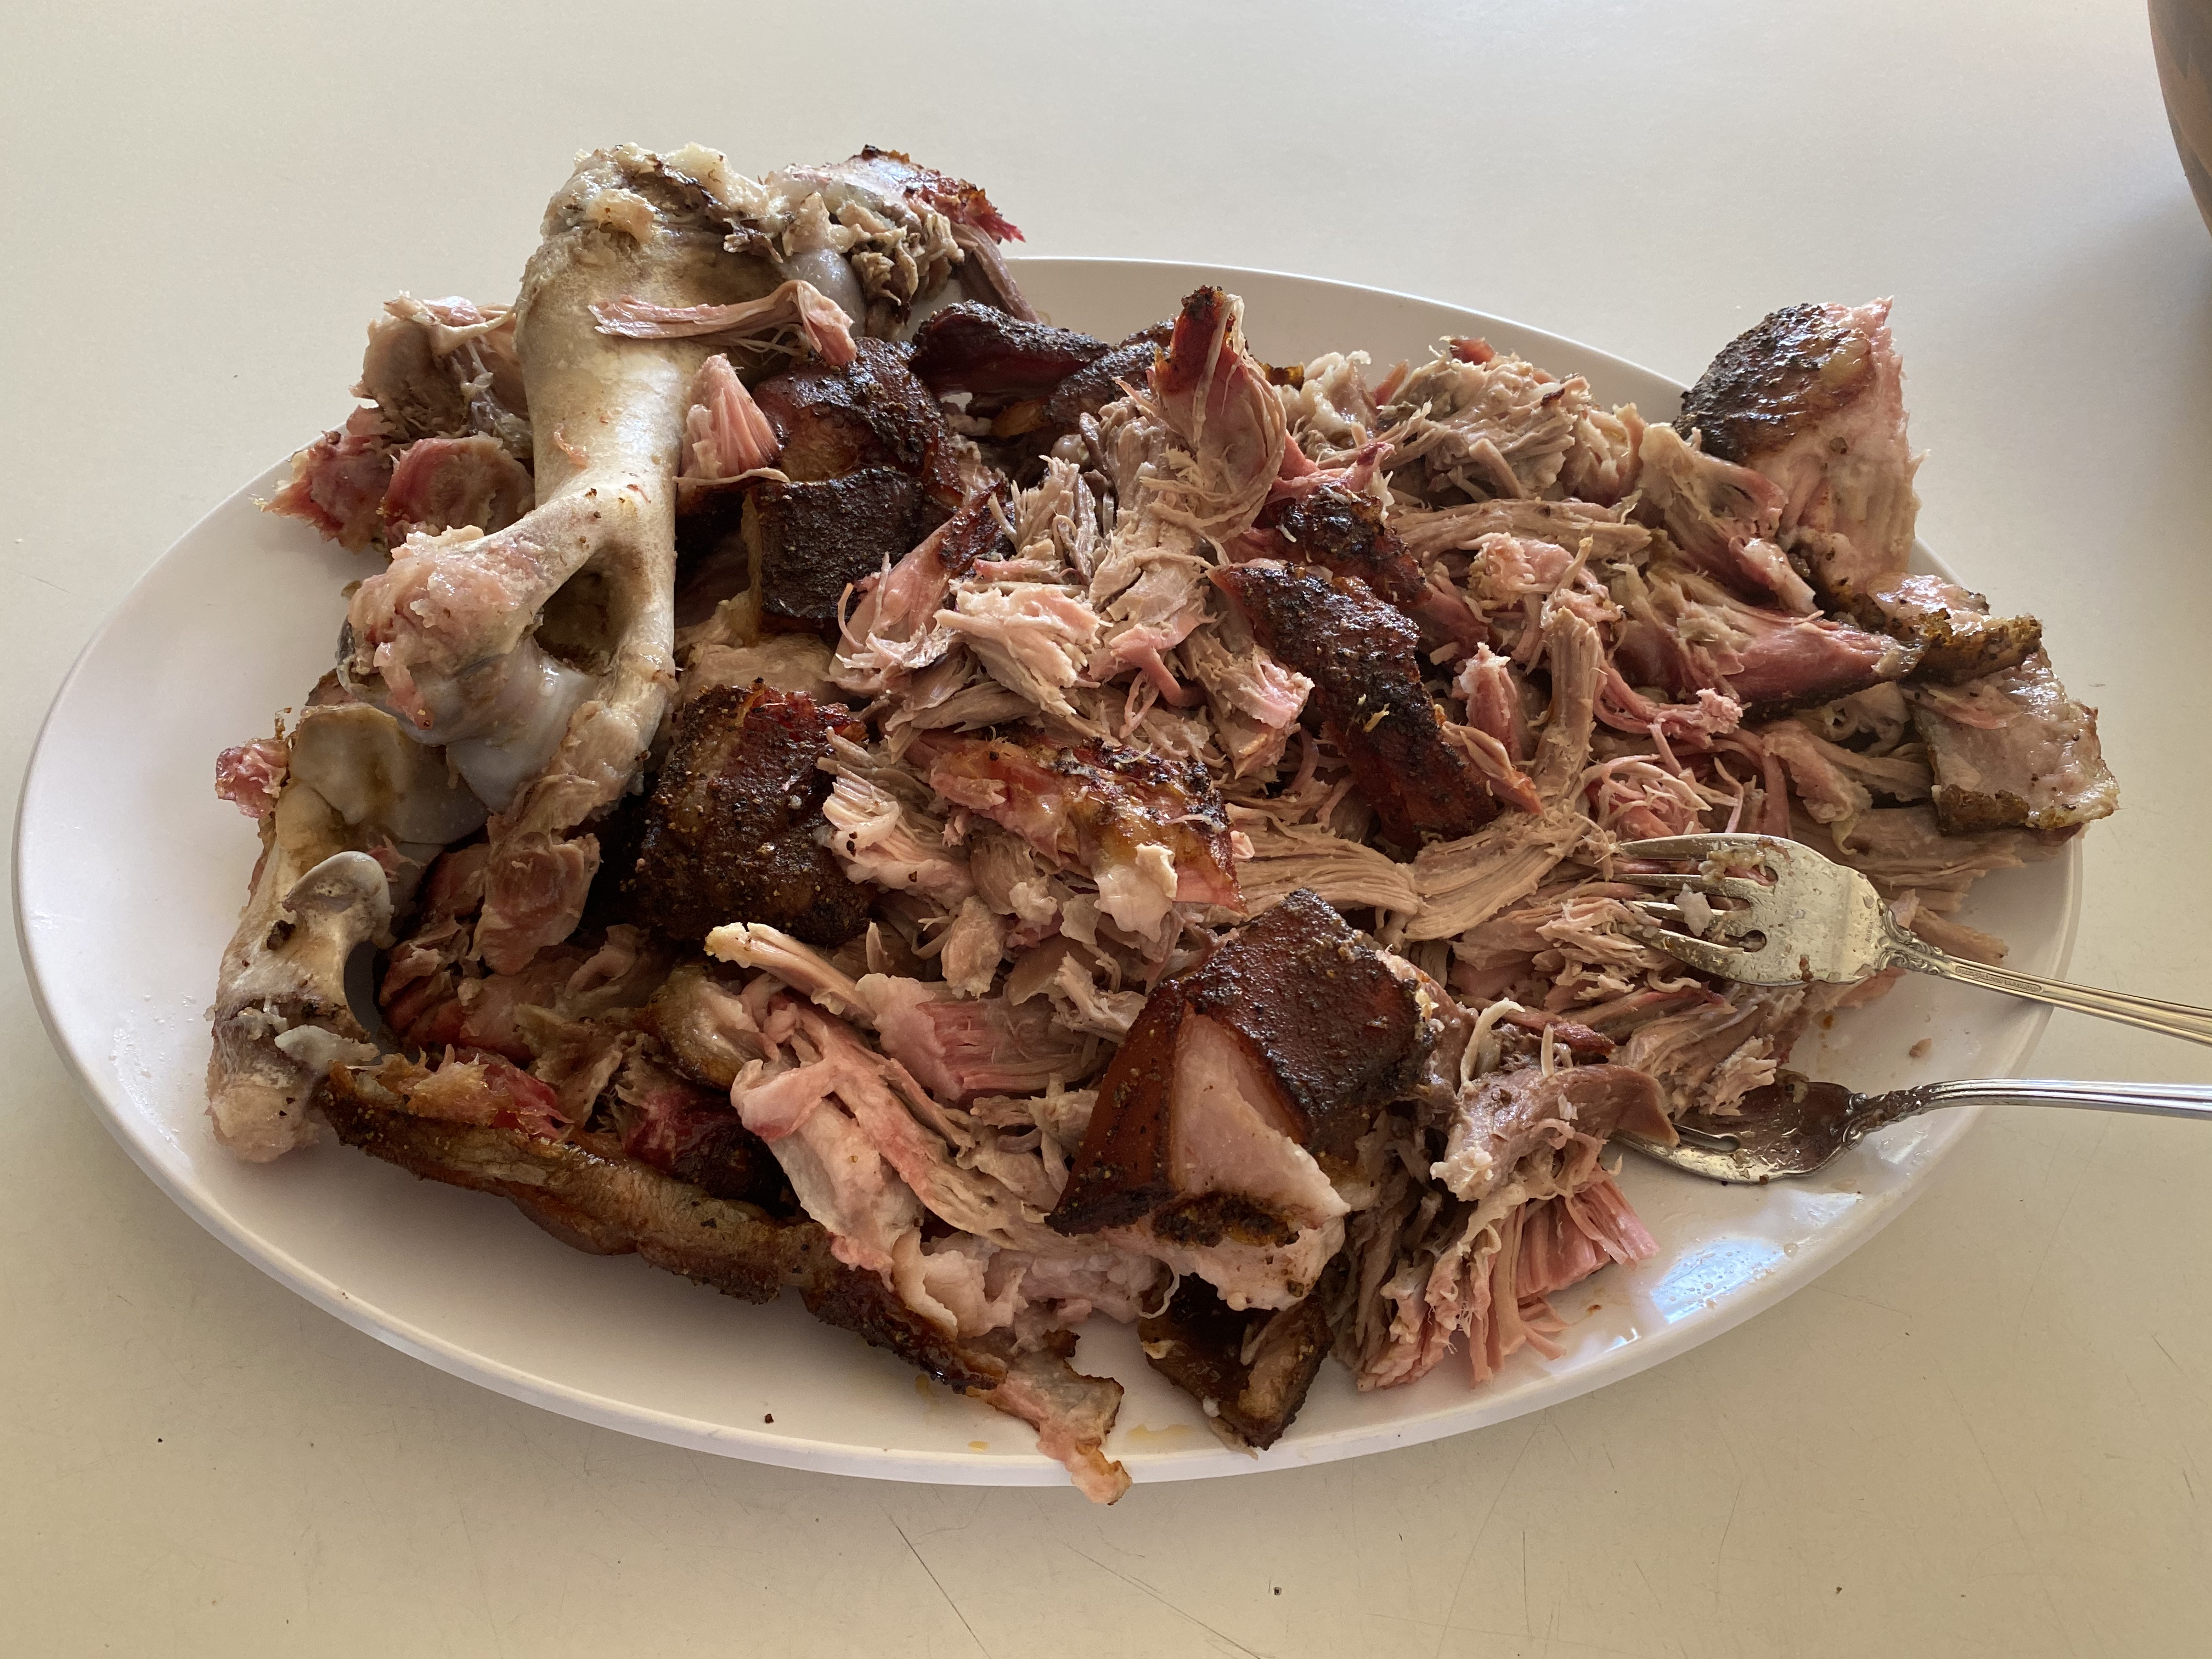
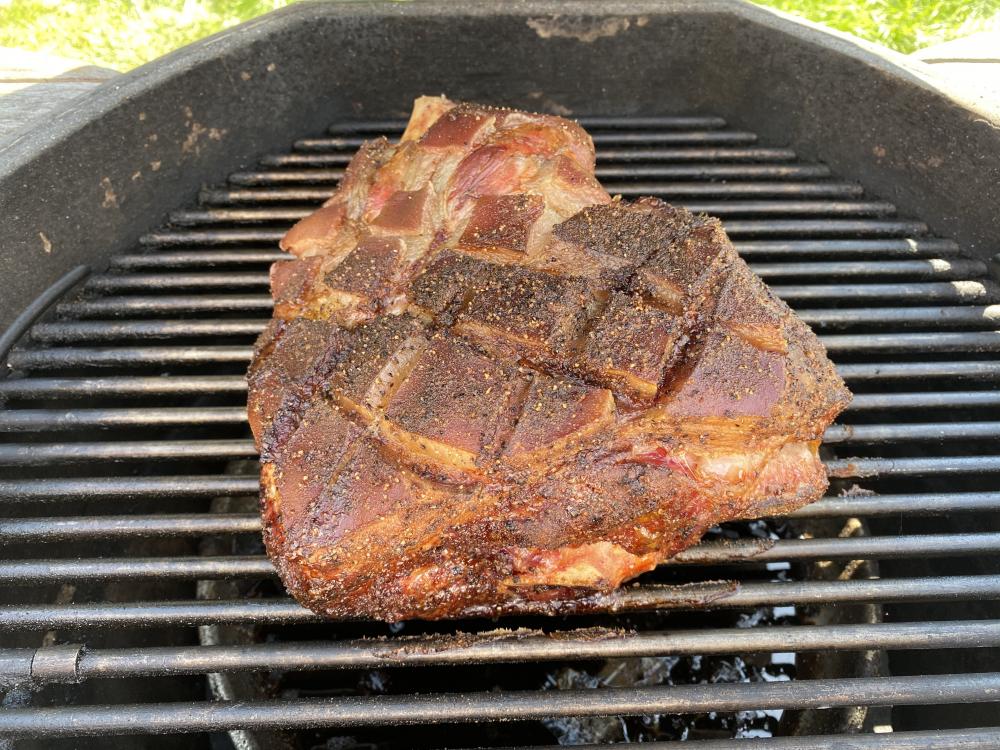
Hi everyone, It's been a while since I've been on this forum. I've been using Smaug, but work has been crazy busy — so much so that I haven't had a chance to shoot photos or post. But things calmed down a little this past weekend, and I managed to take some photos of what I made. Some friends of ours were hosting a karaoke party, and my wife volunteered me to make some pulled pork. During the week, work was still nuts, so she went out to get the meat. I said, "Look for Boston Butts, or pork shoulders". She came back with two pork shoulder picnic roasts. When I unwrapped them, I found out that this was not the usual cut that I was used to in making pulled pork. It had the skin on, and the bones were different. But I didn't have much choice, as it was 1 AM, and I needed to get the cook started, as it was for the next day. I did a quick internet search on making pulled pork from a picnic roast cut, and for a second I considered doing one with the skin on, and the other with the skin off. But then I remembered something my wife told me once: Never experiment with a new method of cooking when bringing food to someone else's house. I decided to do both with the skin off. I also figured that with the amount of skin and fat that came off the first piece, the cooking times for the two picnic roasts would be quite different. I used my usual Aaron Franklin rub recipe. And the roasts went on Smaug at 2 AM. They wound up cooking for 15 hours, finishing up at about 5:30 PM. Temperature control was interesting with this cook. After starting the cook at 2 AM, I was up and checked on the grill at 7 AM. Smaug had settled in at about 180ºF. I opened the vents a crack, and the temperature settled in at 250ºF. Around 2 PM, the temperature started falling. I checked in on the charcoal, and it was almost all gone, so I refilled the charcoal basket. In an attempt to speed things up, I bumped the temperature up to 275ºF. I think the complicating factor for this cook was that the outside temperature was in the thirties, and the cooler incoming air made me go through the charcoal faster than usual, since the incoming air needed to be heated more than if it was summertime. My charcoal situation was also not optimal when I started, as I was using the last bits in the bag, which tend to be smaller, so they burn faster. The pork turned out really well. Our friends put away one of the shoulders pretty easily, and made a dent in the second one. And instead of having us take our leftovers back, they divided up the remainder of the second shoulder among themselves. That's never happened before. I was kind of sad about that, because I wanted to have pulled pork sandwiches the next day, but that gives me an excuse to make another pulled pork soon. [/url] [/url] The other thing I learned from this cook was how different this cut of pork is from a Boston butt. As you can see from the picture above, the bone is round, not like the flat bone that comes in a Boston butt. The bone in a Boston butt is the pig's shoulder blade. Based on the appearance of the bone, I think this cut is from the "upper arm" of the pig. The picnic shoulders took longer to cook than the Boston butts I've done in the past, even adjusting for weight, and my bet is that the increased size of the bone is part of it. The bark set up really well, but there was a few parts that I thought were a little too well done. I kind of expected this, since a Boston butt is nice and round and compact, whereas the picnic roast had some thinner parts that flopped away from the main part of the meat. Also, there's this one muscle where the fibers run all the way across the meat, and so when that got pulled, you got these strands of meat that were 8-9 inches long. They were good, but not as much fun to eat as the smaller chunks of pork. In the past, I've passed up on picnic roasts for a Boston butt, but I think I'll make some more of these now. Picnic roasts seem to be more available than Boston butts here in New Jersey, and they're noticeably cheaper. Besides, I want to try one with the skin on.
-
Better late than never: Terrific job on your storage unit! It really looks great. That's pretty much true for everything. The more you practice something, the better you get at it. I remember the first time I made a dovetailed box with hand tools. Even over just those four joints, I got better with each one. When I was done, you could turn the box around and see the joints getting better as you turned it.
-
Congratulations on the new KK grill! You won’t regret this one bit. And don’t worry about the bubbles. I found bubbles a little larger than the size of my palm on the back side of my KK grill several months after using it reasonably frequently. I poked a hole in it, some fluid leaked out, and it settled down. I’m guessing from your forum name that you’re a radiologist? I’m a pediatric oncologist.