


wilburpan
-
Posts
781 -
Joined
-
Last visited
-
Days Won
28
Content Type
Profiles
Forums
Events
Posts posted by wilburpan
-
-
Ever wanted to know what 6 pounds of wings looks like in a KK grill? Here you go.
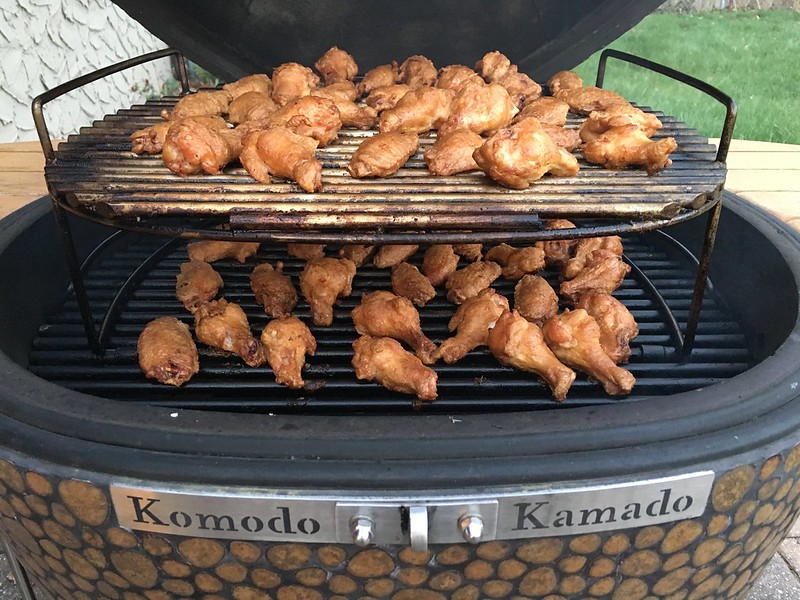
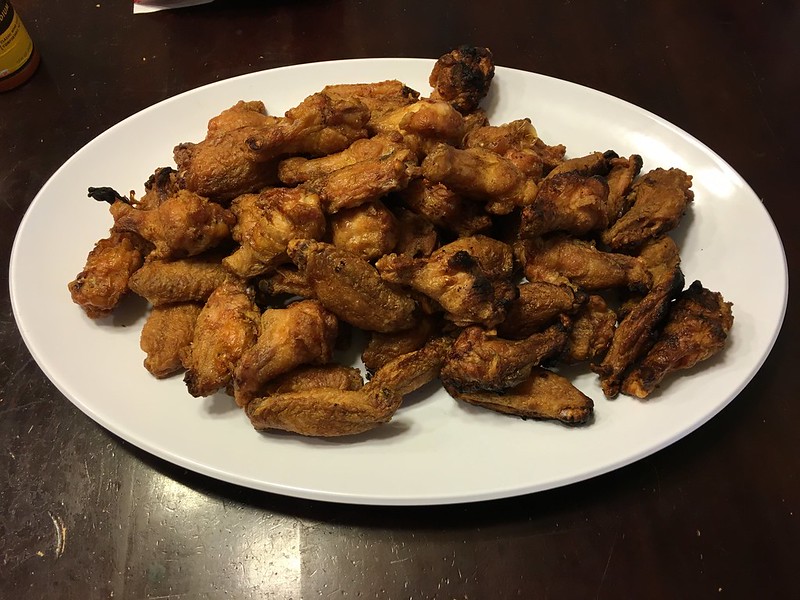
Off the grill:
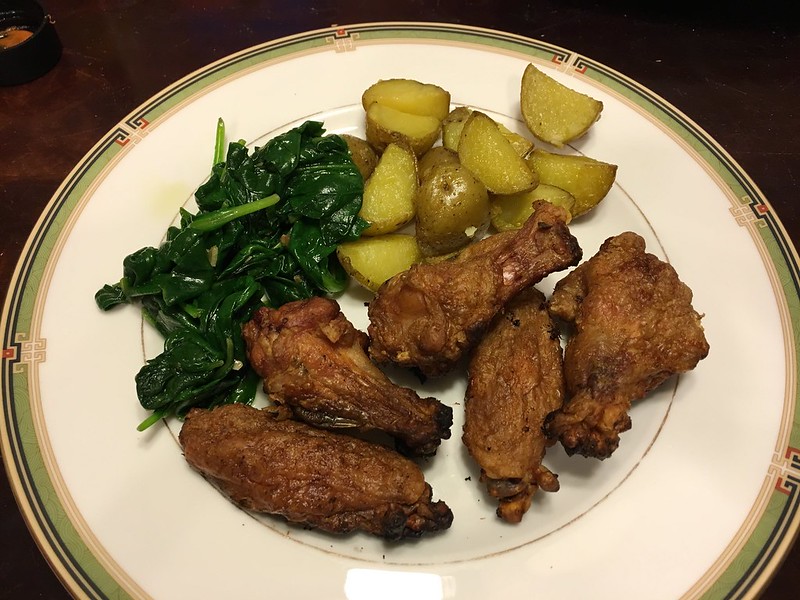
Plated. My wife made spinach and potatoes.
I made these wings using the baking powder/salt trick to get the wings super crispy. They cooked at 400ºF for about 35 minutes. They turned out great, except for the row of wings at the back of the grill. I’ve learned that there’s a relative hot spot towards the back of Smaug since the vent is placed towards the back of the top lid. The back row of wings were a little overcooked, but the rest of them were great.
-
 2
2
-
-
I’ve noticed that the stem of the dome thermometer has acquired a nice black coat of smoke and stuff from all the cooks.
Could that layer of soot insulate the tip and make the thermometer read artificially low?
-
1
-
-
That was a fantastic write up on gumbo. I’m filing this away for future reference.
I don’t suppose you would care to do a similar take on étouffée, would you?

-
Hi Tony,
I cooked the pizza on the main grate. I know a lot of folks cook pizzas on the upper grate on the baking stone at high temps because the pizza benefits from the heat coming off the inside of the lid. But that’s for thin NY style pizza. A Chicago style deep dish pizza is more like cooking a pie or a lasagna, so putting it on the main grate is fine.
-
I haven’t made a Chicago style deep dish pizza in a while, so Sunday night I put one together. I basically follow the recipe at the Real Deep Dish website, using sausage.

There are a couple of modifications that I made to the recipe. First, I turn my oven on to 100ºF, and then turn it off. For the dough rising, I place the bowl with the dough in the oven, and let it sit for several hours.
Second, I’ll add a good amount of fennel seed to the sausage. The Italian sausage here in NJ doesn’t seem to have fennel in it — at least not the ones I can find at our local grocery store. Back in Chicago, where I grew up, Italian sausage always had fennel seed in the mix.
Third, I use a 10” cast iron pan instead of a deep dish pizza pan.
Final product. This was cooked at 450ºF, indirect, for 40 minutes.
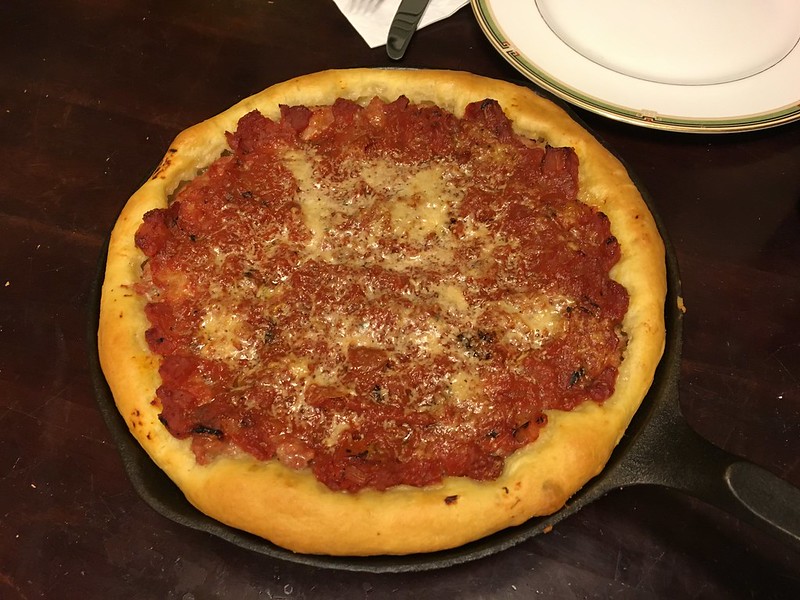
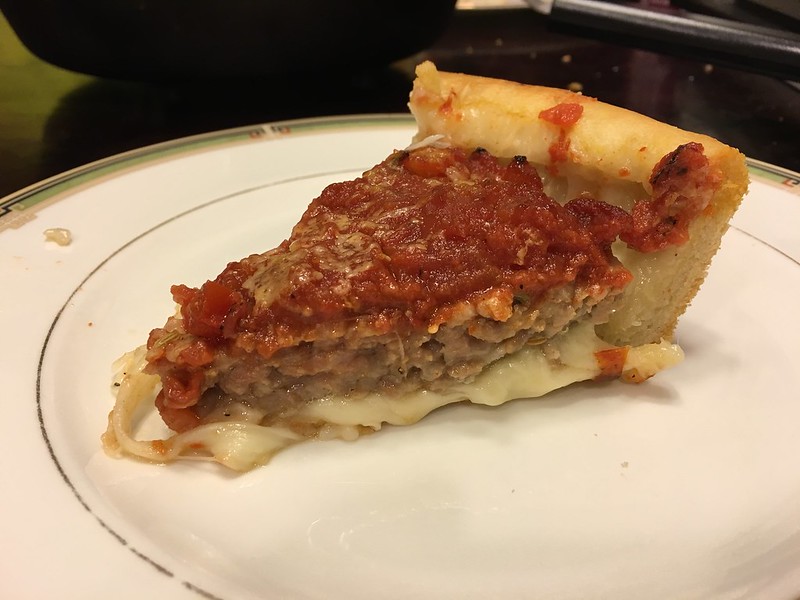
It was great. I really should do this more often. Other than planning ahead enough to let the dough rise, it’s very quick to put the pizza together.
My wife mentioned that this pizza had the best crust of all my attempts at making Chicago style deep dish pizza so far. It was firm enough to keep the cheese and toppings in place but still was very light at the same time. I think one of the keys was that I let the dough rise for a longer period of time than my previous cooks. My kids were out playing, so I waited for them to come back before starting the cook, which resulted in extra rising time for the dough.
-
3
-
-
Sometimes I’ll hear that posting just another rib cook is boring.
I beg to differ. There’s no such thing as just another rib cook. This thread is proof of that.
-
Nice!
Do you have access to dry scallops? If so, try using those. They’re pricier than regular scallops, but completely worth it. It’s like the difference between choice and prime steak.
-
1
-
-
On April 12, 2016 at 6:12 PM, ckreef said:
I baked it in the KK using the upper rack and pizza stone at 452*. After 10 minutes I pulled it and added a little shredded parmesan, some fresh sliced mozzarella and a few pepperoni.
[snip]
Not bad for my first attempt although next time I'm cooking it at 450*.
Now THAT’S attention to detail.
Seriously, that’s a great take on Chicago deep dish pizza.
-
1
-
-
By all means see one in person if you are able to arrange that.
Having said that, I’ll just echo what tinyfish said. I also did a lot of looking into a Komodo Kamado grill, and also asked Dennis a ton of questions via email and by phone, and ultimately ordered my KK 23” without having seen one in person. In addition, my KK 23” was the first kamado grill I ever used. I haven’t regretted it one bit.
-
1
-
-
On April 9, 2016 at 0:00 PM, Newg4 said:
I'm just going to let these babies cook through, not going to foil or anything.
You know what’s never been said about cooking ribs on a KK grill?
“I really miss spritzing and foiling.”
Seriously, great job on those ribs!
-
5 hours ago, churchi said:
Excellent post @wilburpan. Appreciate the time in replying.
I am due for a hi heat cook this weekend, so i am going to try what you have suggested and post back.
Thanks heaps mate.
One other thought: since you have a KK 32”, if you don’t have a lot of food to cook over direct high heat, try using your basket splitter, being sure to put in the horizontal plates so that air only goes through the part of the basket that has the charcoal. Then see how hot the fire gets using the “hold your hand over the fire” method. High heat cooks are at a temp where you can only hold your hand over the charcoal for a second or so. It may be that the KK 32” dome thermometer may not be truly reflective of direct cooking conditions down by the searing grate, especially if you’re using the basket splitter, so waiting for your thermometer to get up to 600ºF may not be necessary.
-
On April 7, 2016 at 9:23 AM, churchi said:
@wilburpan, when you try and get your grill up to searing temp of 500-600 (no heat soak) are you just lighting coals in a few places then using a blower or hair dryer to light all the coals quicker? I think thats what im not doing to get the 32 up to hot temp quickly.
Im thinking i need to light 3 or 4 places with the blow torch, then get the air blower out to light up more coals quickly and that should get the searing temp up i think. Am i on the right track there?
Hi @churchi,
Here’s my method of getting Smaug up to steak searing temps fast.
I start with a full basket of charcoal, and light it over a fairly wide area. I do use a weed torch, but the main purpose is to get a lot of charcoal lit, not to blast the charcoal with the weed torch. I have the lid open with the bottom vents fully open, with the grate off. After five minutes, I’ll flip over the lit chunks in the top layer of the charcoal a bit in order to get the top surface to give off heat, put the grate in, close the lid and open the top vent as high as it would go. I can usually hit 500-600ºF within 15 minutes.
I think that the moving the charcoal around after five minutes helps a lot, because it gets lit coals right at the top of the basket and distributes the fire more quickly than letting it burn on its own. (That’s also why I leave the grate off at first so I don’t have to maneuver a hot grate later to stir up the charcoal.) I’ve noticed in the past that if I’m going for a high temperature, and there’s large pieces of charcoal on the top that are burning only on the bottom side, the unlit portion of the charcoal is preventing heat from coming through. Flipping over those pieces did a lot to speed up the process.
I’ve noticed that when my thermometer approaches 500ºF, the top surface of the charcoal will mainly be on fire, but the larger chunks will have a dark spot in the middle that isn’t actually burning. Here’s a picture from the Serious Eats website that shows what I mean.

This looks like a good charcoal fire, but it’s really not at full blast yet. You see those large pieces of charcoal in the middle that still look black? That’s charcoal that’s not burning. I think this acts as an insulator, blocking the fire underneath it, and preventing the temperature from rising higher. Turning those pieces over helps the temperature come up faster.Hope that helps! Try this method with your KK 32”. I’d be curious to see how well it works for you.
-
2
-
-
Ken and Ryan (and anyone else who has a KK 32” and a smaller KK):
For direct high heat cooks (burgers, steaks, etc.), I tend not to heat soak the grill. I do what I need to do to get Smaug up to 500-600ºF on the dome thermometer, which takes me 10-15 minutes tops, cook what I want to cook, and then shut down.
If you’re doing that sort of cook, how much more charcoal will the KK 32” burn than the smaller grill?
-
1
-
-
Welcome! Since you have a BGE, maybe this will help. A KK 23”, which is what I have, has slightly less area on the main grate than the XL BGE. A KK 23" will be a step up in size from a Large BGE.
If you currently have the XL BGE, and don’t find the size too small, I think a KK 23” will do just fine, even with direct grilling. You lose one dinner plate’s worth of grilling space, but since that difference in area is spread out around the rim of the grill, it’s not very noticeable.
I’ve had up to 20 people over for food, and if I’m direct grilling, I’ve done pretty well with the space on a KK 23”. Sometimes I am cooking in batches, but given that it’s direct grilling, the cooking for each batch gets done fairly quickly. If I was cooking the chicken/asparagus feast that Bosco described above, I would have done the sweet potatoes and asparagus first, put them onto a platter, and would have finished the chicken and bacon well before the veggies cooled off. Cooking like this isn't as convenient as having the extra space on a KK 32”, but it’s not extremely difficult, either.
For cooking indirect, a KK 23” is going to have significantly more capacity than an XL BGE. The design of a KK grill allows the KK’s second grill to be larger than the grates that sit above the main grate of a BGE.
Not that I want to talk you out of a KK 32”
, but I thought you could use another piece of information.
-
1
-
-
You’re still looking good!
And listen to your physical therapists. In this situation, they’re more important than the doctor.
-
1
-
-
1 hour ago, skreef said:
Hey ckreef I use it for all my baking cooks. I guess since you got just one, I better get my own
 1 hour ago, ckreef said:
Kewl, so your going to get your own KK just for baking? What size and color are you looking at? LOL
.
.
.
See how that works - LOL
Wait — here’s a situation where the wife wants a KK grill and has to talk the husband into the idea?
Not only is that backwards, we all know who’s going to be the loser in this battle.
-
1
-
-
5 hours ago, Ed said:
hello all - I am on the verge of pulling the trigger on an order for a 23" - Dennis has of course been enormously helpful and encouraging. Question for all you old hands: my accessory list is the 6" rotisserie, a cover, and the charcoal basket splitter. Any other must haves in your opinions?
I agree with getting the 8” rotisserie basket with the reducer instead of the 6” basket. If you’re getting the splitter, get an extra charcoal basket as well.
One other accessory would be the side tables, if you don’t have any handy space to put things on.
-
Hope you’re back on your feet quick!
-
I did score the fat a little bit, but I could have scored it a lot more than I did. I’ll make sure the score marks are deeper next time.
-
Really nice!
-
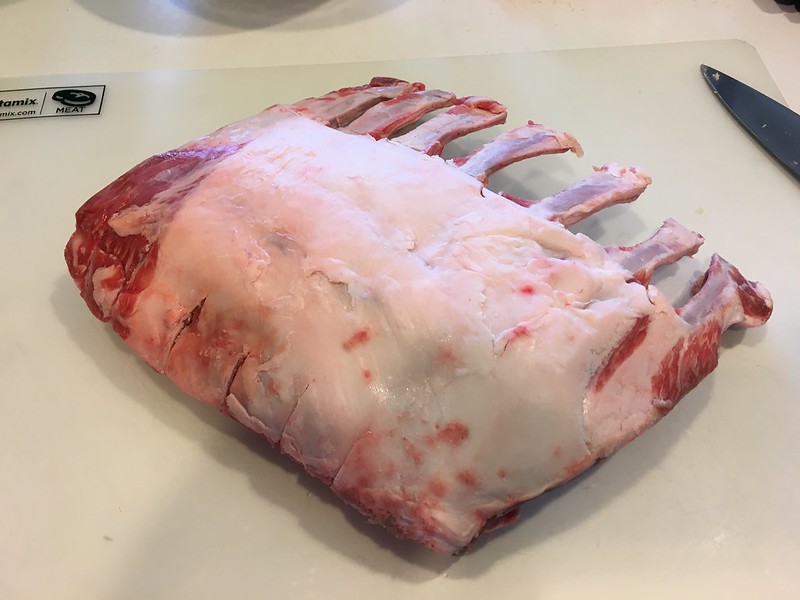
We made a rack of lamb for Easter dinner. It was a classic preparation.
Start with a rack of lamb.
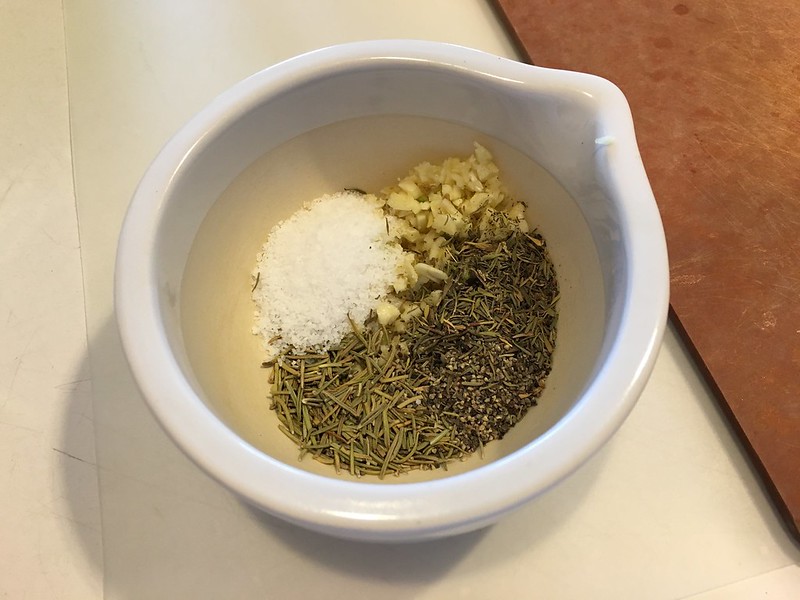
I made a rub by combining fresh chopped garlic, salt, black pepper, rosemary, thyme, and a little bit of red pepper flakes.
I made it into a paste by mashing it in a mortar and pestle. I also added a little olive oil.
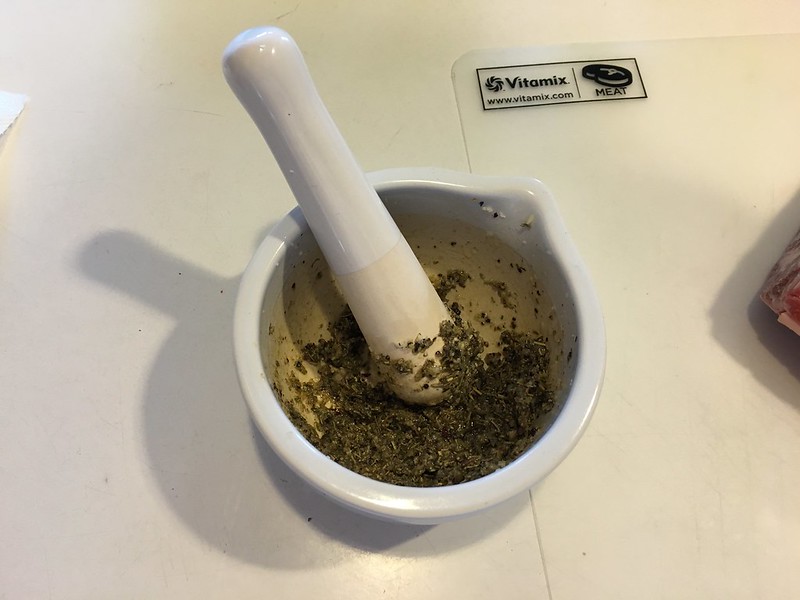
I can’t emphasize how good this technique is. You’ll extract much more flavor from your herbs and aromatics with this technique compared to a food processor. And it’s way easier to clean.
I spread the paste on the fat side of the rack, and found that I didn’t make enough.
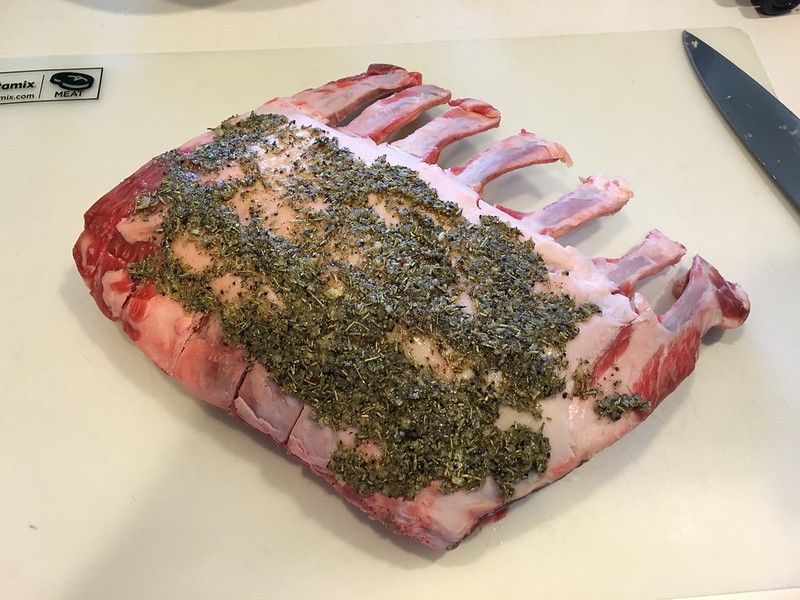
So I made more.
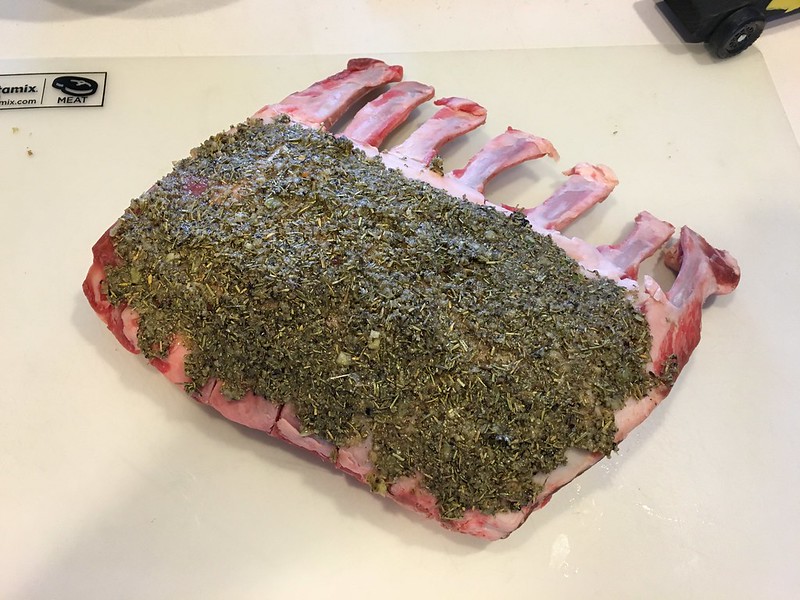
I put the rack in Smaug, indirect at 300ºF. I left it there until the internal temperature hit 125ºF.
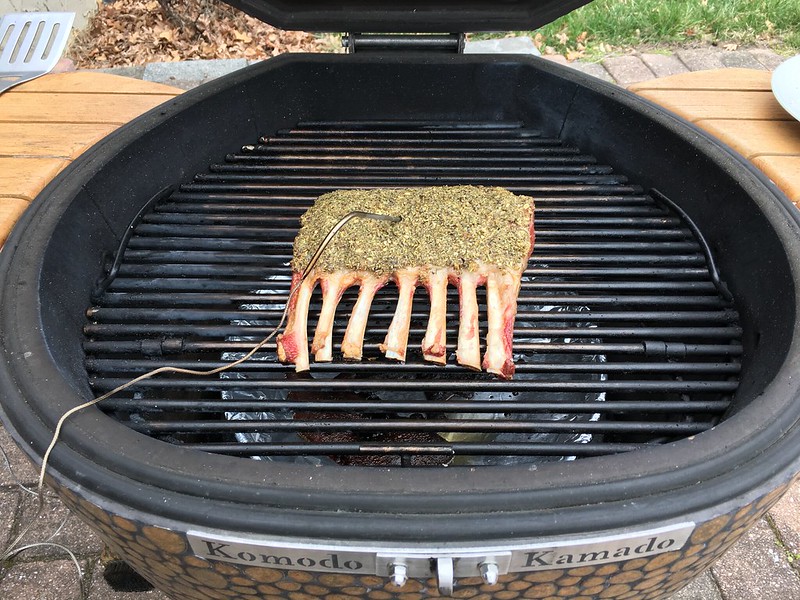
Then I took out the deflector, put the searing grate in, let the fire get real hot, and direct grilled the rack along with some asparagus. Note that I put the bones over the asparagus. This was to keep them from burning, without having to go through wrapping the bones with foil.
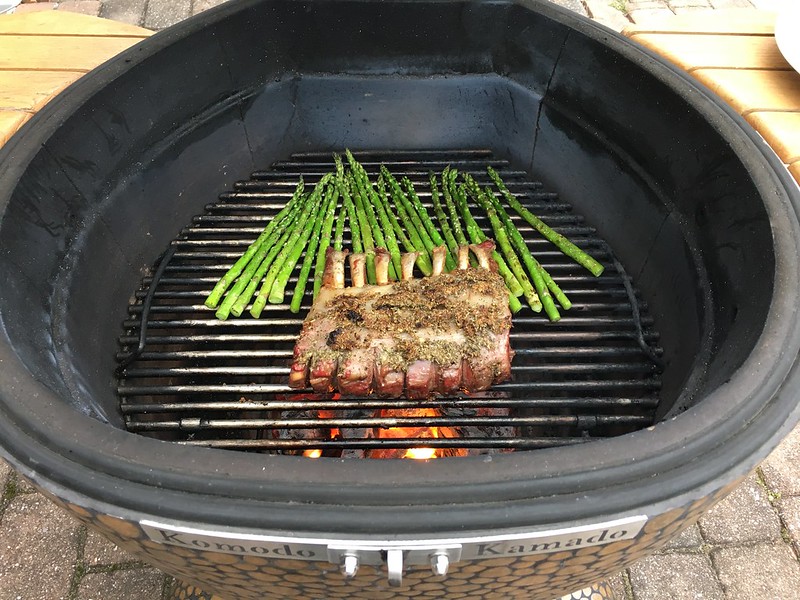
This is the part where I had a near disaster. I tried grilling with the fat side down, and then the rosemary/thyme/garlic crust started peeling off. I managed to salvage most of it.
Here are the money shots. My wife made mashed potatoes and roasted cauliflower.
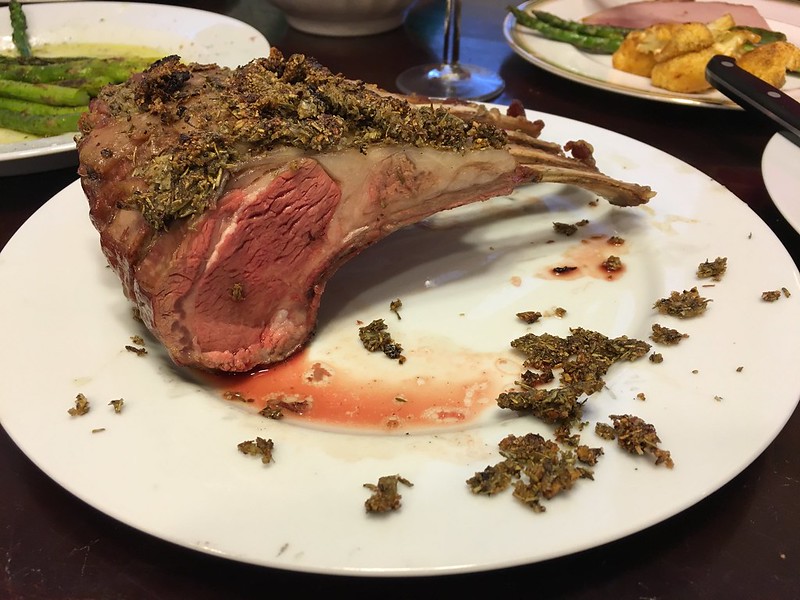
It was delicious. I actually think I could have let the IT go to 130ºF. I like beef medium rare, but I think lamb is a bit better if cooked to medium.
For next time, I could use any tips for getting the paste to stay on the fat side better.
-
1
-
-
Welcome! You’re going to love cooking on your new KK grill.
-
I did a leg of lamb last year for Easter. Here’s my post:
I didn’t use a rotisserie for this cook. Basically, I did a reverse sear: 275ºF indirect, until I hit an internal temp of 120ºF. Then I cooked direct at 500ºF until the outside was nice and browned. Between the two steps I hit a final internal temp of about 130ºF.
If I was to do the same cook with a rotisserie, I’d use a full basket of charcoal, and cook it direct around 300-350ºF. An IT of 130-140ºF is fine. I think that lamb holds up better to a higher internal temperature than beef, so it’s not as bad if you wind up cooking it a bit more than you had planned.
-
I do exactly what you're proposing: I keep Smaug (a 23" KK grill) up against my house when not using him, and roll him away from the house for cooking. The casters work really well, but they don't negate the fact that I'm moving close to 600 lbs. of grill. Having said that, I'm 5'6", not particularly strong, and I can move my grill wherever I want. The hardest part is getting the grill moving from a standstill.
My patio is made of pavers, so there's plenty of little bumps the grill has to go over when moving it, but the casters work well for that, too.
I am the leg man, Goo Goo G'Joob
in KK Cooking
Posted
Chicken legs, that is. Leg and thigh pieces, to be specific.
Here they are prior to cooking. I made a rub using Aaron Franklin’s progressive rub method.
I put them into Smaug, who decided that he wanted to be at 425ºF that day. The legs were cooked indirect for about 40 minutes.
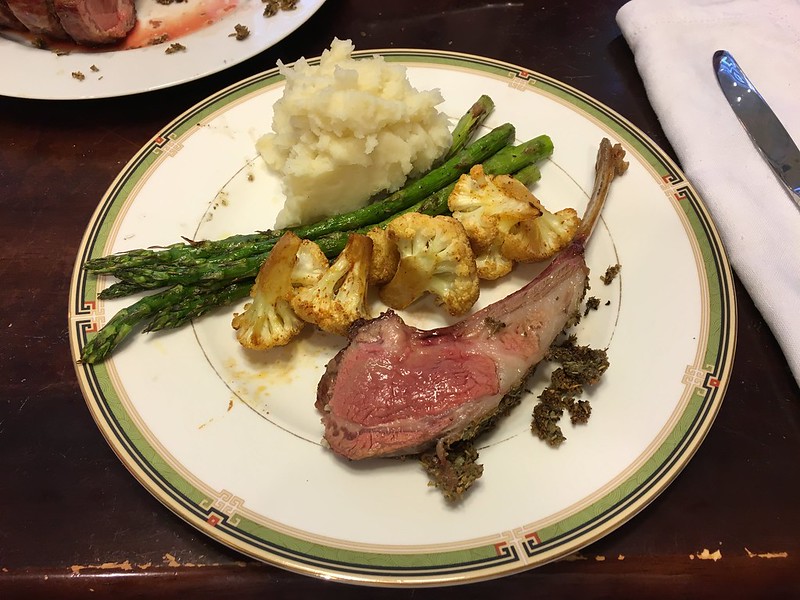
Plated, with some avocado, potatoes, and roasted cauliflower.
Here’s the interesting thing about this cook. By all rights, I overcooked the legs. I decided to mow the lawn while they were cooking, and when I was done, I checked the IT. The IT of the legs was 180ºF, which was much higher than my intended target of 170ºF. Even so, when I cut into the legs, this is what I got.
This is the sort of juiciness level that I expect from steaks, not roast chicken. The meat was incredibly moist. The only comparison I have is the moistness of really good fried chicken. This result was doubly impressive given that I overcooked the leg pieces. On the other hand, maybe I should shoot for 180ºF for dark meat in the future.
The other thing I learned is that I need to be lighter on the rub application when it comes to chicken. I put the rub on the chicken like I would for pork ribs. As far a chicken goes, there can be too much of a good thing. The meat was terrific, but the skin was too salty.