


wilburpan
-
Posts
781 -
Joined
-
Last visited
-
Days Won
28
Content Type
Profiles
Forums
Events
Posts posted by wilburpan
-
-
It was not too bad to be honest. The one i cooked earlier in the week was better but when you got to the middle of the shoulder it was really nice. I did notice the extra 100F that i cooked this shoulder at, and i much prefer keeping it under 300 if i can.
The guests all loved it with all of it going. So that was a big win, i can be critical cause i know what good pulled pork tastes like, however over here in AU there are still quite a number of people who have not really had the low and slow over charcoal. Its usually in a crock pot or slow electric cooker.
SO the comments were really positive.
I do woodworking as a hobby. One affliction that affects almost all woodworkers is that when you show people what you built, you immediately start pointing out all the flaws that no one would notice, while ignoring all the compliments you’re getting. I’m beginning to see that the same applies to cooking BBQ.

I think a few things i learnt from this cook:
1. Obviously keep the cook around the 275F mark
2. Maybe not the whole shoulder with the bone in next time. I think just a few pork scotch fillets (neck) would be nicer. thoughts?
3. Light less charcoal for these low and slow cooks
So anyways i had a quick chat with Dennis late last night. He mentioned that i may have been lighting too much charcoal as well. So i walked him through what i did and he said right away thats enough for a 350F fire, and thats exactly what i had. So he recommended testing today to see if i can get the temp to sit around the 250F mark.
So today was spent playing around with the lighting of the Komodo and getting it up to temp slowly. Good news is i have now mastered it and i have it sitting at 250F for the past 2-3 hours. Its just running along and holding a solid 250F which is what i was shooting for. So i should be prepared for next time.
Just an FYI, that was without using the looft lighter this time. Just a few wet cotton buds soaked in metho, lit them in the middle of the basket and closed the lid. I cant even see the burning charcoal at the moment as it must be burning through the middle of the charcoal stack. Either way i am happy

So another thing i learnt from this cook is i thought that even though i lit so much charcoal in my basket, i assumed that since i restricted airflow on the top and bottom dampers, that doesnt really matter if i have lit too much charcoal in the first place. So i assumed i needed a big fire going, then can shut off the vents almost all the way and it would settle down, but no this is not the case. Hard lesson learnt
In my experience, the KK is so efficient that it’s hard, if not impossible, to snuff out a fire just by closing down the vents once it’s been established, which is why the amount of lit charcoal you start with is important. I generally start the charcoal with a weed burner attached to a propane tank, which sounds like a lot, but I only hit the charcoal with the flame for only about 15 seconds or so. My goal for a low and slow is to have a 1-2 pieces of lump lit, and just glowing red around one of the corners of the pieces. I’m sure using starters or cotton balls would be more precise, but it works for me.
The times I’ve found my temps overshooting by a significant amount, I’ll just shut down the vents completely. That’s the only way I’ve been able to back temperatures down, and even then it’s difficult. For low and slows, if I’m over by 25 degrees or so, adjusting the vents helps, but more than that, closing the vents completely is the only way I’ve found to bring the temperature down.
Having said that, once you figure out what vent settings work for you, you will get very repeatable results. CC doesn’t seem to be posting much lately, but if he was around, he would say to spend an afternoon with your grill, and start a fire as if you were doing a low and slow, trying to stabilize at the lowest temperature you can (200ºF for example). Then write down your settings. Open the vents a little, and see where the thermometer goes. After 15-30 minutes, write down the new temp and your vent settings. Keep going, trying to hit 25ºF intervals. After you finish doing this, you’ll have a good reference for future cooks.
-
Since we're on the KK forum, I can say, you now understand that a KK is simply a much better grill, its efficiency, construction, everything is just superior. Particularly the bronze ones.
I see what you did there!
-
And to show how insanely efficient the Komodo is here is an after shot of the firebox when i had finished my 7-8hour cook (plus 1h heat soak).
The Komodo's are just unreal for the low and slow with regards to fuel consumption. Super happy!!
I'm curious about the temperatures. How much fire did you light? This is a common culprit when there are problems holding temps. Wilber's recent post about this, and possible leaks is spot on, you should have no trouble holding 225°, (just because you should be able to), regardless of ambient temperature.
First of all, that pulled pork looks great!
I agree with Robert that how much charcoal you lit might be one of the factors that might have led to your temps being in the 300ºF range. That’s based on what the ash pattern looks like. For my low and slows, I load up my firebox, and light one spot. At the end of a cook, I find that the fire really just spread to an area about 8-10†in diameter. Granted, a KK 32†is a bigger grill, but I would suspect that you didn’t need that much area of lit charcoal for a low and slow.
One other thing; it’s a little hard to tell from your pictures, but if you didn’t put a deflector over where the fire was on the left side of the charcoal box, that’s going to let more hot air come directly through the grill. I’m suggesting this might be the case just because you have your picture of your charcoal box and smoking wood, and there’s no deflector above that part of the charcoal. I could be completely wrong about this, but I’ll suggest this just in case.
Finally, for future cooks, go for probe tender as opposed to a target internal temperature. When I first started doing low and slow cooks, I would wait until the meat hit a certain IT. What I’ve learned since then is that the IT isn’t as important as how the meat feels. These days, for pulled pork, I’ll use the meat thermometer to see when I’ve hit 195ºF, and then I’ll pull the thermometer, and stick it into the pork at various places. If the probe just slides through the pork like a hot knife through butter, I’m done. If I feel resistance, I’ll let it cook for 15 minutes or so, and try again. I’ll double check the area around the shoulder blade because the bone is going to slow down cooking in that part of the pork.
I use the same approach for brisket, and it works great for that, too.
-
Oh, NICE. (Crappy pictures or not.)
-
I should also mention that olive gold pebble KK grills cook better than the other tile choices, which will help you with your results.
-
So how did it turn out?
-
Since you say you’re doing a low and slow, I’m assuming you were cooking indirect. Here are some possibilities that could explain what you’re seeing.
1. The thermometer is up in the dome, and will be seeing more of the hot air coming up and around your heat deflector compared to the area where your food was cooking.
2. One or the other thermometer is out of calibration (less likely).
For me, I don’t worry about the exact temperature at the grate. The cooking conditions are going to be so repeatable that as long as you’re happy with the results, that’s the important thing. To put it another way, if I replaced your thermometer with one that had a line marked “low and slow†that represented 250ºF, and you didn't know that it was 250ºF, you could still pull off great low and slow cooks just by adjusting your vents so that the thermometer lands on that “low and slow†line.
All you really have to do is decide how good your salmon and sausages were. If they were to your liking, next time you do this cook, go for 250ºF on the dome thermometer, and don’t worry about the exact grill temperature. If you want a more moist result, go for a lower temperature on the dome thermometer the next time, and see how you like it. If you want the outside of the food to be more well done, go for a higher temperature. Either way, knowing the exact temperature at the grill is unnecessary.
-
That looks amazing! The only thing that’s kept me from trying to make my own pastrami is the long brine time, so hats off to you for seeing it through.
I do wish I had a slicer.
FWIW, the real old school delis (Katz’s in New York, Langer’s in L.A., Kaufman’s in Chicago (actually, Skokie)) slice their pastrami by hand, so don’t feel bad. Their goal is to make a pastrami so tender so that machine slicing would shred it to bits, which means that hand slicing is their only option.
-
So glad that the pictures are finally up. That cook looks delicious, and it looks like you had a great Chinese New Year.
新年快樂ï¼
P.S. I would love more details on how you prepped and cooked the whole pig.
-
i dont want to close the vents as the fire will go out. So have opened up the top vent like less than a 1/4 turn and the bottom vent has just enough room to put a CC through it.
One of the things to get used to on a KK grill is that it’s so efficient that you can have what seems like ridiculously small vent settings, and there will still be enough air to keep the fire going. Your vent settings are pretty close to what I use for low and slow cooks.
A couple of things to check since you’re up around 300ºF:
1. Make sure that the latch for the lid is locked all the way down. If it isn’t latched, this will cause an air leak that will drive the temperature up. This is one of those things that when you read it, you wonder how anyone could miss that. I thought that. Then I missed that the first couple of times I used my KK grill.
2. Make sure that the back opening is all the way shut. I’ve had that pop open a little bit, which lets in just enough air (there’s that efficiency thing again) to drive the temperatures up.
3. Finally, you can go ahead and turn down the top vent a little more. The fire won’t go out.
My bet is that assuming there isn’t an air leak, you just let your grill get too hot before dialing down the vents. Getting this down comes with experience. What I’ve settled on doing is starting the grill about an hour before I plan on putting the meat in. I’ll light the charcoal in one spot, letting the fire get established with the bottom vents open a sliver and the top lid open, and after five minutes, closing the lid and setting the top vent at about 1/4 turn. Looking into the grill, at that five minute mark there’s more of a fire than I’ll need, but the grill won’t be heat soaked, and will equilibrate to somewhere between 200-250ºF over the course of the hour.
-
I should have been more clear in that the situation I was thinking of was more of a hypothetical.
-
Welcome to the KK family! I think you're going to be both pleased and surprised cooking on your new KK grill.
-
I like the current thermometers as well. If that guy really wants a 5†thermometer, he should be able to do the swap.
-
One more vote for the 23â€, for three reasons. As Bosco mentioned, if you’re going to be direct grilling, as large as the 23†is, you can fill up the grate in a hurry with burgers, peppers, portobello mushrooms, etc.
At the other end, my KK 23†is so efficient that I have no problems with doing small cooks on it. Here’s the smallest cook I have a photo of — four hotdogs. That is really all that I grilled for this cook.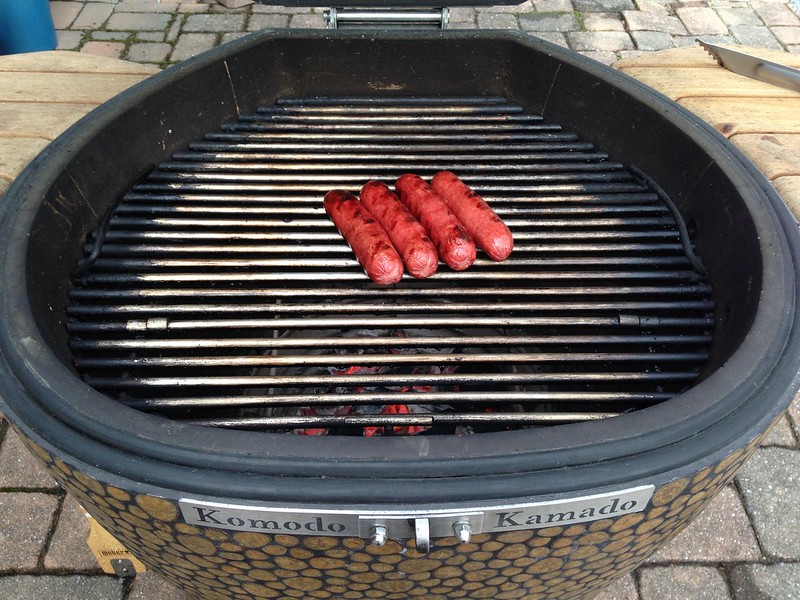
I don’t really think I wasted charcoal for this cook. I can get to direct grilling temperatures (500-600ºF) within 15 minutes, and once I’m done, I shut down the vents and the fire just goes out.Finally, since you’re mentioning the rotisserie, I think having the extra room is good for rotisserie cooking in that the air has more room to circulate around what you’re cooking.
-
Congratulations! You’re going to love cooking on Boz-lo.
And I am partial to olive gold pebble KK grills, having one myself.
-
Here are some answers to some of your questions.
You’re not crazy. Give it a try. Pork shoulder is extremely forgiving.
4 kg = a little less than 9 pounds. I’d allow 10 hours for that, cooking at around 250ºF. That should help you decide if you want to let it cook overnight or just get up real early in the morning.
I’ve done pulled pork with a resting time, and I’ve pulled the meat as soon as it came off the grill. A resting time won’t hurt the meat, but there’s nothing like the bark you get straight off the grill, in my opinion. Overall, I try to avoid resting times for pulled pork.
Fill up your basket. The grill will shut down once you close your vents, so you won’t be wasting any charcoal.
Cook the pork shoulder on the main grate.
If I was using wood, I would scatter some pieces around where the fire is established. You won’t have to add more chunks.
If you want to cook some beef at the same time, go for it, as long as you want the same smoking good profile on the beef. The two pieces of meat will most likely finish at different times, however.
I don’t spritz or wrap. -
FWIW, any smalls that I have to deal with are small enough that they fall out of the bottom of the basket anyway. Adding additional stainless steel rods around the side probably won’t stop that from happening.
On the other hand, given the amount of heat that the basket encounters during a high temperature cook, if the additional stainless steel rods would help keep the basket from warping, that would be a good reason to add the additional rods.
-
I've been making my own rubs, using the approach that Aaron Franklin uses in this video:
Basically, he starts with a 50/50 mix of salt and coarse ground black pepper. That's his brisket rub.
To get fancy brisket rub, add a little garlic, onion, and/or chile powder.
For pork butt, add paprika for color, and a little dry mustard.
For pork ribs, add some more coarse ground black pepper.
For chicken, add some brown sugar.
I've found that for brisket and pork butt, aiming for 1/2 cup total when done works well. For two slabs of ribs or a whole chicken, 1/4 cup of rub is enough.
There are some modifications that I make. Instead of chile powder, I usually use ancho chile or chipotle, and I've used cayenne on occasion. I'll skip the additional black pepper for ribs, and I'll add in some brown sugar when making a rub for pork butt and ribs. Aaron Franklin leaves out the sugar for those rubs because of a concern for burning the sugar. I've not found that burning the sugar is an issue for me, but I do low and slow cooks at a lower temperature (200-225ºF) than he does (275ºF).
You'll probably make your own adjustments as well, but I think this is a terrific backbone for DIY rubs. And it is a lot cheaper to buy the individual spices than the premade blends, which tend to be heavy on the salt and sugar because those are the cheap ingredients.
-
What a nice grill, and set up! I’m also looking forward to seeing more pictures. You’re going to have so much fun cooking on your KK grill. And by the way:
Daenarys arrived today
Great choice for a name!
-
Welcome to the KK forum, Roger!
As far as the cover and side tables go, you do have to take off the side tables to put the cover on. They come off very easily, and hang on hooks that are on the side of the grill. Or you can just lean them against the house.
-
 1
1
-
-
Welcome! I’m so happy that there’s someone else who jumped into the deep end by getting a KK grill first. I did the same thing. Now I’m not the only crazy one around here anymore.
As far as a temperature controller goes, there’s no need to get one right away. Just use your new grill and learn how to control the temperature manually. After that you can decide whether a temperature control system is something that you want to get or not.
For me, I researched temperature controllers a fair bit while I waited for Smaug to arrive. It’s now been 16 months, and I haven’t felt the need to order one. I’m not saying don’t get one — I think that they are in the “nice to have†category of accessories.
By the way, I don’t know if you found this post I wrote on the burn-in process, but have a look: http://komodokamadoforum.com/topic/5951-don’t-sweat-the-burn-in-process-it’s-pretty-foolproof/ You really can’t mess this process up. If any one should have a messed up tile situation because of a less-than-optimal burn-in, it should be me.
-
Welcome, Mario!
I understand about being on the fence. It seems like a big commitment to get yourself a KK grill.
If you have any questions, feel free to post them here. But for what it's worth, I jumped in with both feet into the kamado world, and picked up a KK grill as my first ever kamado, and that was without any low and slow BBQ experience. I couldn't be happier.
-
Great looking chicken! I have to say, I’ve used the rotisserie function way more than I thought I would.
-
Here’s my tips for direct grilling.
1. You usually are looking to get your grill up as hot as possible as fast as possible. I’ve often said that having a kamado grill is like having a charcoal grill that’s as efficient as a gas grill. This is why. I start with a full basket of charcoal, lit it over a fairly wide area, and had the lid open with the bottom vents fully open, with the grate off. After five minutes, I flipped over the chunks in the top layer of the charcoal a bit in order to get the top surface to give off heat, put the grate in, closed the lid and opened the top vent as high as it would go. I'll hit 500-600ºF after a total time of 15 minutes, sometimes less.
I think that the moving the charcoal around after five minutes helps a lot, because it gets lit coals right at the top of the basket and distributes the fire more quickly than letting it burn on its own. (That’s also why I leave the grate off at first so I don’t have to maneuver a hot grate later to stir up the charcoal.) I’ve noticed in the past that if I’m going for a high temperature, and there’s large pieces of charcoal on the top that are burning only on the bottom side, the unlit portion of the charcoal is preventing heat from coming through. Flipping over those pieces did a lot to speed up the process.
I’ve noticed that when my thermometer hits 500ºF, the top surface of the charcoal will mainly be on fire, but the larger chunks will have a dark spot in the middle that isn’t actually burning. Here’s a picture from the Serious Eats website that shows what I mean.

This looks like a good charcoal fire, but it’s really not at full blast yet. You see those large pieces of charcoal in the middle that still look black? That’s charcoal that’s not burning. I think this acts as an insulator, blocking the fire underneath it, and preventing the temperature from rising higher. Turning those pieces over helps the temperature come up faster.
2. The vast majority of my direct grilling has been on the main grate. Things I’ve cooked on the lower grate include steak and scallops, although I’ll often cook steak on the main grate as well.3. I haven’t used the basket splitter too much for direct grilling. You could use the basket splitter to set up two zone cooking, but I tend to go with the “super hot and go†school of direct grilling, if that makes sense.
When doing a reverse sear, I’ll set Smaug at 250ºF or so with the deflector plate, and when I’m ready to do the sear, I’ll take the deflector plate out and let Smaug come up to searing temps.
Chinese New Year ribs and suckling pig
in Pork
Posted
Thanks for the info! I would have thought that it would have taken longer for your pig to cook at 300ºF. Shows what I know.