


wilburpan
-
Posts
781 -
Joined
-
Last visited
-
Days Won
28
Content Type
Profiles
Forums
Events
Posts posted by wilburpan
-
-
Right on!
You won’t regret this one bit. Guaranteed.
And olive pebble is the best.

P.S. Make sure Aashni gets to cook on it, too.
-
If fear of the unknown is ever a concern, remember that I jumped into a KK as my very first kamado grill of any sort. I haven’t regretted that leap of faith one bit.
And I’m someone that tends to get himself into a “paralysis by analysis†situation fairly regularly, so if I can make that leap, anyone can.
-
 1
1
-
-
Your prime rib looks terrific! Great job!
As long as the food turns out good, I don’t sweat the difference between medium rare and medium too much any more. Meat cooked to medium still comes out more juicy on a KK grill than meat cooked to medium on other grills, kamado or not.
And maybe you can turn your brother in law onto the idea of getting a KK of his own, perhaps by inviting him over for food more often, and let him have some more up close and personal time with your grill. -
What are your thoughts on separating point and flat.
I can’t claim to be a brisket expert, but one time I cooked an unexpectedly large 21 lb. brisket that turned out great. One thing I did during the trimming process was to trim out as much of the fat line between the point and flat as I could without actually separating the two pieces. I think that was one of the reasons that my brisket turned out as well as it did, since the brisket became much more even in thickness after removing that fat layer, and I didn’t have to render out that fat during the cook. In fact, I’ve read that some of that fat layer is more difficult to render.
All the details are here: http://komodokamadoforum.com/topic/5801-i’ve-climbed-the-mountain-21-lb-brisket/
-
1
-
-
Doesn’t the 10 day brining step make that pastrami instead of brisket?
Either way, looks fantastic!
-
Thank you all so much for the information. I do cook at high temps sometimes, usually pizza or for searing.
The information about venting is great, I really thought it was a bigger deal than it sounds like it is. I was interested to see if the tiles move around or pop, in a way, disfiguring the look! But I guess not!
I’ve had a tile or two pop during the venting process. I just pushed them back in place after I shut down the vents, and they settled in place. No big deal.
FWIW, based on the reports of people’s venting experiences, I don’t think there’s anyone who messed up that process more than I did, in that I found bubbles of unvented areas six months into using Smaug. For some reason, I never really checked the back of Smaug for bubbles, and during a high heat cook I found a large bubble on the back, below the spring mechanism for the hinge. I was worried that because I had used Smaug quite a bit over that 6 months, and I never relieved the pressure in this bubble. I could only assume that the bubble kept popping up with my high heat cooks, and I never noticed it. I was afraid that this bubble was permanent. I used a knife to cut a slit in the grout towards the bottom of the bubble, and liquid came out. Once I did that, over time this area calmed down as well.
The other piece of advice I like to pass on is not to be too concerned about helping the venting process by using an Exacto knife to cut a small slit to help the gas escape. I think I was a little too precious about that part, which I think is why it took me a while to have the bubbles settle down. If I hadn’t been so reluctant to help the process, the tiles would have settled down more quickly.
-
1
-
-
I let the prime rib stand while the grill was heating up to searing temperatures, but that was more for the grill than the prime rib. I used the searing rack for the searing part. We let the prime rib rest for a little while after the sear, but that was mainly while we got the table set and the kids settled.
The low and slow part for my cook was 6-1/2 hours. I think the prime rib was about 8 lbs. I was pushing the temp on the low and slow part at the end.
-
- how long should I leave it out of the fridge before roasting?
- seasoning recommendations
- deflector/no deflector
- dome cooking temps
- going for medium rare, what should the IT be when I pull it to let it rest in a cooler for a given length of time
-is searing an option even if the bones are tied on?
Basically, if this were your roast, and a rotisserie was not an option, how would you prepare and cook it on your KK?
I’d do a reverse sear for this cook.
- how long should I leave it out of the fridge before roasting?
1 hour, although I would say that the hour wait time is mainly so the salt in your rub has a chance to penetrate the meat and work its magic. I salted my rib roast the night before and let it sit in the fridge overnight.
- seasoning recommendations
After the salting step, I’d make a rub from black pepper, thyme, rosemary, cayenne, and minced garlic.
- deflector/no deflector
- dome cooking temps
200-225ºF, indirect to start
- going for medium rare, what should the IT be when I pull it to let it rest in a cooler for a given length of time
Stop the indirect cook at an IT of 120ºF. Take out the deflector, open up your vents, and sear until the outside gets to where you want it.
-is searing an option even if the bones are tied on?
Yes. The string won’t burn that quickly.
-
1
-
-
I have never seen an additional benefit to the roti for this cook, having done it both ways. If you want medium rare from crust to crust I would go with a 200-225 dome temp and do a reverse sear. I would pull at about 125ish and bring the KK up to 500+ temps (pull the stone so you are now direct) during the rest phase then sear for about 5-10 minutes and carve immediately. Alternatively you can do the sear in the oven which is logistically simpler. No additional rest is required after the reverse sear.
If you cook at 250 you will still need a sear to get a great crust. I also think you will have a rim of more done meat around the cap. Nothing wrong with this, but it is just the way it is. If you cook at more traditional temps like 325-350 you will get a nice crust without a sear required, but less even color across the roast. The Roti is a good option for cooks at this temp.
IMHO.....hope this helps!
Totally agree with this. Decide how you want your prime rib roast to look and/or whether you want to deal with maneuvering things around for a reverse sear, and then do the cook accordingly.
Either way, the one thing I would do is cut the bones off and tie them back on before starting the cook. (See this post for an example.) It will be much easier to carve the meat afterwards when you can just cut the string and pop the bones off rather than trying to maneuver around the bones or cut them off when the meat is hot from the cook.
-
I won't give you the double dog dare else you'll be like CC, back behind the woodshed getting some licks - LOL
I have a history of making the occasional poor judgement call. But not that poor.
-
One other thing to know if you're still wondering about casters on a big grill like the KK 32": even at a half ton, with four casters, each one has to support 250 lbs. It's not difficult to find high quality casters that can support twice that weight or more.
I have a KK 23â€, and can move it around on my back patio which is covered with pavers just fine, and I’m not a big guy at all.
-
That looks so good!
-
Yes, I did see that. I'm going to get one.
-
Great job on that cook, Bosco!
There’s a joke in here somewhere about how one can order a grill that goes back and forth across the ocean before it finally gets delivered, and you’re still doing a rotisserie cook sooner than if you waited for the Joetisserie.
Was there a reason you let your roast sit in the cooler for three hours, or was that just a function of when the roast hit your target temperature? And it looks like the cook was done direct over the charcoal without any sort of deflector, right?
-
After 45 minutes, ramped up to 375F for another 15 minutes. Done on the KK.
[snip]
Flavor was excellent, meat was nice and moist with a hint of the Chinese 5 spice powder, the skin was good, but not "perfect." Needed a bit more time on the KK and/or a bit higher temp at the end. But, overall, the best duck I've done yet!!
Great job on that duck, Tony!
Don’t be afraid to go higher on the temp at the end to get the skin where you want it. I went to 400ºF at the end, but this was a direct rotisserie cook, and I’m not sure whether you were cooking direct or indirect at the end of your cook. If it was indirect, you may want/need to go up higher than 400ºF.
When we were in Beijing, at the restaurant that served the best Peking Duck I think I will ever have, I got a brief look into their kitchen. They finished off the duck by hanging the whole duck in front of a wood fire in a brick oven, fairly close, and rotated it around to crisp up the skin. I’m sure that the temperature in that oven was pretty high for that step.
-
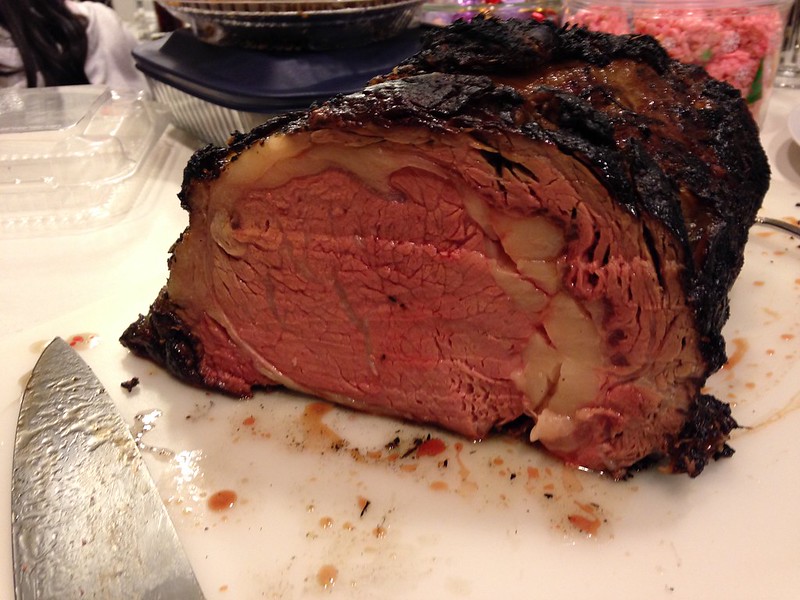
My prime rib cook from last year was a 8-9 lb. prime rib roast. I cooked it at 200ºF, and ramped up the temp to 250ºF at the end for a total of 6 hours of cooking. The target temp was 120ºF, and then I seared the outside. This prime rib had the bones on, which is important, as a boneless prime rib will cook faster.
All the details are here: http://komodokamadoforum.com/topic/5080-post-christmas-prime-rib-roast/
-
Merry Christmas and Happy New Year to you, too, Dennis, and everyone!
That’s awesome news.
-
1
-
-
Beeswax is a great food-safe finish. The only problem is that it will wear off after a while, so you’ll have to reapply it at some point. But it should work great.
As far as tung oil goes, the problem with how finishes are regulated is it’s entirely possible to describe a finishing product as “tung oil†when it has no tung oil in it at all. In addition, you can do things like label a finish as “Danish oil†and have it really be a varnish thinned with a solvent, without any oil.
Either way, once the finish has cured, it should be relatively safe for BBQ purposes as far as not contaminating your food. I wouldn’t use the table as a chopping board, but it would be fine to hold plates and trays.
-
Do you want the skin to turn out crispy, or does it not matter?
Edit: never mind, saw what you wrote about the cracklings.
Whatever your planned cooking start time is, I’d add in another hour for lighting the grill and letting it stabilize and heat soak. This was counterintuitive for me when I first started using Smaug, but it takes less time to heat up the grill for a hot and fast cook like steak than it does for a low and slow cook.
The other thing is the skin. The low and slow will leave the skin cooked, but not crispy. You’re going to have to do something about that if you want crispy skin. Either slice off the skin and cook it separately at the end, or take out your deflectors at the end, let the grill heat up to a higher temperature, and finish cooking the outside like a reverse sear. Again, you’re going to need to build in extra time for this.
-
That looks great!
How did you source your bison brisket? Did you go through a local butcher/meat supplier, or did you have to mail order it?
-
That shot of your eight pounds of wings was impressive.
As was how your ribs turned out!One thing to keep in mind for your next wing cook: if you plan on cooking indirect (that’s what I prefer as well), you need to make sure the wings on the outside are over your deflector, and not too close to the walls of the grill. Otherwise you’ll have a perimeter of overcooked wings. DAMHIKT.
-
I'm good on pulling it at 120* but forget the oven. Tent it and crank the KK up to roaring coals with the lower grate in position. Give it a minute or 2 sear on each side then serve. The hotter the coals the shorter the Sear time and the less final carry over.
I'm actually considering an initial sear on Prometheus followed by a Low-n-slow on Cassiopeia. Doing the Sear first with cold meat should give me even less cooking while searing compared to a reverse sear where your meat is at temp for the Sear.
Charles - Prometheus 16.5", Cassiopeia 19" TT
If your sear time is a minute or two, which was my searing time, I’d do the reverse sear. You’ll have better control over the outcome, and if the difference between the sear with cold meat and a sear with meat at 120ºF makes a meaningful impact on your prime rib, then you are really cooking a tenderloin instead (if you get my drift
).I’m not sure that reverse sears are great for all cooks. I’m not a big fan of reverse seared steaks, for example, because even at 1-1/2†thick, a steak is thin enough that you don’t have to worry about achieving a good result with direct grilling over an appropriately high flame. But for bigger pieces of meat, I think reverse sears are great. This also includes cooking a whole bird: roasting a whole bird at a lower temperature and finishing at a high temperature to crisp up the skin routinely gives me better results than high temps at the beginning, and then dropping down to a lower temperature. In my hands, this was true for oven cooking, and is true with Smaug.
Besides, if overcooking the outside part of a prime rib is the issue, I don’t see how I’m going to do much better than this. This was the result of a reverse sear.
-
EGGARY, I'd go for the 120F IT before taking it off the grill. I'm with your wife on this one.

Me too. 120ºF was my target temp for last year’s prime rib roast. Based on how it turned out, 120ºF will be my target temp until I die.
-
Great job, Bosco! I was waiting for you to try a pizza cook.
Here we go!!!
in Forum Members
Posted
P.P.S. Did you pick up any accessories? The rotisserie attachment is sweet.