


wilburpan
-
Posts
781 -
Joined
-
Last visited
-
Days Won
28
Content Type
Profiles
Forums
Events
Posts posted by wilburpan
-
-
I’m so happy your KK grills got to you safe and sound. If you haven’t opened them yet to get to the stuff packed inside, you’re still in for a real treat.
And there’s only one thing better than the anticipation and delivery of a new KK grill, and that’s putting them to use for cooking a fantastic meal.

-
Quoting, because I can’t think of a better way to say this.
-
Great looking dinner! I love seafood of any type.
Any reason you didn’t cook the shrimp right on the grates? It looks to me like they were large enough so that you wouldn’t have to worry about them falling through the bars of the grate.
-
Those ribs look terrific!
-
I'm following this with interest! The lack of ash so far is really impressive. I'm not sure what the upper and lower ash catchment is all about, but I'll find out once I help Bosco set up his new grills!
I’ve found that ash and other debris tends to collect in two areas in a KK grill. The obvious area is falling through the charcoal basket to the bottom of the grill. The other is around the little ledge around the perimeter of the charcoal basket. You can see this in the very first picture that Charles posted in this thread.
The other important thing is that this shows a clear advantage to the KK grill design as opposed to other ceramic grills. Because of the way the shield is designed, as long as ash isn’t piled up around the front area of the bottom of the grill, air will continue to flow through unobstructed. And because of the height of the shield, it’s going to take a lot of ash to make that sort of impact.
In a KJ/BGE type of kamado, air enters through the bottom vent, through a rectangular passage, and then up through the fire basket. The height of that rectangular passage isn’t very tall compared to the gap that the KK heat shield makes, and so would be more prone to clogging during a long cook, or if you’re not keeping up with clearing ash out the bottom of a KJ/BGE grill.
For me, I use an old 2†paint brush for sweeping the ash down and out the grill. Because the bristles of the brush are densely packed, not much ash escapes the brush, and I think it’s gentler on the inside surfaces of the grill. Not that a KK grill needs babying in that way, but it makes me feel better.
-
A little while ago I asked about whether cooking ribs on the lowest grate position was feasible or not. Yesterday was my younger boys birthday, and we did a big rib cook. Here’s what happened.
Mission: cook eight racks of baby back ribs without a rib rack. This was the biggest rib cook I’ve done so far. When I got back from the store, I realized how much area eight racks of baby backs covers. Luckily, it was a nice day out. Here’s my prep station.

The recipe was pretty much what I’ve done before. Aaron Franklin-style DIY rib rub, rub some olive oil on the ribs, and then put rub all over.
Now it was time to load up Smaug. I lit the charcoal, put the diffuser plate on the charcoal basket, and let Smaug settle out. He wanted to be at 210ºF yesterday. I put two racks on the searing grate. I should note that there’s enough room under the searing grate for the diffuser plate, but putting a drip pan under the searing grate would have been pretty tight. I didn’t use a drip pan for this cook.
Then three racks on the main grate.
And the last three racks on the upper grate.
I let the ribs go for about 6 hours, turning up the heat for the last hour to 250ºF. It was suggested before that I rotate the racks between the grates, but I didn’t do that. I used the bend test to check for doneness.
Dennis keeps complaining that I stopped posting money shots. That’s only because sunset comes quickly at this time of the year. So here’s a money shot with the flash on my phone. Now you know why I don’t like posting money shots taken after the sun goes down. 
And here are the ribs. These are the ribs from the main grate and the searing grate. The kids ate the ribs from the upper grate before I could get a picture under better light.

The ribs were great, as always. You could tell that the ribs on the searing grate were cooked a bit more than the ribs on the main and upper grates, which is what you might expect since they were closer to the fire, but they really weren’t cooked more by much. Basically, the ribs from the top two grates were just about perfect, and the ribs from the searing grate were at the fall-off-the-bone state. In the picture above, you can see that the rack on top of the platter broke in half as I tried to get it off the grate. That rack came from the searing grate.One thing I considered doing is placing the heavier racks on the searing grate to account for the searing grate being closer to the fire, but I forgot to do that when loading up Smaug. Based on this cook, I would think about doing that in the future, but that’s getting towards BBQ OCD territory.
In any case, I would consider this a success. Doing low and slow cooks on the searing grate still would be my last choice for a low and slow, but it’s good to know that it’s doable.
-
 1
1
-
-
FWIW, I’ve never roasted a whole bird of any sort directly in a pan, even in a conventional oven. I’ve always found some way to raise the bird off the bottom of the pan, whether it was with a roasting rack, on a bed of vegetables, or some improvised method (you can build some impressive structures with aluminum foil and chopsticks
).Likewise, the times I’ve cooked whole birds on Smaug, I’ve placed them on the main grate, with a drip pan underneath to catch drippings if needed.
Either way, I think getting the bottom of the bird exposed to the heated air gives you a better result, especially with how the skin on that part of the bird turns out. That’s one reason why rotisserie cooks with whole birds are so good.
Okay, back to the whisky talk.
-
Thanks for the input! We did another headcount of our guests, and I think I’ll try doing three on top, three on the main grate, and two on the bottom. If the two on the bottom don’t come out good, my family will eat them. The other six racks should be more than enough to serve our guests.
I am mainly doing this instead of the skewering thing because I am curious to see what is going to happen.
I also am going to place a thermometer on the low rack to see how much difference there is between the low rack and the dome thermometer at 250ºF. -
We’re having a bunch of people over this weekend. I’ve been asked to make ribs. I’m anticipating that I’ll need eight racks altogether.
I’ve piled six racks of ribs on the main and upper grate of Smaug, but there’s not enough room for an additional two racks. I won’t have time to go out to get a rib rack before this weekend.
Has anyone cooked ribs on the lower grate of a KK grill? I’ll be using the heat deflector, of course, and plan to set Smaug at around 225-250ºF.
-
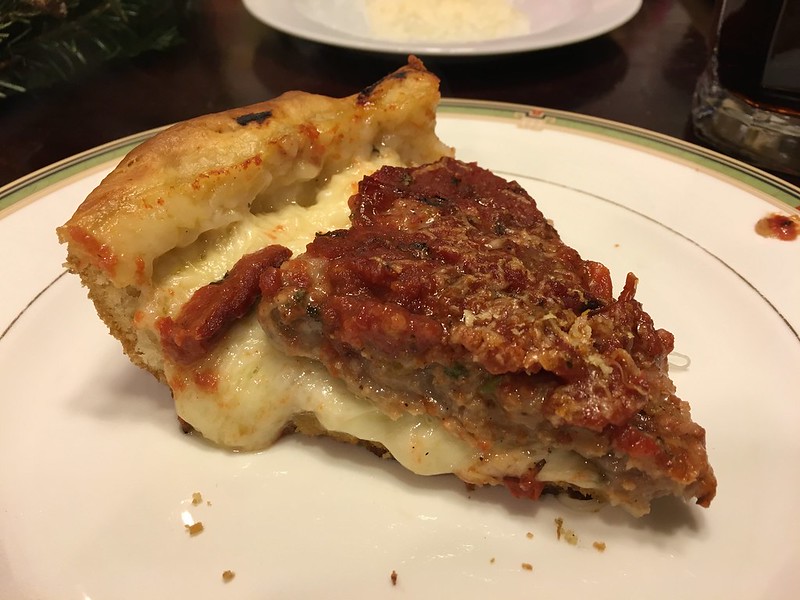
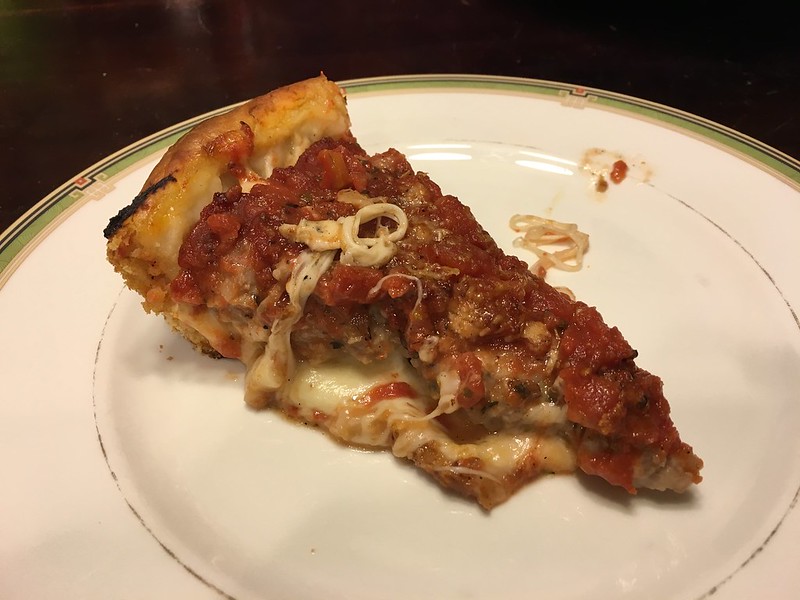
Great looking thick slice..
I can't seem to get the real money shot with the pie baked in the KK to load..
Must be my computer..
LOL
Blame the winter solstice.
-
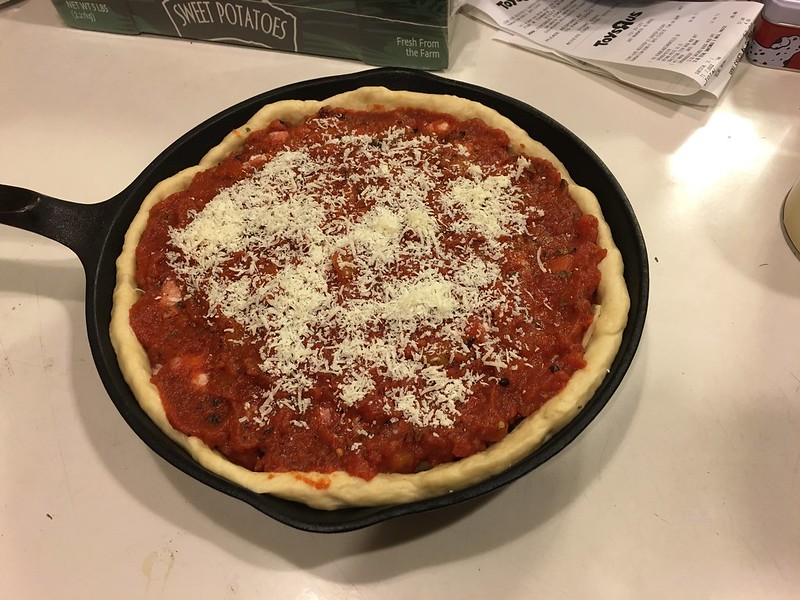
I made another Chicago style deep dish pizza this past weekend, using the same recipe that I had used before. I made two important changes this time.
First, I made sure I cooked the pizza at 450ºF, instead of 550ºF. Total cooking time was about 35 minutes.
Second, and I think this was the more significant change, when I let the dough rise, this time I heated my oven to 100ºF, put the dough in the oven, and then shut the oven off. The dough rose to a significantly higher volume than the last time.
Both changes paid off in the crust. It was much easier to spread out the crust in the pan. The outer crust was not as hard as it was last time, and overall there was a general increased lightness to the crust that was new.
At this point, I’m really close to the taste of Chicago style deep dish pizza that I grew up with. I’d like to get the crust to have a little more buttery flavor to it, so I may bump up the amount of corn oil in the dough recipe a little.In addition, Italian sausage here in New Jersey is not as flavorful as Italian sausage in Chicago. Italian sausage here is pretty bland. Weird, considering it’s not like there aren’t any Italians in New Jersey. It could be that Italian sausage recipes in Chicago are influenced by the Eastern European population there. Maybe that’s why pepperoni is the most popular topping here in NJ, whereas sausage is the most popular pizza topping in the Chicago area. I need to figure out what it is that is missing from the Italian sausage here. Maybe it’s fennel seed.
Here are some pictures. And thanks to everyone for their input on my last Chicago style deep dish pizza cook! It really helped.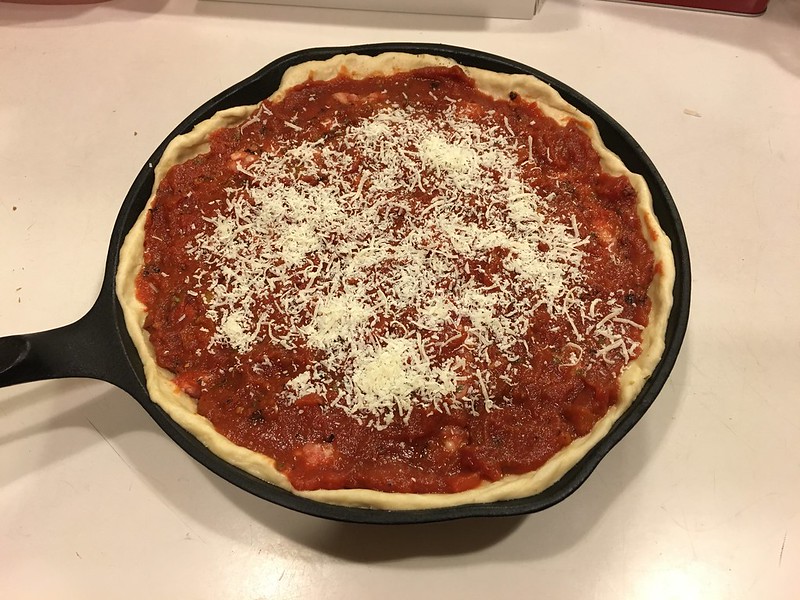
-
Looks terrific, as always!
A general question on making desserts in a kamado: I would assume that you would not want a smoky profile on your pie or cheesecake. Do you do anything to limit/get rid of the smoke for cooking dessert?
-
That’s a great story! So glad everyone had a great time.
-
Looks great!
Personally, I’m still looking forward to a carbon steel version.
-
I even called Ryan from the hospital to apologize for not being able to help uncrate! I really wish I could go, but I'm not allowed to drive until January, let alone life anything...this sucks!! Sorry bro.
Hospital? What happened? Hopefully you’re ok.
-
1
-
-
Looks good.
To darken, perhaps consider 2 things?
1) Reverse sear, take out of basket, insert lowest grill, and sear it a bit. Probably take off at a lower internal temp. though...
This is exactly what I would do.
Still, that rotisserie is a lot of fun, isn’t it?
-
Amazing cook, Bosco!
How did you make your au jus? Did you collect drippings from the rack of lamb as it cooked?
-
What I would do is to cook the gratin part way the day before, and stop after the 1 hour bake, before you crank the oven up to 400ºF. Stick it in the fridge. Take it with you, and use your in-laws’ oven to do the 10 minute bake at 400ºF.
That way, you’ll have a fresh out of the oven gratin, without tying up your in-laws’ oven for an hour.
-
You know, despite this

and this

this slow boat

digging it out from here

and this

the hardest part of Bosco’s grill journey may very well be getting a KK 23†and a KK 32†from the truck into his backyard.
-
I did use the baking stone, on the main grate, and put the pan directly on the baking stone.
-
Thanks for the help! I’ll keep those things in mind the next time I make a Chicago style deep dish pizza.
It strikes me that the cast iron pan probably saved the crust from burning with the elevated cooking temperature.
I should mention that I grew up in Chicago, so I have a pretty good idea as to how this should turn out.
-
That looks like a fabulous cook! Makes me sad that I’m the only one in our house that likes lamb.
-
Even though I’m in pediatrics, and Bosco is over 18, I’m going to put in a second medical vote for going to see someone NOW, especially if you think there’s a nerve issue.
And at this point, crazy glue won’t help. The time to get a laceration put back together is at the time it happened.
-
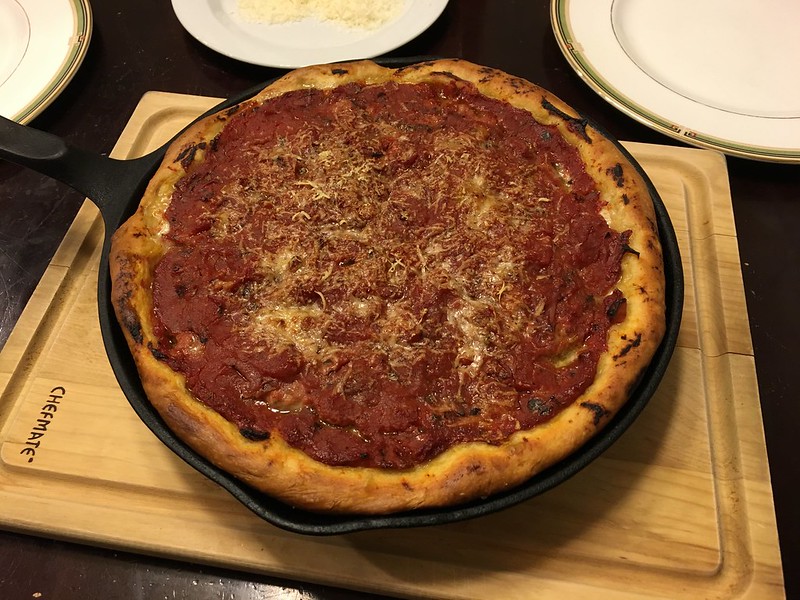
I’ve done a fair amount of cooking throughout my life, but the one area where I have no experience is baking that involves making a dough with yeast that needs to rise. Over the weekend I tried making a Chicago style deep dish pizza.
Here’s the before shot, before it went into Smaug.
Here’s the final product.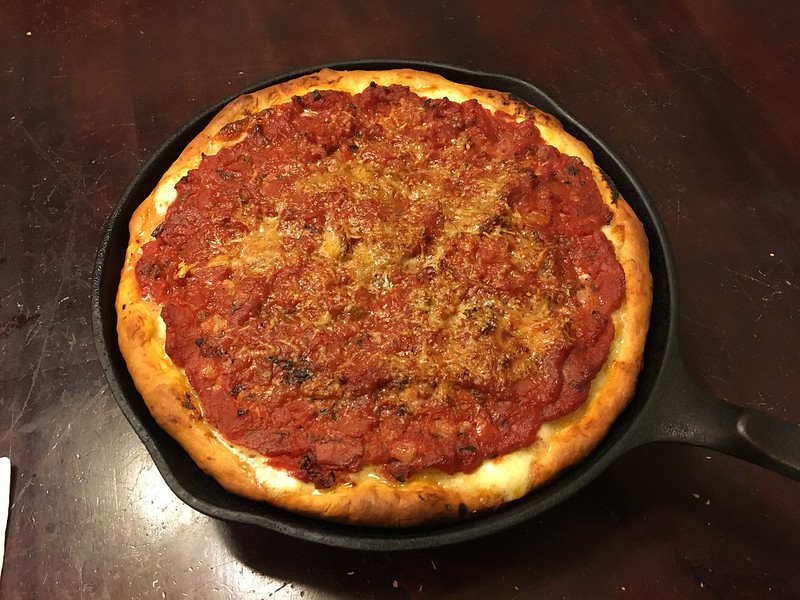
(Sorry, Dennis, no money shots of the grill, as it was too dark.)
I followed this recipe from RealDeepDish.com. For the dough, it’s a simple recipe. Combine lukewarm water, yeast, sugar, and salt. Add in all-purpose flour and corn oil. Knead until incorporated, then let rise for 1-2 hours.The filling turned out great. I had some issues with the crust, however. Ideally, the crust should be browned on the sides and bottom, and be relatively easy to cut through. The crust was nicely browned, but the outer crust turned out much harder than I would have liked. I really had to apply significant pressure with a knife to cut through it.
Here’s a list of things that I think went wrong.
1. I used a 10†cast iron pan for the cook, and the recipe said that it makes enough dough for a 12†pizza, and I still had trouble getting the dough to cover the bottom and sides pan.
2. When forming the crust in the pan, I put the dough in the middle and stretched it out across the bottom and up the sides of the pan. There was a spot on the bottom that thinned out to the point where it tore a hole. To fix this, I wadded up the dough back into a ball and started over.
3. Smaug got up to temp faster and higher than I expected, and I cooked the pizza at 550ºF instead of 450ºF like the recipe calls for. I put the pan on the baking stone on the main grate for this cook.
4. I’m not sure that the dough rose enough. I put the dough in a covered bowl for the rising part, and it was bigger after two hours, which is when I used it. The bowl sat out on my kitchen counter for this part, and the temperature in my kitchen was about 70ºF.
My guess that the problem was a combination of (1) the dough not rising enough, (2) I probably should not have I wadded up the dough to start the stretching process over, (3) using too much dough for the size pizza I was making, and (4) cooking at too high a temperature.
But like I said above, I have no experience with rising doughs. This is literally the second time I’ve used yeast and flour together, and the last time I used yeast was in the 1980’s. So I could use some help in figuring out what I need to change the next time I make this, as I realize I could be way off in what went wrong.
Thanks!
Now the real journey begins... My KK story
in Forum Members
Posted
That’s terrific news! Looking forward to your report on the delivery.