LK BBQ
-
Posts
92 -
Joined
-
Last visited
-
Days Won
1
Content Type
Profiles
Forums
Events
Everything posted by LK BBQ
-
Looking at your photo does bring me back to the delivery day - when you realize how solid, beautifully engineered, and beautiful it is. It becomes the most amazing thing you own. That is priceless.
-
She is adorable. Congrats!
-
All, I've noticed that the 19" side tables will not mount in the folded position if the accessory hooks or the rotisserie mount is on the grill. I would consider leaving the tables out, but then I can't cover it anymore. I am just that lazy that I'd prefer not to take the motor and rotisserie mount off everytime I cook. While I know it is recommended, I figured I could keep everything protected enough as long as ithe tables were closed and the KK was covered. A few weeks ago, I saw a post on this problem. Someone had bent some eyelet bolts to allow the side tables to mount further from the body of the KK - far enough to clear the rotisserie motor mounts Dennis had also created some metal brackets as a solution. I tried desperately to find that post, but couldn't. Does anyone know the thread I'm referring to and have the photos of how to bend the eyelet bolts or else Dennis's extending bracket? Is that bracket available to purchase? Many thanks in advance for your guidance!
-
Been a bit, but still struggling to get it hot for pizza
LK BBQ replied to ChiKing's topic in Forum Members
I had a similar situation. I have a 19", so my situation could be different. I could get the fire burning hotter without the stone. There were two theories - one is that the thermal mass of the stone is meaningful. The other is that the airflow is slowed down by the stone - air needs to move around the stone to get to the top instead of a smooth flow. I found that I could get the fire blazing without the stone first, and then added it later after the grill was already soaked with heat. I just needed to give the stone enough time to heat soak as well. Using bigger lumps of charcoal helped meaningfully as well. I don't think I've mastered this yet. -
Earlier in the thread, someone suggested 3D printing some parts. I am relatively new to 3D printing, but agree that plastic probably won't work on a hot grill. There is an option on some of the 3D printing services to print in metal - either stainless steel or a mix of stainless steel and bronze. The way it works is that the 3D printer uses metal dust mixed into some sort of a plastic. After the 3D print is made, the plastic binder is burned away in a furnace and the metal fuses together. I believe there is a bit of shrinkage that occurs I doubt it's as structurally strong as something that is properly cast, milled, or forged, but it is probably more than strong enough for this purpose. You can design something at home and prototype in PLA, and then order the final metal print somewhere else. If someone designs an adapter, please share your work with the forum! https://www.shapeways.com/materials/stainless-steel
-
All, I found a simple fix to a problem I was having. When I first got the KK, it created a beautiful seal. The first latching position would already make a pretty good seal, and I could feel the second latching position really pull it tight. Over the years, I had to push it to the second position to have it even feel closed at all, and I could see that there was even still a crack to leak air. I was going to mess around with replacing the silicone seals or replace/bend some of the metal parts in the latching system, and then I finally realized that you can simply loosen the two bolts on the lower part of the latch, shift the plate down, and tighten the bolts back up. Presto, the KK seals as tight as it did brand new. The plate had probably just shifted a bit over the years. I'm embarrassed it took me this long to figure it out. Just in case this helps anyone else out there, I thought I'd post this. I recall a thread about this long ago, but figured it might be a helpful solution for someone else too!
-
Hey all, one more quick question. Do you leave the rotisserie motor mounted or do you remove it after each cook? Just wondering what most people are doing. While the OneGrill motor seems to be designed to handle elements, I wasn't sure that leaving it out would be a good idea. Thanks in advance!
-
All, thanks for your very helpful tips and advice. I realized that the spit has a threaded hole on both sides, and the blunt tip that screws onto the end can go deeper on the other side than the one it was originally shipped in. Those few millimeters of difference let it mount comfortably. It also meant removing the little spacer ring that went around the threaded screw side of the blunt tip. All set to go! It is fun to have the KK's capabilities grow over time as I reach deeper into pizza cooks, rotisserie, and more.
-
I finally got a rotisserie spit for my 19" KK - very excited to fire up some rotisserie meals! I have some rotisserie chickens on my mind, and then ultimately the holy grail will be a porchetta! I have a few newbie questions. First is that the spit seems just a little too long to fit into the grill. If I put the spring loaded side in first, the other side of the spit scrapes against the side of the KK. Do I need to cut the spit down, or do I just need to push harder on the spit and the spring loaded side? I wanted to check before I made an irrecoverable mistake or broke something. Second question is whether people use direct or indirect heat when cooking with the rotisserie. Any guidance is appreciated! Many thanks in advance!
-
I would describe it as a garden variety alien portal opening up before the invasion begins.
-
All, I found this video and recipe explaining Tony G's approach. The recipe is here. https://www.winemag.com/recipe/tony-gemignanis-pizza-napoletana/
-
I ordered this one from Amazon: https://www.amazon.com/dp/B00JAFTN8G/ref=dp_cerb_1 I had more constraints. In a 19" KK, I had less room to use a square or rectangular shaped steel. This one was the right size, I think. It is only 1/4" thick, but I realized that the price is good and that I could simply stack two of them together if I wanted more heat capacity. It is actually easier to lift, move, and store 2 lighter ones stacked together than have 1 heavy one. For that reason, I'd recommend 1/4" steels.
-
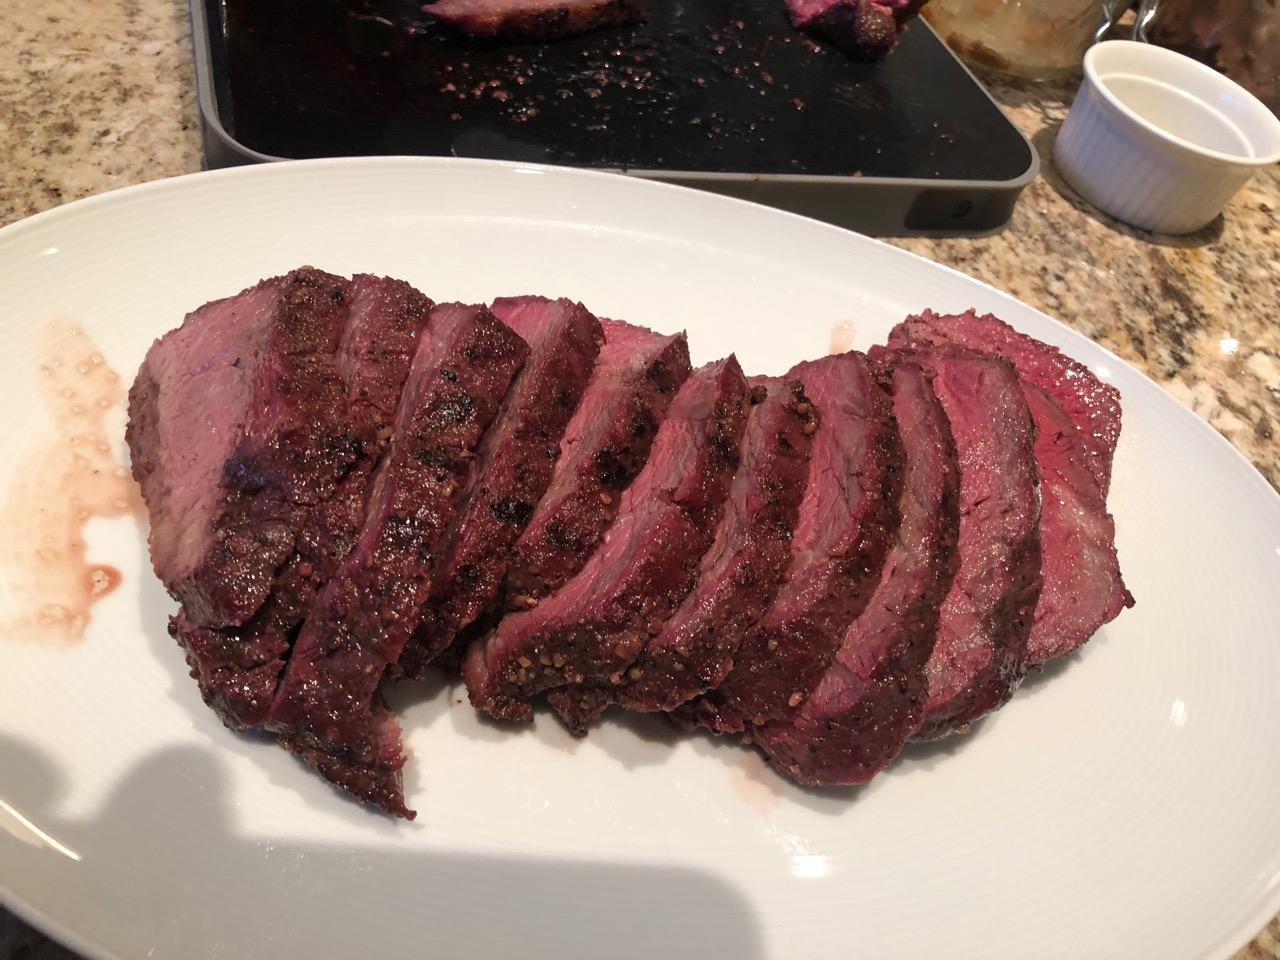
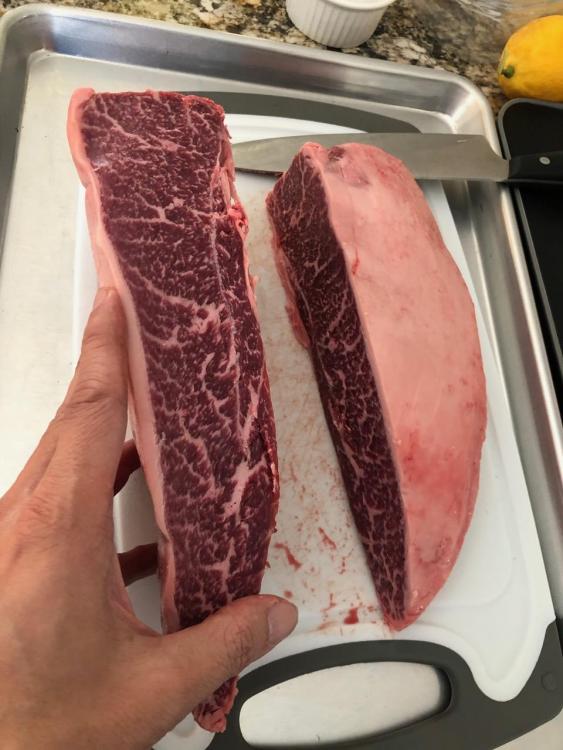
I posted this photo recently of my wagyu picanha. I believe it is an Australian wagyu, so perhaps it may be accessible in Indonesia. This one certainly had marbling. It is actually my new favorite beef cut. I agree the flavor is like the tri-tip, but it is slightly more tender and has less connective tissue. This gives it a beautiful consistent texture. It isn't as fatty as the ribeyes, but it has deep beef flavor. I had to ask the butcher to trim the fat cap to 1/4", however. The butcher was clearly distressed having to cut it off. He reminded me that people buy it because of the fat cap. If only my wife and kids loved fatty meat the way I do! Your cook is far more beautiful than mine. Clear signs of a pro vs. a novice.

-
Thanks for the feedback. I like the forward sear too, but haven't figured out how to cool the KK fast enough after firing it up hot. I'm not doing sous vide at this point. I think of the KK as a sort of air-sous-vide with its temperature control. I figure that the reason to have the KK is to take advantage of the temperature control - not just to use it for a finishing sear.
-
You are absolutely right - but Tony G's pizza is perfection. Try his restaurant Tony's Pizza Napoletana in San Francisco. Either sit in the restaurant, or else order from the restaurant menu from the takeout side (not the takeout menu). I don't have the skills, but I can't help but try to fly as close to the sun as I can. I still think that the airflow with the pizza stone is part of the problem, but of course I don't know for sure. Will try a few more ways to handle this, and I may also jury rig a fan to stoke the fire.
-
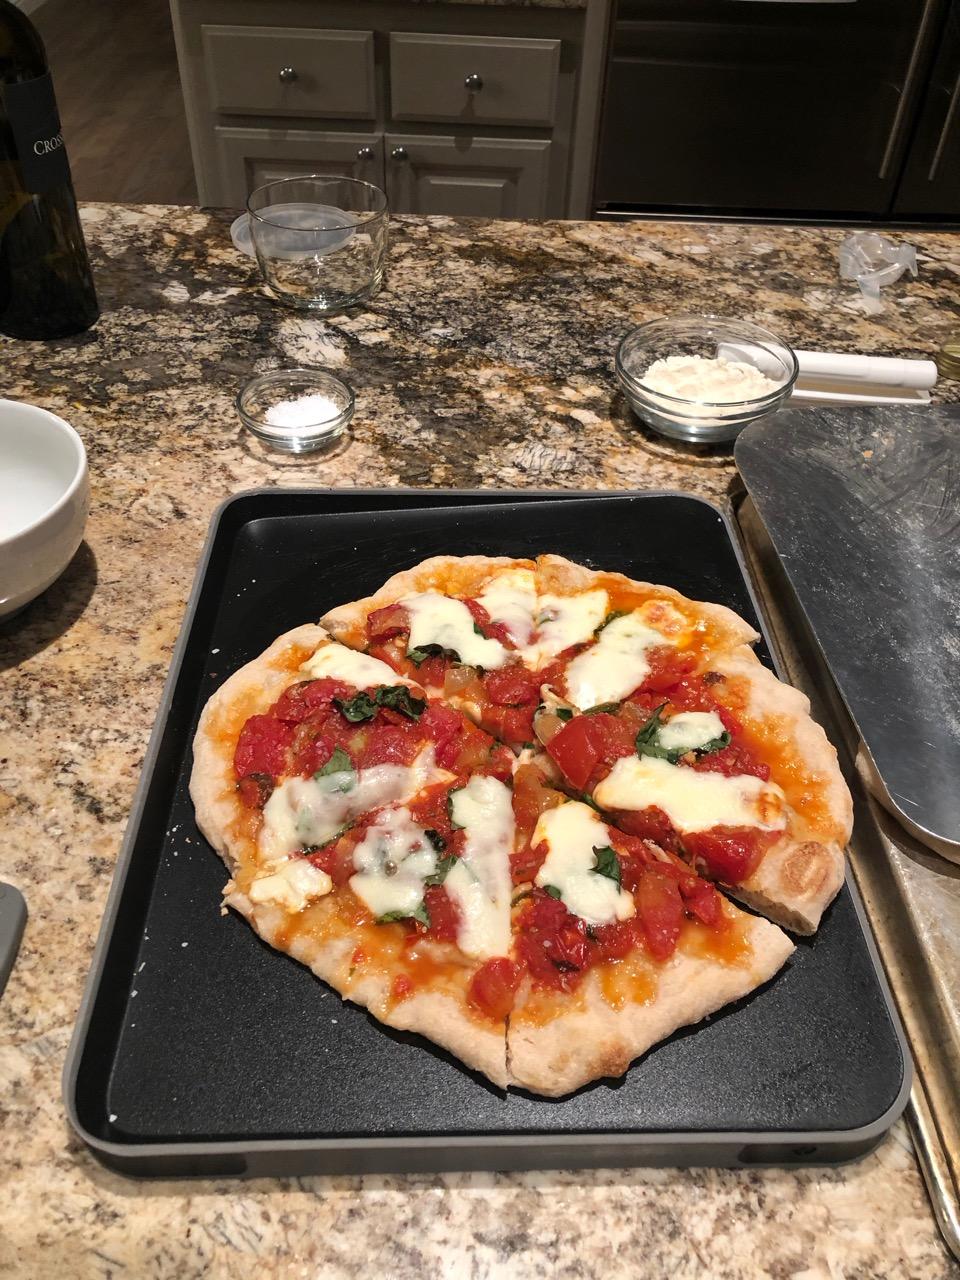
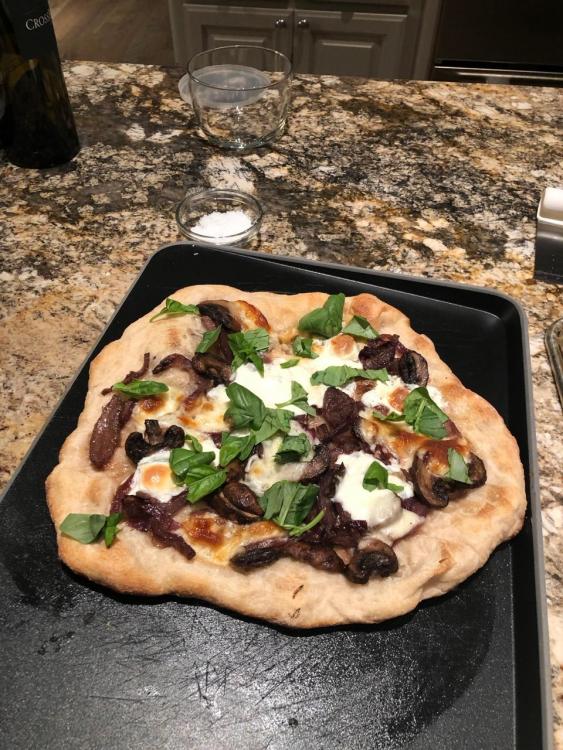
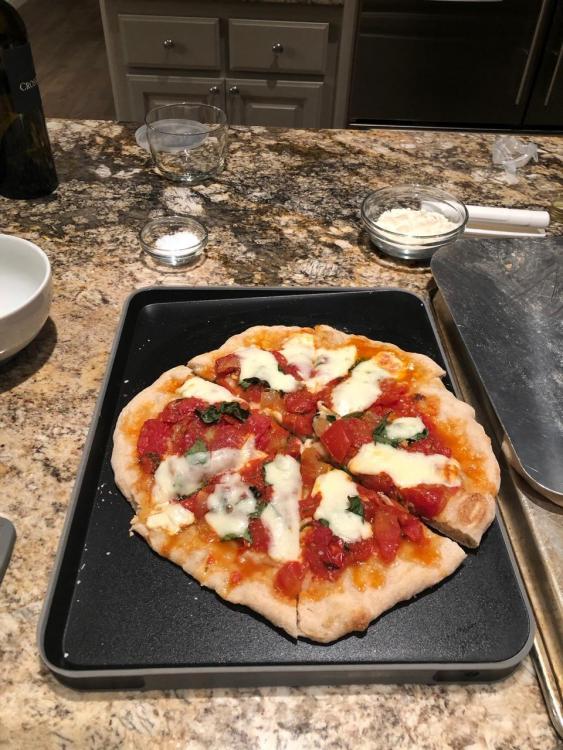
Last weekend, I decided to use the extra time at home from sheltering-in-place to make pizza in the slow Napoletana style. I followed Tony G's method for his world championship pizza to make the dough. The dough was made from zero zero flour, yeast, sea salt, and water only. It took 3 days of total prep to make the starter and let the dough rise. It was the first time I've made a dough like that. After it was done, it was visible what Tony G is striving for. Long gluten strands and complex channels of air in the dough. I tossed the dough carefully, trying stretch the dough but not to compress it. My KK is a 19" Li'l Isla, and here is where I ran into some problems. I wanted to put my new pizza steel on the main grate and then put the pizza stone on the upper rack. Tony G recommends that setup to cook the pizza on steel and then toast the bottom of the dough on the upper stone for a moment - just enough to crisp the bottom enough for the dough to hold its own weight. As it winds up, the handle of the swinging charcoal opening on the main grate would have prevented me from being able to pick the pizza off of the steel on the main grate using my peel. To improvise, I stacked the heat deflector on the main grate withe the pizza stone on top. This lifted the surface high enough so that the pizza peel wouldn't be impeded. Then I used the steel on the upper rack. I baked the dough on the upper rack and then slipped it into the stone below to finish it. There was barely enough room to slide the pizza in. For KK buyers who are interested in making pizza, I recommend getting the 23" KK or larger - it would just give a bit more comfortable room to work with the pizza. I did also have problem still in getting the temperatures hot enough. I had initially warmed the KK to 550 degrees, but when I put the stone and steel in the KK, I couldn't raise the temperature above 450 - despite trying to give it ample time to heat soak the stones. I topped one pizza as a Margherita, and the other as a white pizza with mushrooms, Red Onions, salad greens, and a touch of olive oil. Despite some struggles, it all tasted great!
-
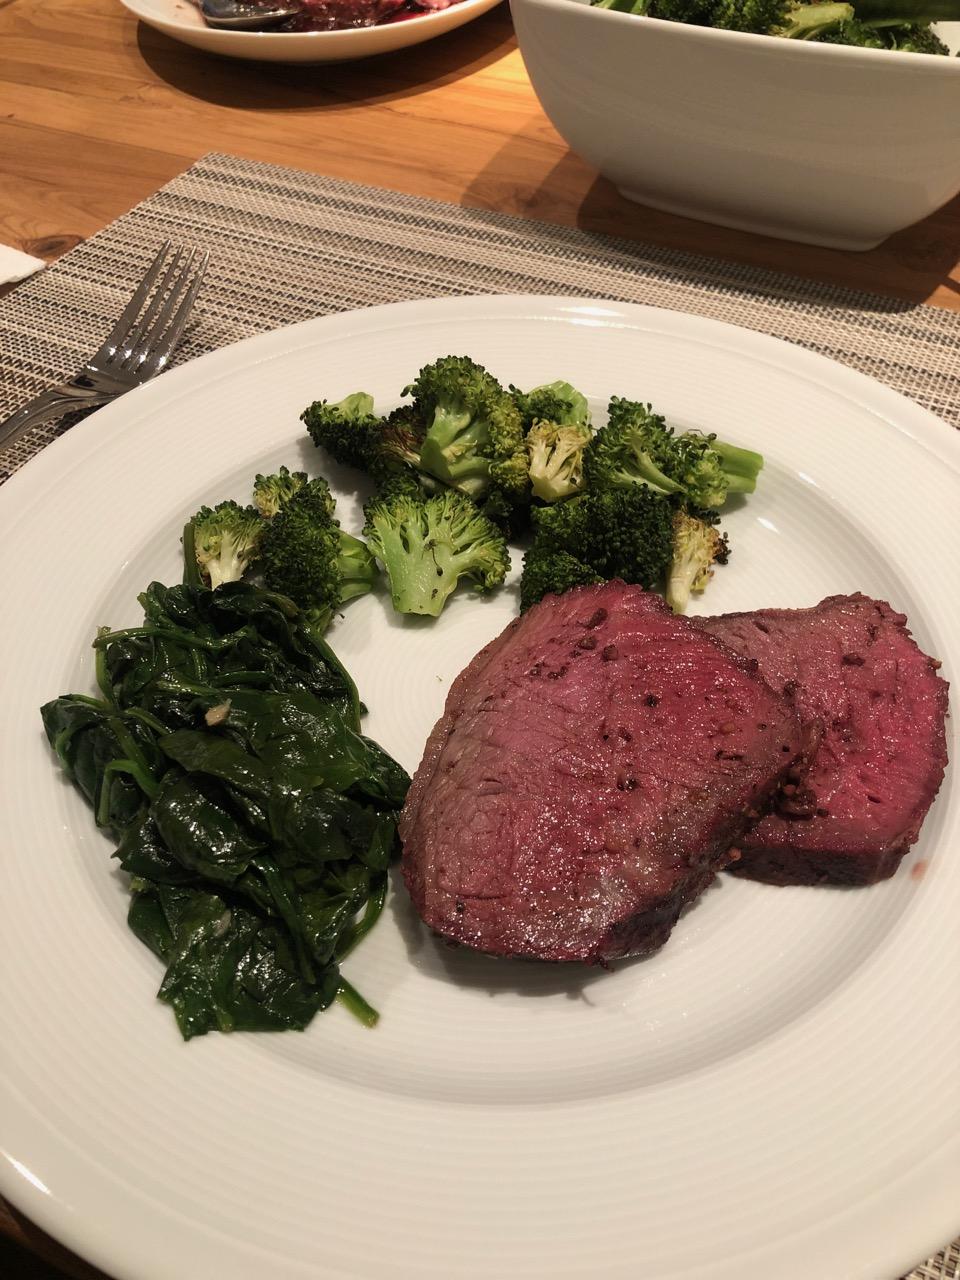
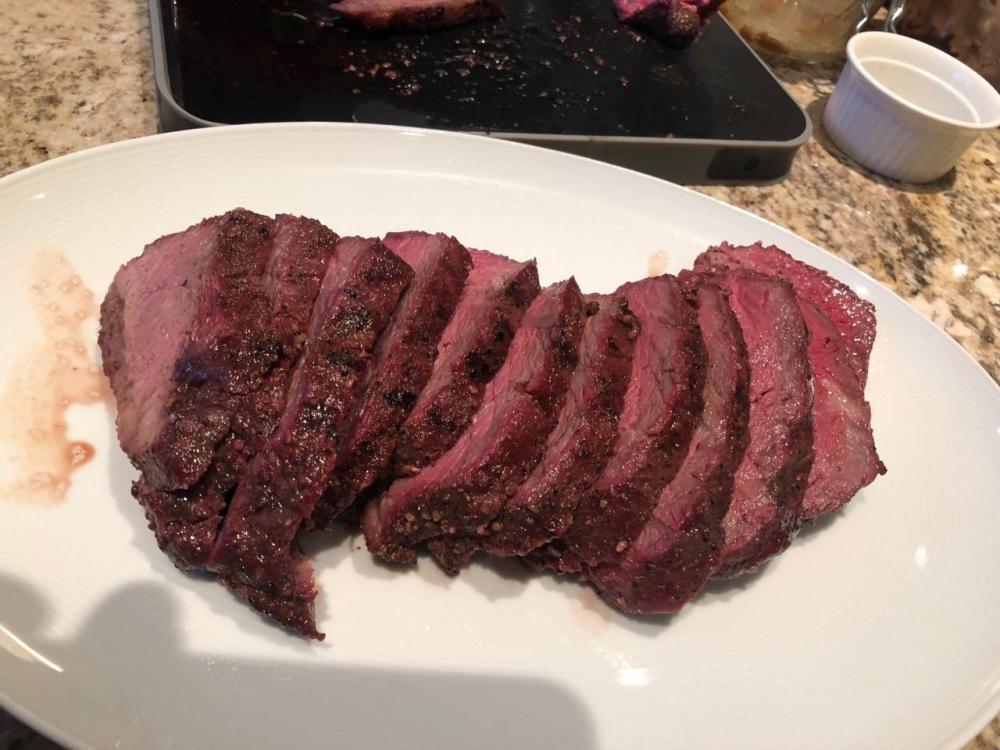
Here's my weekend cook. Wagyu Sirloin Cap. Look at the marbling on that. I split the cap, giving 1/2 to my neighbor. I seasoned it with salt, pepper, and garlic, and also added a light touch of rub that had some sugar and chili. I let that sit in the fridge for a few hours, and then cooked it at ~250 with a lump of hickory to an internal temperature of 120. I brought up the KK fire and seared it. I probably could have used a bit more sear, but I was worried by the smoke and smell from the burning grease. I thought perhaps I was burning the steak. It was absolutely delicious. My wife and kids wolfed it down in no time. I'm still learning my way through KK technique, but this is pretty straightforward!

-
Do you have good suggestions on how to transfer charcoal into the basket without inhaling a plume of black dust? Right now I put it in from the bag, straight into the KK. Also, any ideas on how to clean the ash without inhaling a plume of white dust? I’m afraid that I’m going to develop lung problems at the rate I’m going
-
Oh yeah - back to my main question - would a BBQ guru type blower help push the air enough to fix the circulation issues?
-
Thanks for the suggestions. I was thinking that the 19" grill has less room for the air to flow around the pizza stone or drip tray than it would around the 23" or larger KK. I'm still learning my way through all of this, though - so I may be wrong about this. Any other suggestions from 19" KK pizza chefs?
-
True, but the fire has no problem getting blazing hot without the stone or tray. It is only with the stone/tray in place that it doesn't get as quite as hot. The drip tray is only 13.5", so I think a pizza steel would need to be relatively small diameter. The best option I have found so far is a pizzacraft baking steel with 14" diameter.
-
I am considering attaching a metal bowl to the underside of the main grate. I was thinking that perhaps that would provide the aerodynamic features that directs the air around the stone/tray and keeps the airflow streaming around the it. Just a crazy theory.
-
I have a 19" Li'l Isla and I love it. It's been a joy to cook with. There's one reason (other than size) why the 19" may be at a disadvantage to the 23" and bigger KK's - airflow. If I put the drip tray or pizza stone into the grill, it gets much harder for me to bring them temperature up to blistering pizza temps. I will be taking DL's advice to get a pizza steel. My question is whether the temperature controlled blowers out there would help. They are primarily designed around facilitating low and slow, but can they blow hard to increase the airflow for higher temps? Thanks for your advice on this!
-
My guess is that the pizza stone takes up a larger proportion of the 19" than it would on a 23". Also, by forcing the air around the outside of the stone, it slows down the overall airflow. Finally, it's possible that by putting it on the upper rack, it is an even tighter fit at the top of the dome. These are just my theories, as I'm still new to the pizza game.
-
I've noticed that when I use the Pizza Stone in my 19" KK TT, it takes a very long time to heat up. The grill can normally get to 500 degrees quite quickly, but with the pizza stone it struggles to get there. Do you think it is because the pizza stone restricts the air flow or is it just the thermal mass? I suspected the former, as the baking stone takes much of the air flow away.