LK BBQ
Owners-
Posts
92 -
Joined
-
Last visited
-
Days Won
1
Content Type
Profiles
Forums
Events
Everything posted by LK BBQ
-
I have a 19" KK TT. I recall that there used to be folding tables as opposed to the rod and tube tables. Are these still made and what are the advantages/disadvantages of each? Thanks!
-
They weren't so detailed about the science on this - and I didn't read it too closely. I think they seemed to be implying that an hourglass shape is an ideal Kamado shape. The KK has that to some degree with the firebox. I'm not sure if that's what they were trying to accomplish or not. https://www.engadget.com/2019/10/25/harvard-barbecue-desora-kamado-joe-cinder-grills/?utm_campaign=homepage&utm_medium=internal&utm_source=dl
- 1 reply
-
- 3
-

-

-
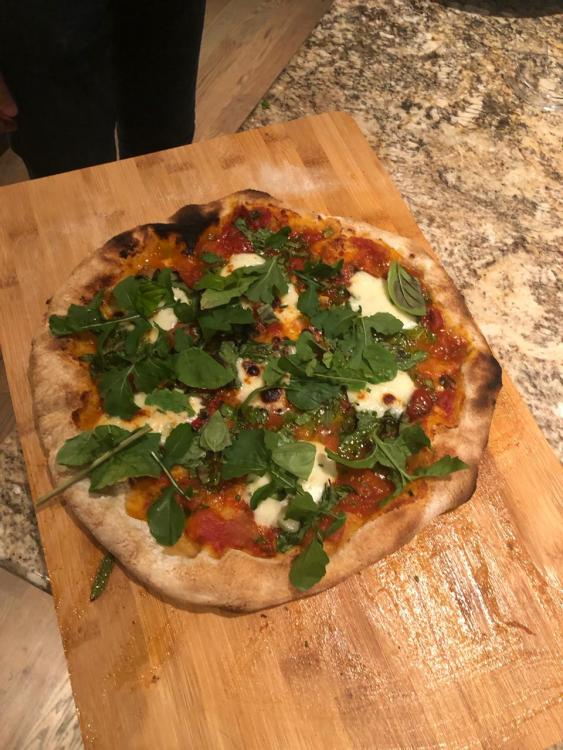
This is my first full pizza cook. I've done some test cooks before, with generally shaky results. I finally felt prepared to do it with guests. I made 5 Neopolitan style pizzas. I kept it very simple, with a home-made sauce (from garden and farmer's market tomatoes), fior di latte, and fresh basil. I topped some of the pizzas with arugula. The basil and Arugula were also from the garden. I was loosely following the protocols of Tony G's Pizza Bible. The pizzas turned out great. I cooked the pizzas at ranges from 500-650. The ones in the 600 range were better than the 500 degree ones. The dough puffed up like an Indian naan. I wish I had taken a KK money shot, but it took intense concentration to keep the production of 5 pizzas going!
-
Thanks. One other thought - as a low and slow cooker, it does have some advantages over charcoal. First, is that I could keep the airflow to near zero - with the dampers closed. If you think the KK generally keeps food moist, this setup was even better in this respect. The second, is that I could control smoke 100% by adding and removing the smoking box. Finally, to the degree that using charcoal has some other health implications, this does not use combustion at all. If people think this is something useful, the parts probably cost less than $100-150 combined, and the PID controller is in the $200 range. I probably spent thousands altogether trying different parts and also hiring fabricators (for versions that didn't ultimately make the cut). After owning a KK for many years, I am now learning charcoal cooking from scratch!
-
Final note: As much as I wanted to deliver to Dennis a working electrical product to share with the community, I just ran out of time to take this to the next level. I had a very busy job and kids to raise. Over the course of this project, I had to consult with electricians, electrical distributors, ceramic specialists, heating element technical sales, industrial designers, and even a master welder. Some of it was overkill, but I wanted to do this safely. As I started to understand the complexity of getting a heating element to heat up that much thermal mass, I wasn't sure if this would be a practical thing to build. Dennis would certainly have the fabrication capability to make a product that could be packaged with the PID controller. I just don't know if enough people would be able to use it. It would only be practical for low and slow cooks at household current. It could do a very good job at that, though. The electrical element could also be used as a charcoal starter for the non-condo crowd. Thanks very much to Dennis for his extra efforts to make this experiment possible. Dennis, if you want to take this further, I'd be happy to share information. I hope this was helpful!
-
Here is the grill in operation. So, after all is said and done, would I recommend this? First of all, I would wait until someone builds a fully tested commercial product. This was incredibly difficult to build as a hobbyist. I lacked the machine tools to fabricate it the way I would have liked to. I made some beautiful steaks, pork shoulders, and chickens with this. It was easy to start (flipping a switch) and gave me perfect cooking control. It was slow to heat, however, and it was hard to do a reverse sear as the time to get above 500 degrees was a long wait. Most homes in the US would not have convenient access to the amount of power I had available. You would need an electrician to provide a dryer (or even higher amp) circuit. Finally, if you are going electric to fit with condo rules, keep in mind that the weight of a standard KK is more than most decks would be designed for. I was able to make it work because I was using a smaller KK without a firebox - and my deck is fully supported by steel beam structures - it is not an overhanging balcony. Now that I have moved elsewhere, I am back to charcoal like everyone else. Maybe I'll break out the electrical gear again sometime for some easy low and slow cooks. I doubt I'll try to use it at high current again - I could probably do a hybrid charcoal/electrical cook to accomplish higher heat cooks. I hope this helps!
-
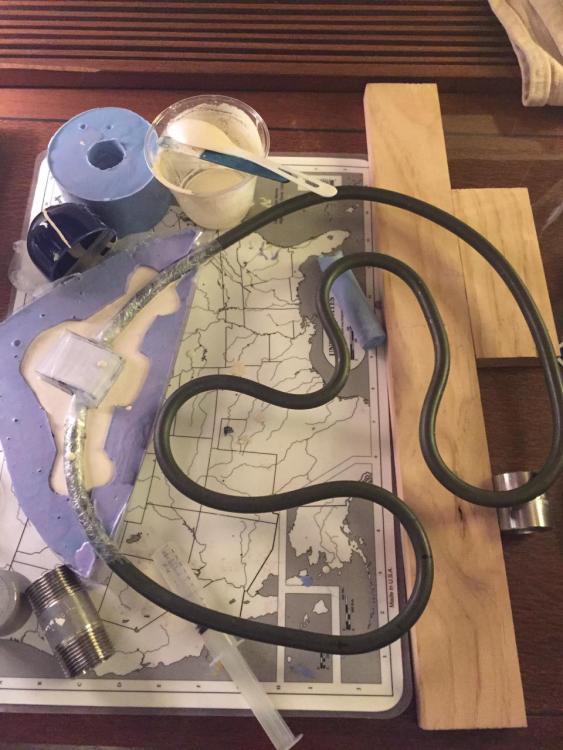
** Note ** I do not recommend that anyone try this. These designs worked for me, but your results could be very different. It involved using high electrical current which would be very dangerous if not handled safely. Please do not attempt this unless you are very secure in your knowledge of all of the electrical elements and materials involved. I do not want or accept any legal or moral liability. If anyone has any concerns about this information being shared, I'd be happy for these materials to be removed. I'm posting this in the hopes someone with the right skills could create a safe, legal, and UL approved product. Everyone else should not attempt this. Using non-UL approved products may void your home insurance and also may simply be dangerous. ------------------------- Here are a few photos to show you the design of the electric heating element. I created this design to allow a single length of heating element to distribute the heat as evenly as possible. There are limits to the bend radius of Incolloy heating elements, so it made it hard to have a simple back and forth design. This design worked pretty well. The paper drawing was my basic design template , and I have a tape measure to show scale. This was designed to be able to fit at the bottom of a 19" KK. This design was for a 3500W heating element which was on a 220v / 30A circuit. Again, I was being very conservative to keep a cushion to max current. By running both elements together, I was able to get about 5000W of power. The elements ran from power from different electrical panels to avoid overloading. I actually once got the KK up to 1000 degrees, although it took a very long time to get there. The 2nd photo shows my effort to create a ceramic cast part to hold the heating element steady within the KK from the Guru port. Using Ceramic casting proved to be difficult using my limited home tools. Therefore I eventually used stainless steel plumbing parts which I potted with high resistance, high capacitance, and high thermal resistance ceramic. This did a good job of protecting the electrical wiring from heat and held the elements in place. The final picture shows version 1.0 of the heating element attached to the top port and version 2.0 attached to the bottom port. This setup allowed me to have a heating element right under the main grill for direct high heat, and one underneath the fire basket (I didn't actually use the firebox or fire basket) for indirect low-and-slow cooks. If I were to build a version 3.0 heating element, I would have tried to use a longer heating element and a higher wattage. Note that in order to use this, I used ceramic electric blocks rated for very high temperatures and very high amperages - far beyond my actual usage. I also used electrical connectors and electrical wire rated similarly. For example, I think the wire was 10AWG wire rated for 1000 degrees celsius. I sourced these on Amazon, Ebay, and AliExpress. I also used some Aremco ceramic potting and casting materials. I don't remember for sure, but I think I tried Zirconium Oxide ceramic and later Silicon Dioxide. I think the Zirconium Oxide was preferred b/c it was stronger and had great thermal and electrical properties. I believe it is the same ceramic that is used for teeth fillings and crowns. I used 10 AWG outdoor rated wiring, and connected it with an Auber Instruments thermocouple based PID controller, which was rated for up to 900 degrees. It worked beautifully and I could control the smoker temperature to within 1 degree. The only problem I experienced with it was that it didn't handle opening the lid well. It would get confused and turn off the power to be safe. The PID controller flickers the heating element to bring the heat up gradually to the target temperature on a sine curve - which helps to avoid overshooting the temperature.
-
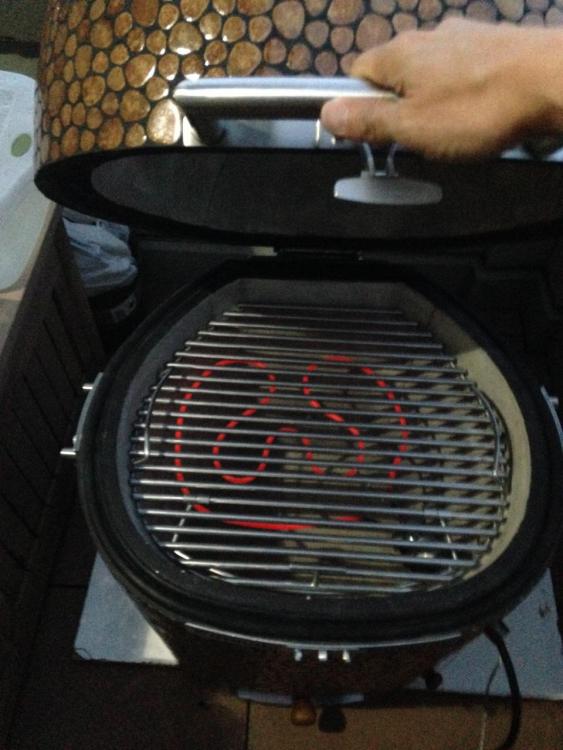
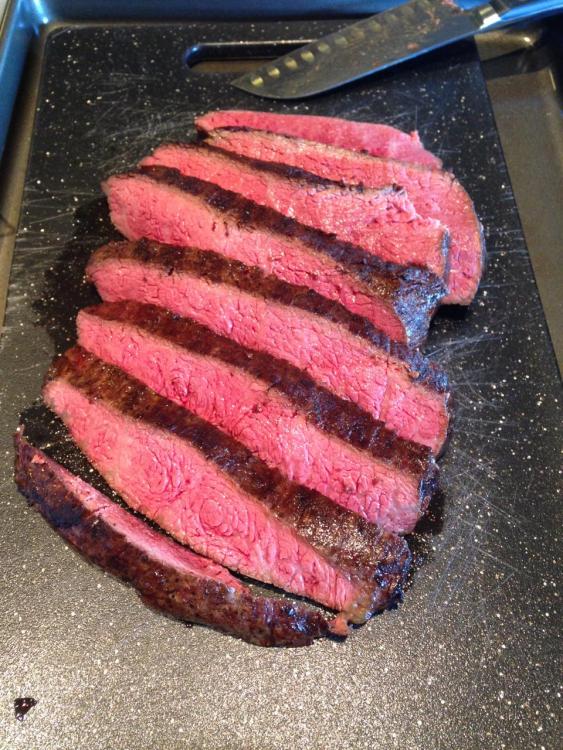
OK, I was finally able to dig through my photos and found some that will give you a pretty good idea of the setup. I'll post them in a series here. First, here are some photos of version 1.0 of the electric grill. It worked on 110v / 15A. I think I used a heating element in the 1200W range to make sure I kept a cushion on the maximum rating. It worked and was great for smoking. It could get in the 200-250 degree range in about 30-60 minutes if I remember correctly. These photos show: 1) The first firing of what I believe to be the first ever electric KK. Dennis may know better. 2) Proof of the first time it hit 400 degrees. It took a long time to get there. Maybe 4 hours or more? A 110v / 1200W heating element just doesn't have enough power to heat up all of that thermal mass. 3) The electric KK in action, cooking a Wagyu Culotte Cap with a smoking box 4) The finished steak. It was delicious. You can see that it cooked very evenly and had almost no grey ring. It was like cooking sous vide. I believe I needed to get the sear in a pan or the broiler.
-
Sorry for such a late reply - I hope you see this. I have done it and it works. If you can PM me your email, we can exchange the long details. Dennis helped me with this and I had told him I would share details. Short story is that Dennis made a KK with an extra blower port. One port was just below the main grill. The other was below the fire basket. I attached the heating element to the higher port for grilling, and the lower port for smoking. The key components were long food grade heating elements (I will look up the source), a PID controller from Auger Instruments, and high heat high amperage rated wire, connectors, and wiring blocks from eBay. You need to use 10 gauge wire at high current. I told Dennis I would share this with the KK community, but I ran into a few problems. The first is that I found out such a device would not be UL rated, which means it would possibly impact home insurance policies. Second is that a 110v outlet does not provide enough heat to grill. It can easily get a KK up to smoking temps in 220-250 range with an hour of heat soaking, but it just can’t get to 500 unless you leave it for 10+ hours. I happened to have a 220v 30A outlet, but I worried about sharing info and having people tinker with such high current. I actually experienced an appropriately spec rated part melting down in a shower of sparks. High voltage and amperage can work, but is a much higher risk for people handling it. The final issues were that most balconies aren’t structurally designed for that weight and that a key part to support the heating element in the KK was very difficult for me to fashion. I used stainless steel plumbing parts and ceramic potted insulation. I can explain the process, but someone with fabrication skills could do a much better job. I’ll post photos later. The smoker worked really well as a smoker, but not as well as a grill. I made 2 versions, and perhaps the third would have grilled better - at higher amperage. It was easy to start and I could control the temperature to 1 degree and control the smoke quite precisely by the amount of wood. It is a great way to smoke. The electric element could also probably be used as a charcoal starter. I didn’t have a chance to waterproof everything so I had to be careful about rain. Overall, I’m not sure if I’d recommend doing it, though. It was a great hobby but it was a big effort. As you can see, there are risks involved, and I don’t want to assume anyone else’s risks, legally or morally. That is why I haven’t posted more details. Perhaps someone else can take it to the next level to make UL approved and tested parts. Dennis, you already have the Stainless steel and ceramic skills to do it and I can share the info. Again, I do not recommend this to anyone who is not secure in their own knowledge of handling high current and high heat circuits safely!
-
I saw a previous thread where Pequod recommended the Pizza Bible after trying multiple dough recipes. I have the Pizza Bible and am about to try out some of its recipes on the KK for the first time. For those of you who don't know, the author is Tony Gemignani, who is a champion Pizza maker. He has won multiple dough throwing tournaments, but also won the coveted World Championship in Naples with his amazing Margherita Napoletana. If any of you pass through San Francisco, be sure to go to Tony's pizza. It is truly the finest pizza in the world. An American winning the Naples Pizza Championship was as unlikely and earth shaking as when American wines first won at blind tastings in France. http://tonyspizzanapoletana.com/about/ When you read his book, you will understand how he won. He is exacting and demanding. He recommends that people buy a kitchen scale sensitive to 0.1g. He prefers live yeast and also recommends specific flours and dissects the advantages of each. At his restaurant, he has a wood fired oven, a coal fired oven, and a gas fired oven for different temperatures. He recommends either two steels or stones in the oven - one to cook the pizza on and one to move it to briefly to finish the pizza - as the slight drop in temperature from cooking the pizza would result in a slightly less crisp bottom. He believes that pizza dough must be made slowly, as accelerating the yeast leads to bigger bubbles and less intricate dough structures. I am not a big Pizza eater myself, but Tony's is truly special. BTW, I do not know Tony and do not benefit from this recommendation! I have a question for all of you. Tony's Margherita Napoletana recipe has a version to cook at 500-600 degrees and also a version to cook at 900 degrees. Have any of you fired up to 900 degrees and do you have any tips? Any guidance on how long it takes to heat that high and any cautionary notes? I'm already wary of potentially not working fast enough and damaging the gaskets at such high heat and would love advice on whether to bring the temperature that high - or whether I should just do the lower temp recipe. Many thanks in advance!
-
One other question - to get a "raging fire" do you keep the KK wide open or do you just open up the vents all the way?
-
Thanks, all. This is very helpful. Believe it or not, the reason for at least some of these questions is that I was living for years in a condo that didn't allow charcoal - so with DL's help, I converted it into an electric KK. I recently moved and am now learning my way through charcoal. I would put the heating element right under the main grill, so I've never had to deal with the lower grill and even the firebox before. I've cooked a few chickens without a rotisserie and had delicious results. Spatchcocked and even just whole. The thing that hasn't worked for me is getting a crispy skin. It's always been a bit too moist in there. I've tried drying the chicken off and putting a little baking powder, but it didn't really do much. Will experiment with higher heat.
-
All, I've owned a KK 19" TT for years, but for various reasons I have a few very basic questions: 1. To grill a burger, would you cook it on the lower grate or on the main grate? It would be easier to do it on the main grate, but I'm wondering if you need to go to the lower grate to get a nice crusty sear. Also, how would you set your vents - or would you just let it burn wide open to get lots of direct heat? 2. What are the advantages of cooking a chicken on a rotisserie vs. just cooking it in the upper grate in the dome? Does Rotisserie make a dramatic difference? If so, why don't we cook more things using rotisserie such as a pork butt? 3. If you're cooking a pork butt on the kk, do you need to use a drip pan to avoid all of the fat and juice falling to the bottom and causing flare-ups? Just wondering what people do. Many thanks for your advice!
-
Here's a question. Would it be better to bring the temperature of the bird up slowly so that the minimum temperature of the bird reaches 145 degrees. As it gets there, adjust the grill temperature down to about 145 degrees so that no heat is gained or lost in the bird. Hold it there for 8+ minutes and then you can be sure the bacteria is killed. What am I missing in thinking about this approach?
-
I'm a bit confused. What did you use as the rotisserie basket? I don't see one listed on the 19" TT accessories in the KK on-line store. Is it just an out-of-stock or is that something you need to buy somewhere else? Thanks everyone for your help!
-
Actually, now that I'm looking at the on-line store - is there a rotisserie for the 19" KK? Or is there a 3rd party product? The 19" grill has the ports for the motor/axle. I've never looked closely at the rotisserie features and methods.
-
All, I have a 19" Tabletop model. Do you recommend the rotisserie with it? I was wondering if there is enough room after using all of the gear to rotate a decent sized bird or roast. Any thoughts or recommendations are appreciated!
-
I have one recommendation - if you choose to put a location, I would use Bali instead of Indonesia. Indonesia makes me think of Jakarta. Bali makes me think of more beautiful exotic images.
-
Wow. This is an AWESOME community. Way to go, wilburpan and Dennis!
-
I spotted this article about the Harvard Grill. I laughed to myself after reading it. All that work, and they've essentially built themselves a junky version of a KK! http://www.engadget.com/2015/05/08/harvard-bbq-smoker-brisket/
-
I have a Max Burton single burner, and plan to replace my cooktop with induction. A full kitchen induction cooktop (usually has more wattage than the hot plate burner) can actually cook faster than gas. It's safer, cleaner, and more efficient. The main thing I miss is the feel of picking your pan off the stove to swirl it as you cook - induction only works with the pan resting flat on the cooktop. Other than that, I think induction is superior. More temperature control, timers, faster, etc.
-
All, I am planning to cook Thanksgiving turkey in the KK this year. The only thing is, I have no idea what method or recipe to use. Since this is my first turkey in the KK, I asked the butcher to split the turkey in half. I am roasting one half in the oven and one half in the KK. This is a hedge against my own skills rather than the KK. Also, my kids don't like smokey flavors yet (they are still very young). A few questions: 1. Any favorite methods or recipes? Feel free to post links to past threads or outside recipes. While there are many in the forums, it is hard to tell which are especially favorites. 2. Anyone have success in cooking low and slow but obtaining a crispy skin? 3. Do you prefer cooking turkey on the KK for the low and slow moisture or the smoking flavors? Any and all recommendations are appreciated!
-
New Grill Shaped 304 Stainless Drip Pans
LK BBQ replied to DennisLinkletter's topic in KK Announcements
Dennis, just curious: What were the original round drip pans (a lightweight metal) made of? Is it appropriate to use that drip pan as a heat deflector? It's much easier to move around than the heavy one - if it will do the job. -
Are covers available for 19" High Caps?
-
I followed the story a bit as well on the Kamado fraud forum when I was researching what Kamado to buy. Two guys bought out Richard Johnson's company, and at least initially seemed to be trying to strike deals with the masses who had been defrauded. Their emails seemed to be genuine. Then the complaints on the forum about the new owners seemed to grow. Either the new owners got overwhelmed by the bad will of the POSK or else they may not have been as sincere as their initial emails indicated. Many people were even starting to question whether these people were real or whether they were just avatars for Richard Johnson. Soon, people just stopped discussing them altogether. I assumed they were effectively out of business. I have no idea what the truth is, but just decided that life is too short to even consider dealing with these issues. Doing business with unethical or incapable people is too much heartache. As for the quality of the grills, the consensus seemed to be that they were usable but had a half-life. They would arrive with some broken tiles and the tiles would eventually start falling off. Also, the cement used for the grill itself would start to crack, so people would need to buy cement repair kits to fix these cracks along the way. It was possible to do, but left some unhappy campers. It had stainless steel on it, but maybe not as much structural stainless. It was used more for specific parts. Therefore, the overall structural integrity of their Kamado was a bit weaker. I am an appreciative Komodo Kamado customer and love my grill.


.thumb.jpg.4afe73954caebee07c9f1f9778e0915f.jpg)
.thumb.jpg.483e0d4a475cfe5ee1befba653280a6c.jpg)

.thumb.jpg.c9a14e73b15f79be4f17e60cc6ce29c8.jpg)

.thumb.jpg.23e97542384ba932b5030f404a32a8bf.jpg)
.thumb.jpg.fe1acbd7588f028e4fc9e8db5d81e1e5.jpg)
