

.GIF.0c507fdd0aaa5c1cae84b6c43af405e7.GIF)
tony b
-
Posts
12,548 -
Joined
-
Last visited
-
Days Won
525
Content Type
Profiles
Forums
Events
Everything posted by tony b
-
I'm more in danger of ending up looking like Orson Welles! And, I will drink wine before its time - often!
-
.thumb.GIF.006d23b9323146d2dd9055f4e195bc2a.GIF)
New Grill Shaped 304 Stainless Drip Pans
tony b replied to DennisLinkletter's topic in KK Announcements
Gave me an inspiration - heat deflector on lower grill, with the KK drip pan inverted on top, then place my roasting pan on top of that (right side up), with the bird in the roasting rack on the main grill. Kills two birds with one stone (pun intended). Insulates the roasting pan so the drippings don't burn, and allows airflow around the bird to promote even cooking. -
Susan, a trick that I've used in the past to get open a frozen top hat is to load up the chimney starter, place it on the lower grill, fire it up, opening the louvers on the lower vent and close the lid down on the first latch. Should thaw it out about the time the coals are going good to start up your cook. Also, a good reason to have a cover for your KK - to keep the ice from building up on it and freezing the top hat shut. That is, assuming that you're using your KK in winter, like a diehard!
-
Impressive speed in coming up to temperature
tony b replied to wilburpan's topic in KK Features & Accessories
Yeah, need to school the newbies, as most other grills (e.g., kettles) won't do this, so folks don't have any experience and can get burned if not careful. It's because the KK is so airtight when fully closed up. -
Thanks, Doc! I will definitely try this in the future. Something else to experiment with. I was thinking that apple juice instead of water in the pressure cooker. BTW - I assume that you had the pressure cooker on High setting? I agree - a thousand good rubs out there (about half of them are in my pantry right now - ha, ha!!)
-
Thanks. First I have to confirm that I get Cooking Channel in my cable package!
-
Actually I'm hoping to get one of Dennis' new model drip pans with the double bottom, so the drippings don't burn.
-
Impressive speed in coming up to temperature
tony b replied to wilburpan's topic in KK Features & Accessories
Wilburnpan, be careful doing that - shutting down the grill from fairly high temperature and then opening it back up. You can get nasty backdrafts and can singe off some arm hair (or worse)! I can speak from firsthand knowledge about this. I was cooking steaks at high temp on a friend's BGE, closed down the vents to let the steaks roast to finish, opened up the lid too fast and WHOOOSH! I jumped back in time to not get singed, but I was lucky! Here's some info from the Naked Whiz website, including a video. http://www.nakedwhiz.com/flash.htm -
Heph, what's in the drip pan?
-
That's a shit-ton of meat, son! Pork necks?? I've never seen that cut before. Cook it like a butt - intriguing!
-
What channel is this one, Susan? I've never heard of it?
-
Nice job, man! To quote one of my favorite songs - "Keep on rocking in the free world!" When's the "hunk-o-meat" cook?
-
Sounds like you're on the right track to me, especially stuffing the cavity with onions and apples. My Mom did that and I've found no reason to not continue myself! I've upped my game by tossing in a nice big sprig of fresh rosemary and some fresh thyme in the cavity, rub a little oil on the outside, salt and pepper liberally and off to the races!
-
Careful.. Dome 900º ~ Lower Grate 1452º!!
tony b replied to DennisLinkletter's topic in KK Features & Accessories
Yeah, what he said! Love my splitter basket. Gonna use it again tonight to cook a single chicken breast. -
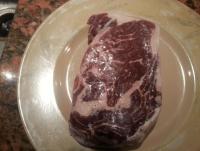
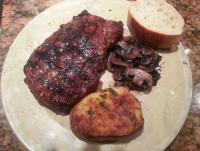
Did another frozen steak tonight - prime rib eye (about 1.5" thick). This time I took pictures, so you know that it actually happened! Straight out of the freezer. Quick baste of oil and seasoning (combo of Dizzy Pig Raising the Steaks and Sucklebuster's Hoochie Mama & Steak Rub) and onto the grill. At the peak, the KK was cranked (700F dome), which according to Dennis' test, put the lower grate @ 1000F!! Probably one of the best crusted steaks that I've done. But, was a crazy cook. After I got the initial sear done (3 minutes per side, then 2 minutes per side), the interior was still seriously cold (54F). So, I closed down the vents and dropped the temperature in the dome to about 450F and just kept flipping it over about every 2-3 minutes and checking the temperature until I got around 120F internal. Ta, da! Sorry, the last one is a bit blurry, but I was using the camera phone. Trust me, it was a perfect rare!


-
Careful.. Dome 900º ~ Lower Grate 1452º!!
tony b replied to DennisLinkletter's topic in KK Features & Accessories
A couple of pics of tonight's steak cook. First, at the peak, dome was at 700F, which according to Dennis' test, put the lower grate @ 1000F. From this pic of the cook, it seriously looks like 1000F!!!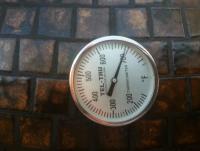

-
Tasty looking cluck, Susan!
-
I recall when I was shopping around, Lodge is never cheap, anywhere! Hence, the reason I went with the Texsport model. Looks like you can order them directly from Texsport. However, this is the model with legs, which shouldn't interfere with using it as a smoking pot at all. Seems like the "without legs" model is back ordered everywhere! http://www.texsport.net/cast-iron-cookware-and-accessories/seasoned-quart-dutch-oven-p-3661.html
-
Folks, load up on CoCo when you order your grill. If I remember correctly, Dennis can pack like 15 boxes in the crate with an OTB-23" and it doesn't affect shipping price. Can only image how many boxes will fit in the crate of the Bad Boy 32"!!
-
Don't forget to take pics of that virgin cook! Forum Rule #1 - No picture, it didn't happen!
-
Sorry, but couldn't help but notice the warning label - "Shoots flaming balls!" Jerry Lee Lewis would be pleased!
-
Funny, Doc! It's just that the pizzas were small (8"), so it make the peel look bigger. http://www.amazon.com/Kitchen-Supply-14-Inch-16-Inch-Aluminum/dp/B002JPJ0QY/ref=sr_1_1?s=kitchen&ie=UTF8&qid=1412701704&sr=1-1&keywords=pizza+peel
-
you could start with this one, but I'd still drill the holes in the bottom and seal the lid on with flour/water paste. the downside seems to be no handle.
-
No pics that I could find. Here's the one that I bought on Amazon, it was 2 quarts. http://www.amazon.com/gp/product/B003K6WG1W/ref=oh_aui_detailpage_o07_s00?ie=UTF8&psc=1# Unfortunately, Amazon says it's not in stock with no estimated date.
-
New Baking Stone for the 23" Ultimate
tony b replied to DennisLinkletter's topic in KK Announcements
Just keep us informed. I am interested, but it's not urgent.


