Leaderboard


Popular Content
Showing content with the highest reputation on 04/30/2016 in all areas
-
Well, I can't speak to which tile produces the best results on the 32" - I only ordered a 23"... Seriously though, you guys really are such good people. The subject of the forum came up when I was having my intro chat w Dennis to discuss the order, and I am 100% convinced that it was the friendly and knowledgeable people on this forum that pushed me over the edge and made me pull the trigger on the order. I'm really looking forward to getting to know you all better.3 points
-
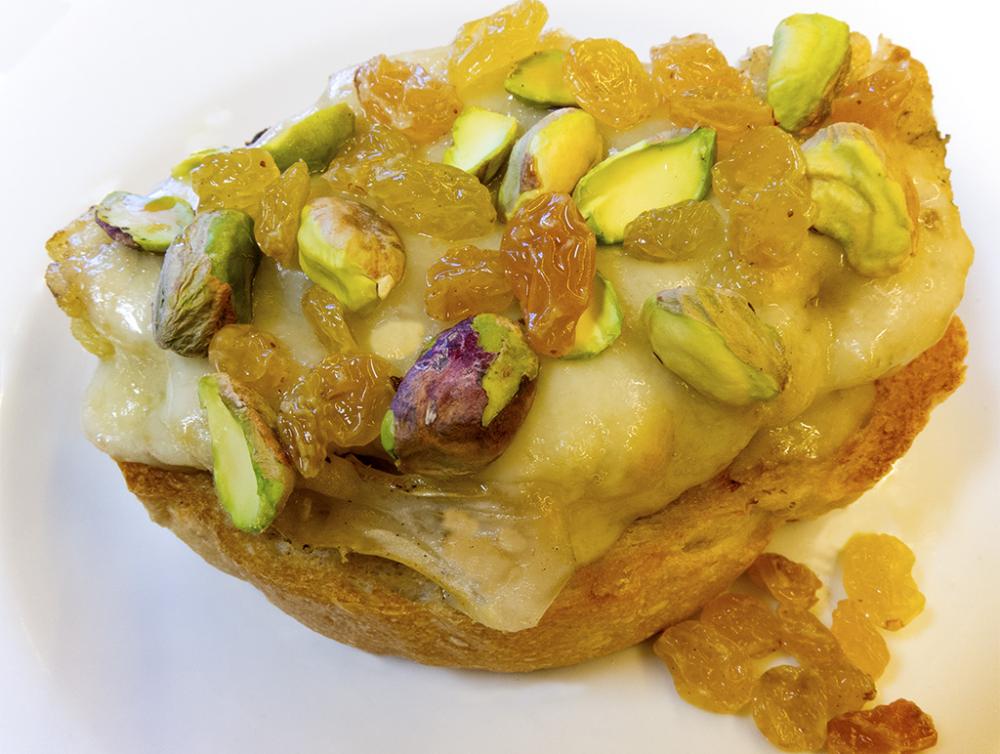
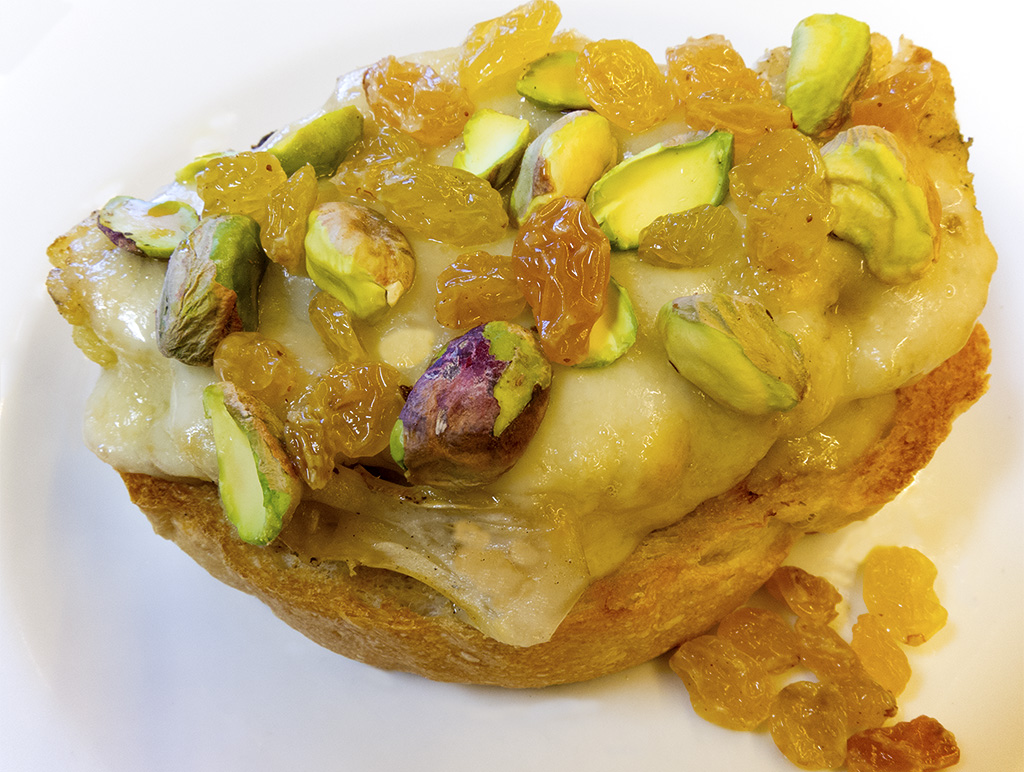
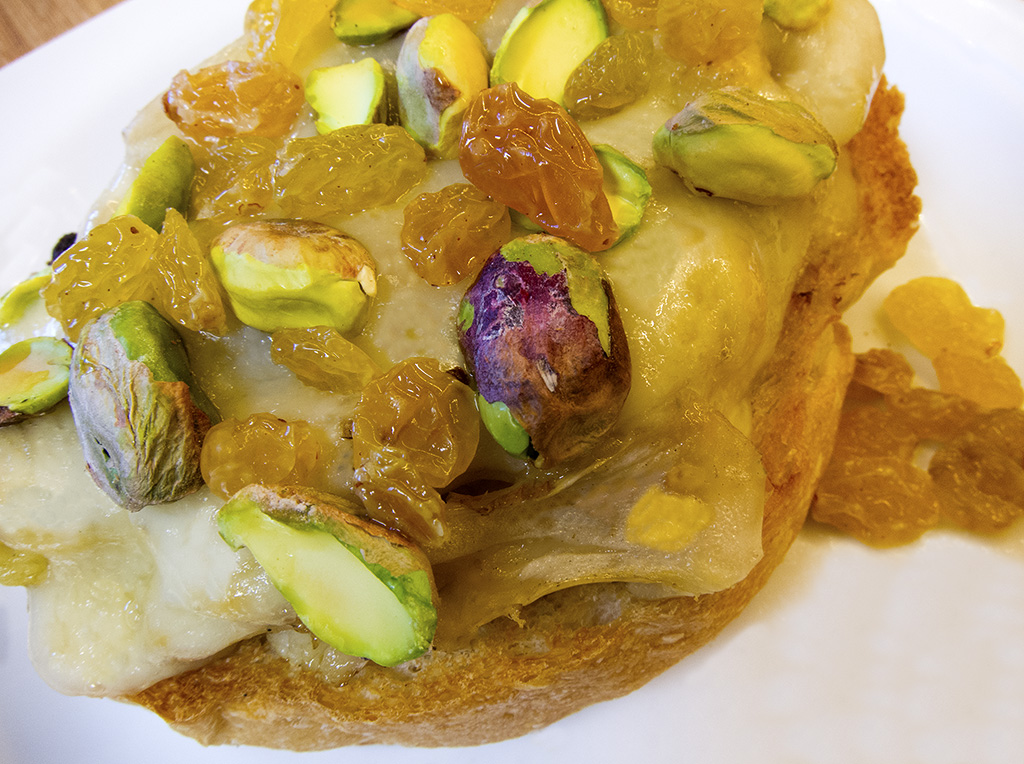
Just when you thought you'd seen the last of that KK roasted cauliflower, it's back. This time as a cauliflower melt. Remember that sour dough bread I did the other day, well, it's back too. Toasted a nice thick slice of sd bread, topped with roasted cauliflower, cheese, melted it under the broiler and added, wine soak golden raisins and some pistachios and you have a nice sandwich lunch.
 2 points
 -
We now have the financing live again on the website. Affirm was problematic so we changed. The new company is http://www.getfinancing.com and will give you more than one lender to choose from. Please let me know how it goes and if the process has any hiccups..2 points
-
If you would like to split a pallet of charcoal between San Francisco and Mountain View Ca, let us know. I'll take 10-20 boxes. We can save a bit if someone has a business address with a loading dock.1 point
-
This was in an Email from Thermoworks and it looked interesting. Cooking Chicken to 145* and maintaining 145 for 8 minutes. Thermal Tips: Simple Roasted Chicken Posted by Kim on Apr 27, 2016 in Accuracy, Bacteria, Blog, Carryover, ChefAlarm, Chicken, Cooking for Geeks, Food Safety, Jeff Potter, Kenji Lopez-ALT, Poultry, Roasting, Super-Fast Thermapen, Temperatures, Thermal Secrets| 9 comments The FDA Food Code recommends cooking chicken to 165°F (74°C). But the pasteurization of chicken is actually a function of both temperature and time. If you can hold your chicken at 145°F (63°C) for 8.5 minutes, you can achieve the same bacterial reduction as at 165°F (74°C). In his new book Kenji López-Alt uses this principle along with the principle of carryover cooking in large masses of meat to achieve succulent, perfectly safe results at a dramatically lower pull temp. To learn the necessary thermal secrets, keep reading. The Food Safety Culprit: Salmonella Verifying the internal temperature of chicken is particularly important given the threat of salmonella bacteria in poultry. Why is there so much concern with this particular bacteria? Salmonella is a very hardy bacteria. It lives in the temperature range of 35-117°F (2-47°C) which is beyond what most other common food bacteria can tolerate. According to the CDC, 1 in 6 Americans gets sick from foodborne illness each year, and about one million of those cases can be attributed to salmonella. Proper cooking and refrigeration temperatures when dealing with chicken are critical to avoid foodborne illnesses. Food Safety is About Temperature and Time The FDA Food Code suggests cooking chicken to 165°F (74°C) to be sure all bacteria is killed and safe to eat. This temperature is suggested because at 165°F (74°C) the chicken achieves a 7-log10 reduction—meaning that 99.99999% of the bacteria present are destroyed—instantaneously: a foolproof rule to follow for safety. Salmonella isn’t anything to be trifled with, and 165°F (74°C) is indeed the temperature to target if preparing food for individuals at higher risk of illness (older adults, pregnant women, young children, and others with compromised immune systems). Not widely known is the fact that chicken can achieve the same 7-log10 reduction at temperatures as low as 136°F (58°C) as long as that temperature is held at 136°F (58°C) for at least 63.3 minutes. As the internal temperature increases, the holding time for a 7-log10 reduction decreases. In a document from the USDA on Time and Temperature Tables for Cooking Poultry Products, the time cooked chicken must be held when brought to an internal temperature of 145°F (63°C) is 8.4 minutes. At 150°F (65.5°C) the time is reduced to only 2.7 minutes! Chicken as the Temperature Rises In The Food Lab, Kenji breaks down what is going on with the protein as the internal temperature of poultry rises: Under 120°F: The meat is still considered raw. The muscle cells are bundled up in long, thin fibers giving the meat its “grain.” At 120°F: The protein myosin begins to coagulate, forcing out some liquid that remains within the protein sheaths at this point. At 140°F: The remaining proteins within the muscle cells of the breast meat coagulate, forcing all of the liquid out of the cells. The coagulated proteins make the meat firm and opaque. At 150°F: Proteins in the sheaths themselves rapidly coagulate and contract. Water that was forced out of the cells and collected within the sheaths is squeezed out of the breast meat. Above 150°F: Muscle fibers in breast meat have become almost completely squeezed dry. Meat is dry and chalky. 160-170°F: When held in this temperature range for ten minutes, collagen in the leg meat will begin to convert into rich gelatin, keeping the meat moist and juicy even after the muscle fibers have expelled most of their liquid. Chicken Texture at Different Pull Temps Below is a breakdown of what the texture of the breast meat of chicken will be at different pull temperatures: 140°F: Pinkish-tinged and almost translucent; extremely soft, with the texture of a warm steak; fleshy. 145°F: Pale, pale pink but completely opaque; very juicy, a little soft. This is Kenji’s favorite doneness temp. 150°F: White and opaque, juicy, and firm. 155°F: White and opaque, starting to turn a little bit stringy; bordering on dry. 160°F and higher: Dry, stringy, and chalky. According to this temperature guide, the breast meat will become dry if taken too far above 150°F (65.5°C), while the leg meat needs to reach the temperature range of 160-170°F (71-77°C) in order for the connective tissue to dissolve into mouthwateringly rich gelatin. Knowing that salmonella has been scientifically proven to be safely eliminated at temperatures lower than 165°F (74°C), we followed Kenji’s recipe for Simple Whole Roast Chicken to the finest detail, including the 145°F (63°C) pull temperature. Tracking the Cook Using ThermaData Thermocouple Loggers, we placed thermocouple needle probes in four locations: the standard recommended location at the deepest point in the breast avoiding bone (the lowest temperature found in the chicken), one in the breast toward the shoulder, another closer to the top of the breast about 1/2” below the skin, and the last probe in the center of the thigh. The data loggers enable us to see how all the temperature gradients rise over time as the lowest temperature reaches our pull temperature, and monitor the carryover cooking through a 30 minute rest to be sure it stays at or above 145°F (63°C) for at least 8.5 minutes. Thermal Tip: Ingredients —1 whole chicken, 3-1/2 to 4 pounds —1-2 tablespoons vegetable oil or olive oil —Kosher salt and ground black pepper Instructions • Line a sheet pan with heavy-duty foil and place a V-rack or cooling rack on the pan. Suspending the chicken above the pan is important to allow for air circulation around the entire bird. • Preheat oven to 500°F (260°C). • Remove the neck and giblets and pat the chicken completely dry with paper towels. Dry skin with be more crisp and brown evenly. Food Safety Tip: Don’t Rinse • Using your hands, separate the skin from the meat. • Apply oil both under and on top of the skin. Using oil rather than butter will yield crisper skin because butter is about 18% water, which will steam and then cool the skin as it evaporates, giving the skin a spotty appearance with soft spots as it browns. • Season on all sides with salt and pepper. To Truss or Not to Truss? • Place the chicken onto the prepared rack. Place the ChefAlarm probe into the deepest part of the breast to track the lowest temperature during the cook. Set the ChefAlarm’s high alarm to 145°F (63°C). • Place the chicken in the 500°F (260°C) preheated oven and turn the oven temperature down to 350°F (177°C) as soon as the oven door is shut. Continue cooking until the high alarm sounds (cook time will be approximately 1 to 1-1/2 hours depending on the size of the bird). • Once the alarm sounds, spot-check the breast meat with an instant read thermometer like a Thermapen to be sure the ChefAlarm’s reading is the lowest temperature (the exact location of the lowest temperature may shift during the cook). You need to verify that the lowest reading is 145°F (63°C). Check the temperature of the leg meat, as well. It should be in the perfect 170-175°F (77-80°C) range. If not, put the chicken back into the oven for a couple more minutes. • Once final pull temp has been reached allow the chicken to rest, uncovered, for 15 minutes. This is critical. It must rest for a full 15 minutes for the full pasteurization of the meat to occur and for the chicken to be safe to eat. To be extra safe, you could use both the built in timer function in the ChefAlarm set to 15 minutes and the low temperature alarm feature unique to the ChefAlarm. Simply set the low temperature alarm to 145°F (63°C) during the rest to be sure your chicken doesn’t dip below the target temperature for at least 8.5 minutes. Observing Temperature in Motion The graph above shows the temperature changes at various points in the whole chicken as measured by our ThermaData Thermocouple Loggers. You can see exactly how the internal temperatures increased during the cook. The red horizontal line represents our pull temperature of 145°F (63°C). The most dramatic rises in temperature were, unsurprisingly, in the thigh and the outer breast meat which were most directly exposed to the hot air in the oven. Neither of those areas saw a temperature increase during the rest. Rather, you can see how they began to cool immediately once the inside breast meat reached 145°F (63°C) and the chicken was removed from the oven. Most importantly, we found that the coolest breast meat (the internal reading above) did NOT cool when the chicken was removed from the oven. See how the purple line above continues to rise from 145°F (63°C) to a maximum temperature of 155°F (69°C) during the resting period—the most dramatic temperature increase due to carryover cooking during the rest. It is important to note that this continuous rise in internal temperature after the chicken was removed from the oven is due to the significant mass of the whole chicken being cooked. We would NOT expect to see such carryover cooking in a single chicken breast, for example. The thigh’s peak temperature, as shown above, of 200°F (93°C) occurred as the internal breast meat reached our pull temp, resulting in a gradient variance of 55°F (30.5°C) between the coolest and hottest parts of the chicken! Many different temperatures occurring in the same roast chicken. In summary, we were able to observe that with Kenji’s recommended pull temperature the chicken remained in the necessary thermal range above 145°F (63°C) for a full 15 minutes (more than the required 8.5 minutes for pasteurization) after pulling the chicken from the oven, making it just as safe to eat as a piece of chicken that had reached the instantaneous pasteurization temp of 165°F (74°C). The Real Test: How Did it Taste? Because the chicken was cooked to a lower temperature, the meat retained more moisture and the result was a juicy and succulent piece of chicken—not a dry bit to be found! Not only was the meat extremely juicy, but the measures taken with drying the meat and separating, oiling and salting the skin, made for crackling-crisp skin. Some of our very willing taste-testing subjects commented this was the best roasted chicken they’d ever tasted. Because of personal preferences and some individuals being more susceptible to contracting illness, this cooking method may not be for everyone. But with the right tools and expert advice, you can experience better tasting roasted chicken. With the ChefAlarm and Thermapen‘s precision and accuracy there is no need to question your chicken’s safety. Get roasting!1 point
-
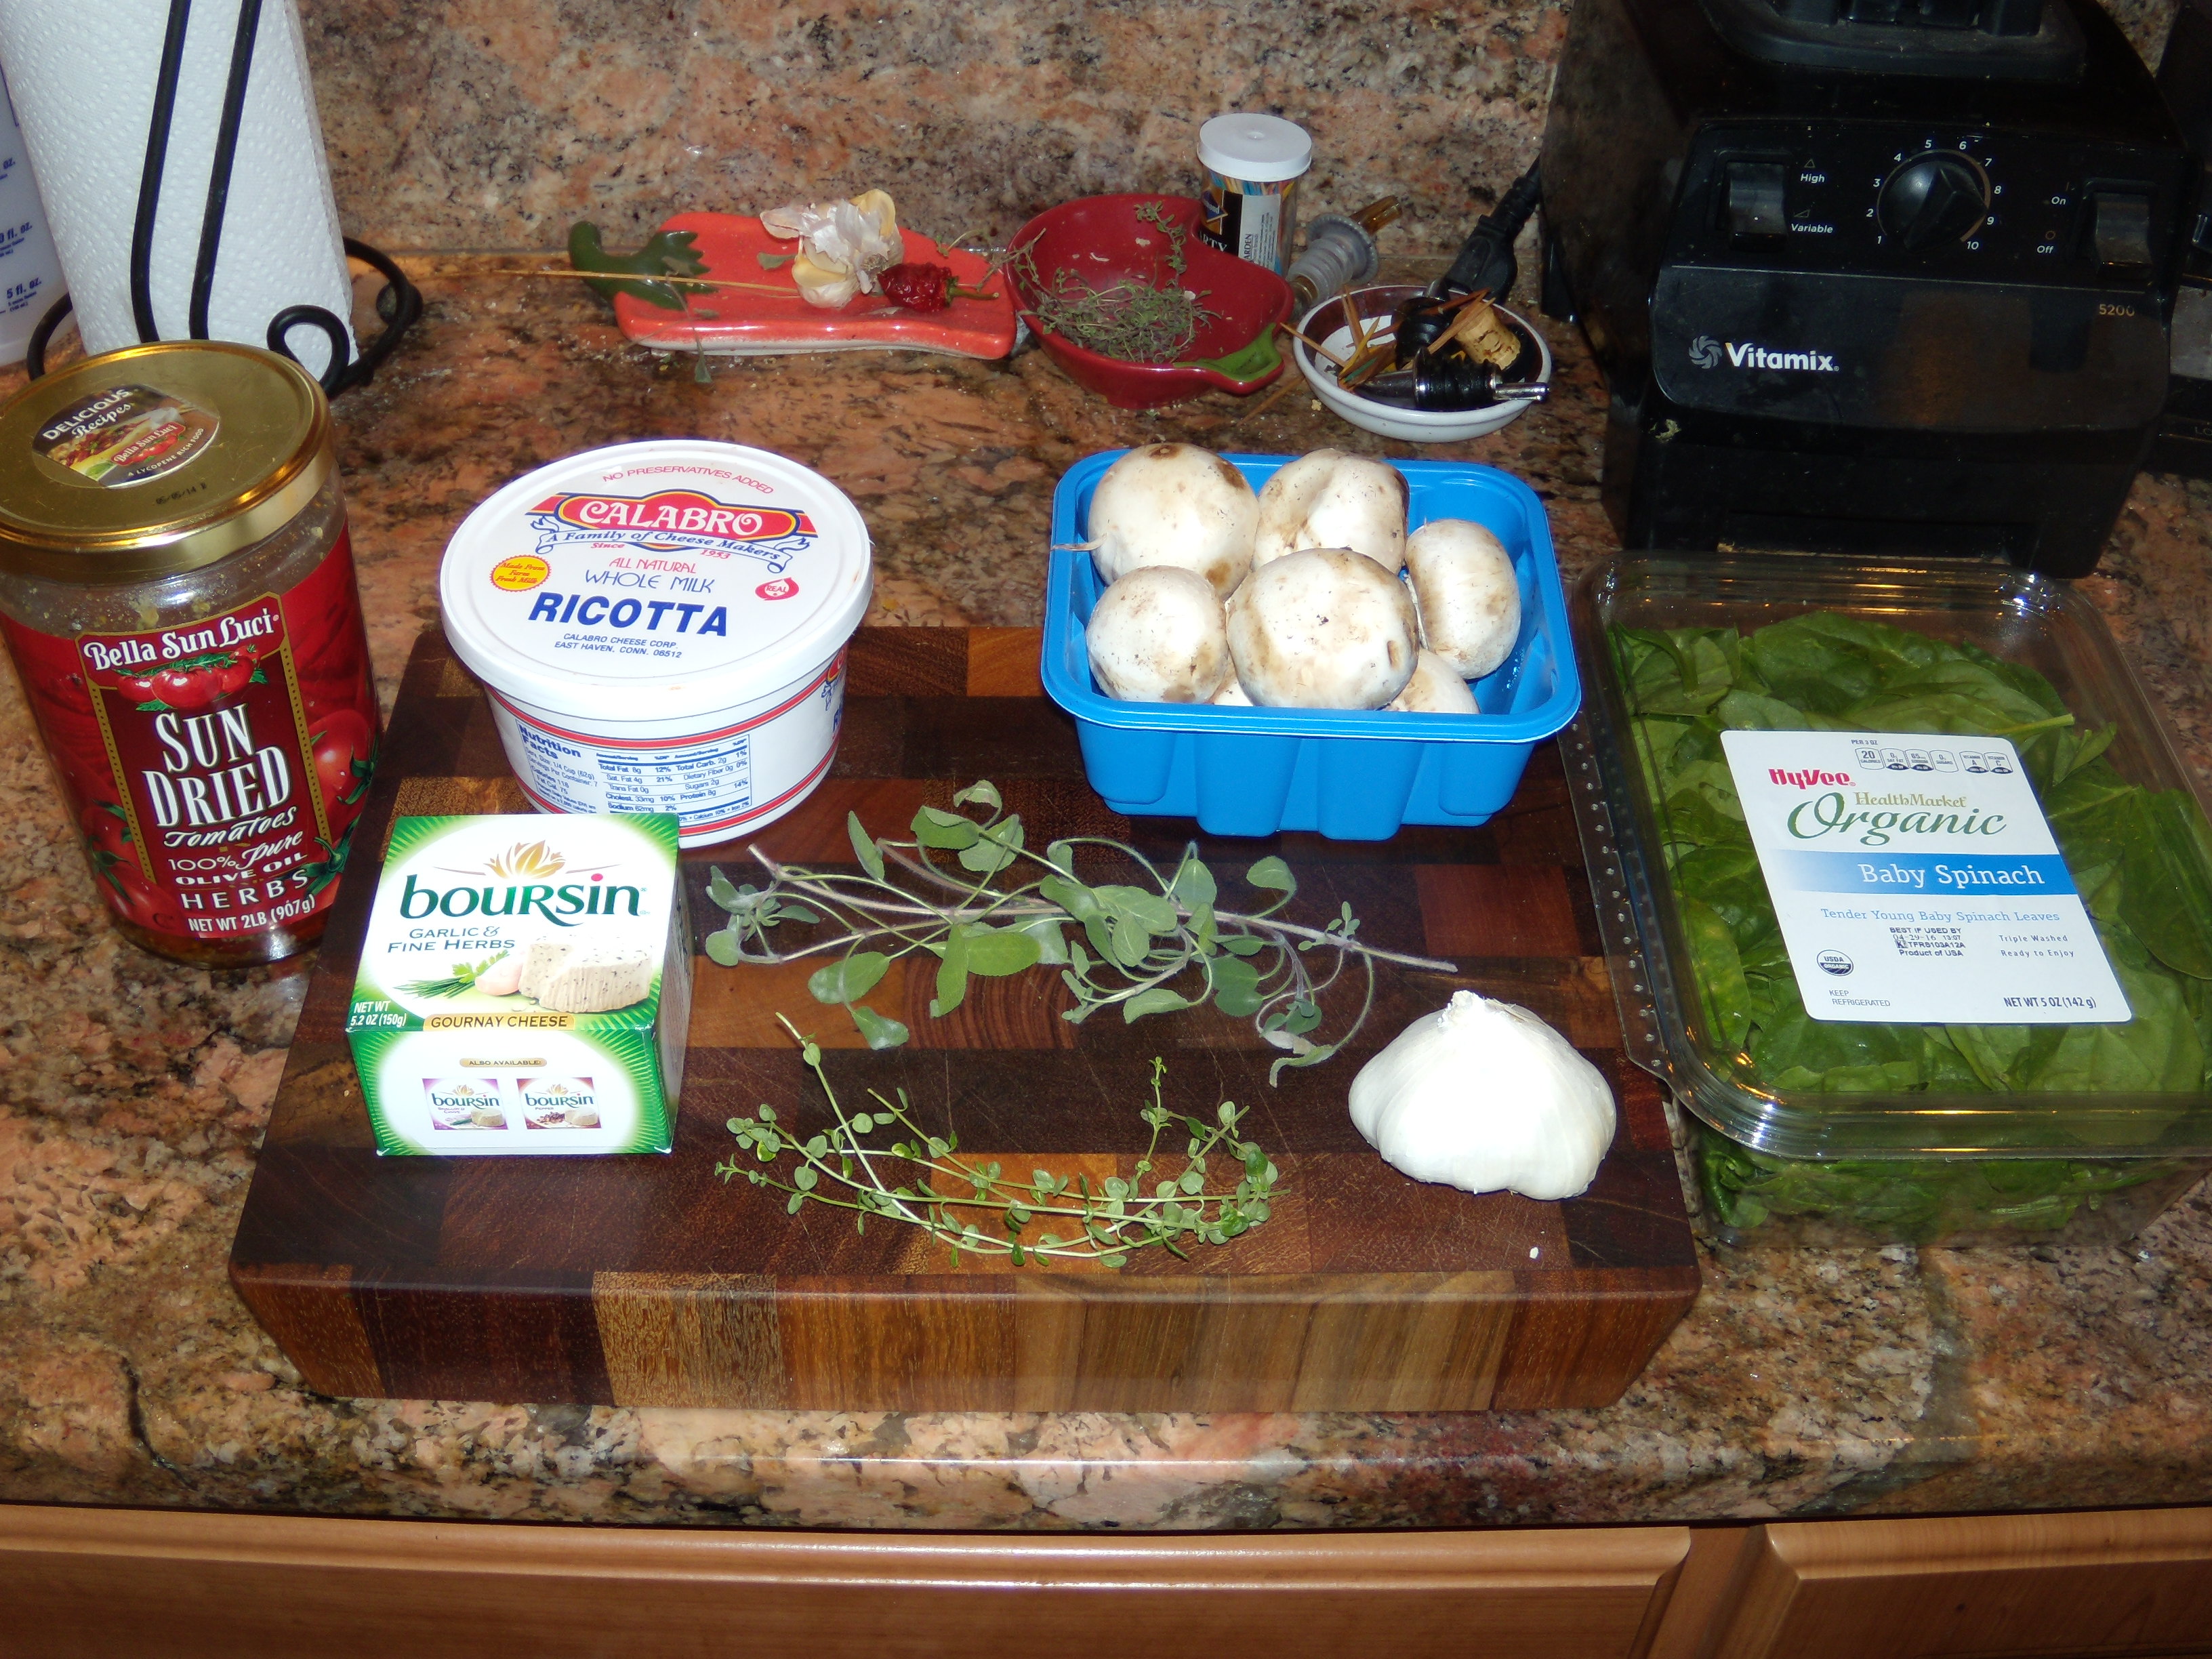
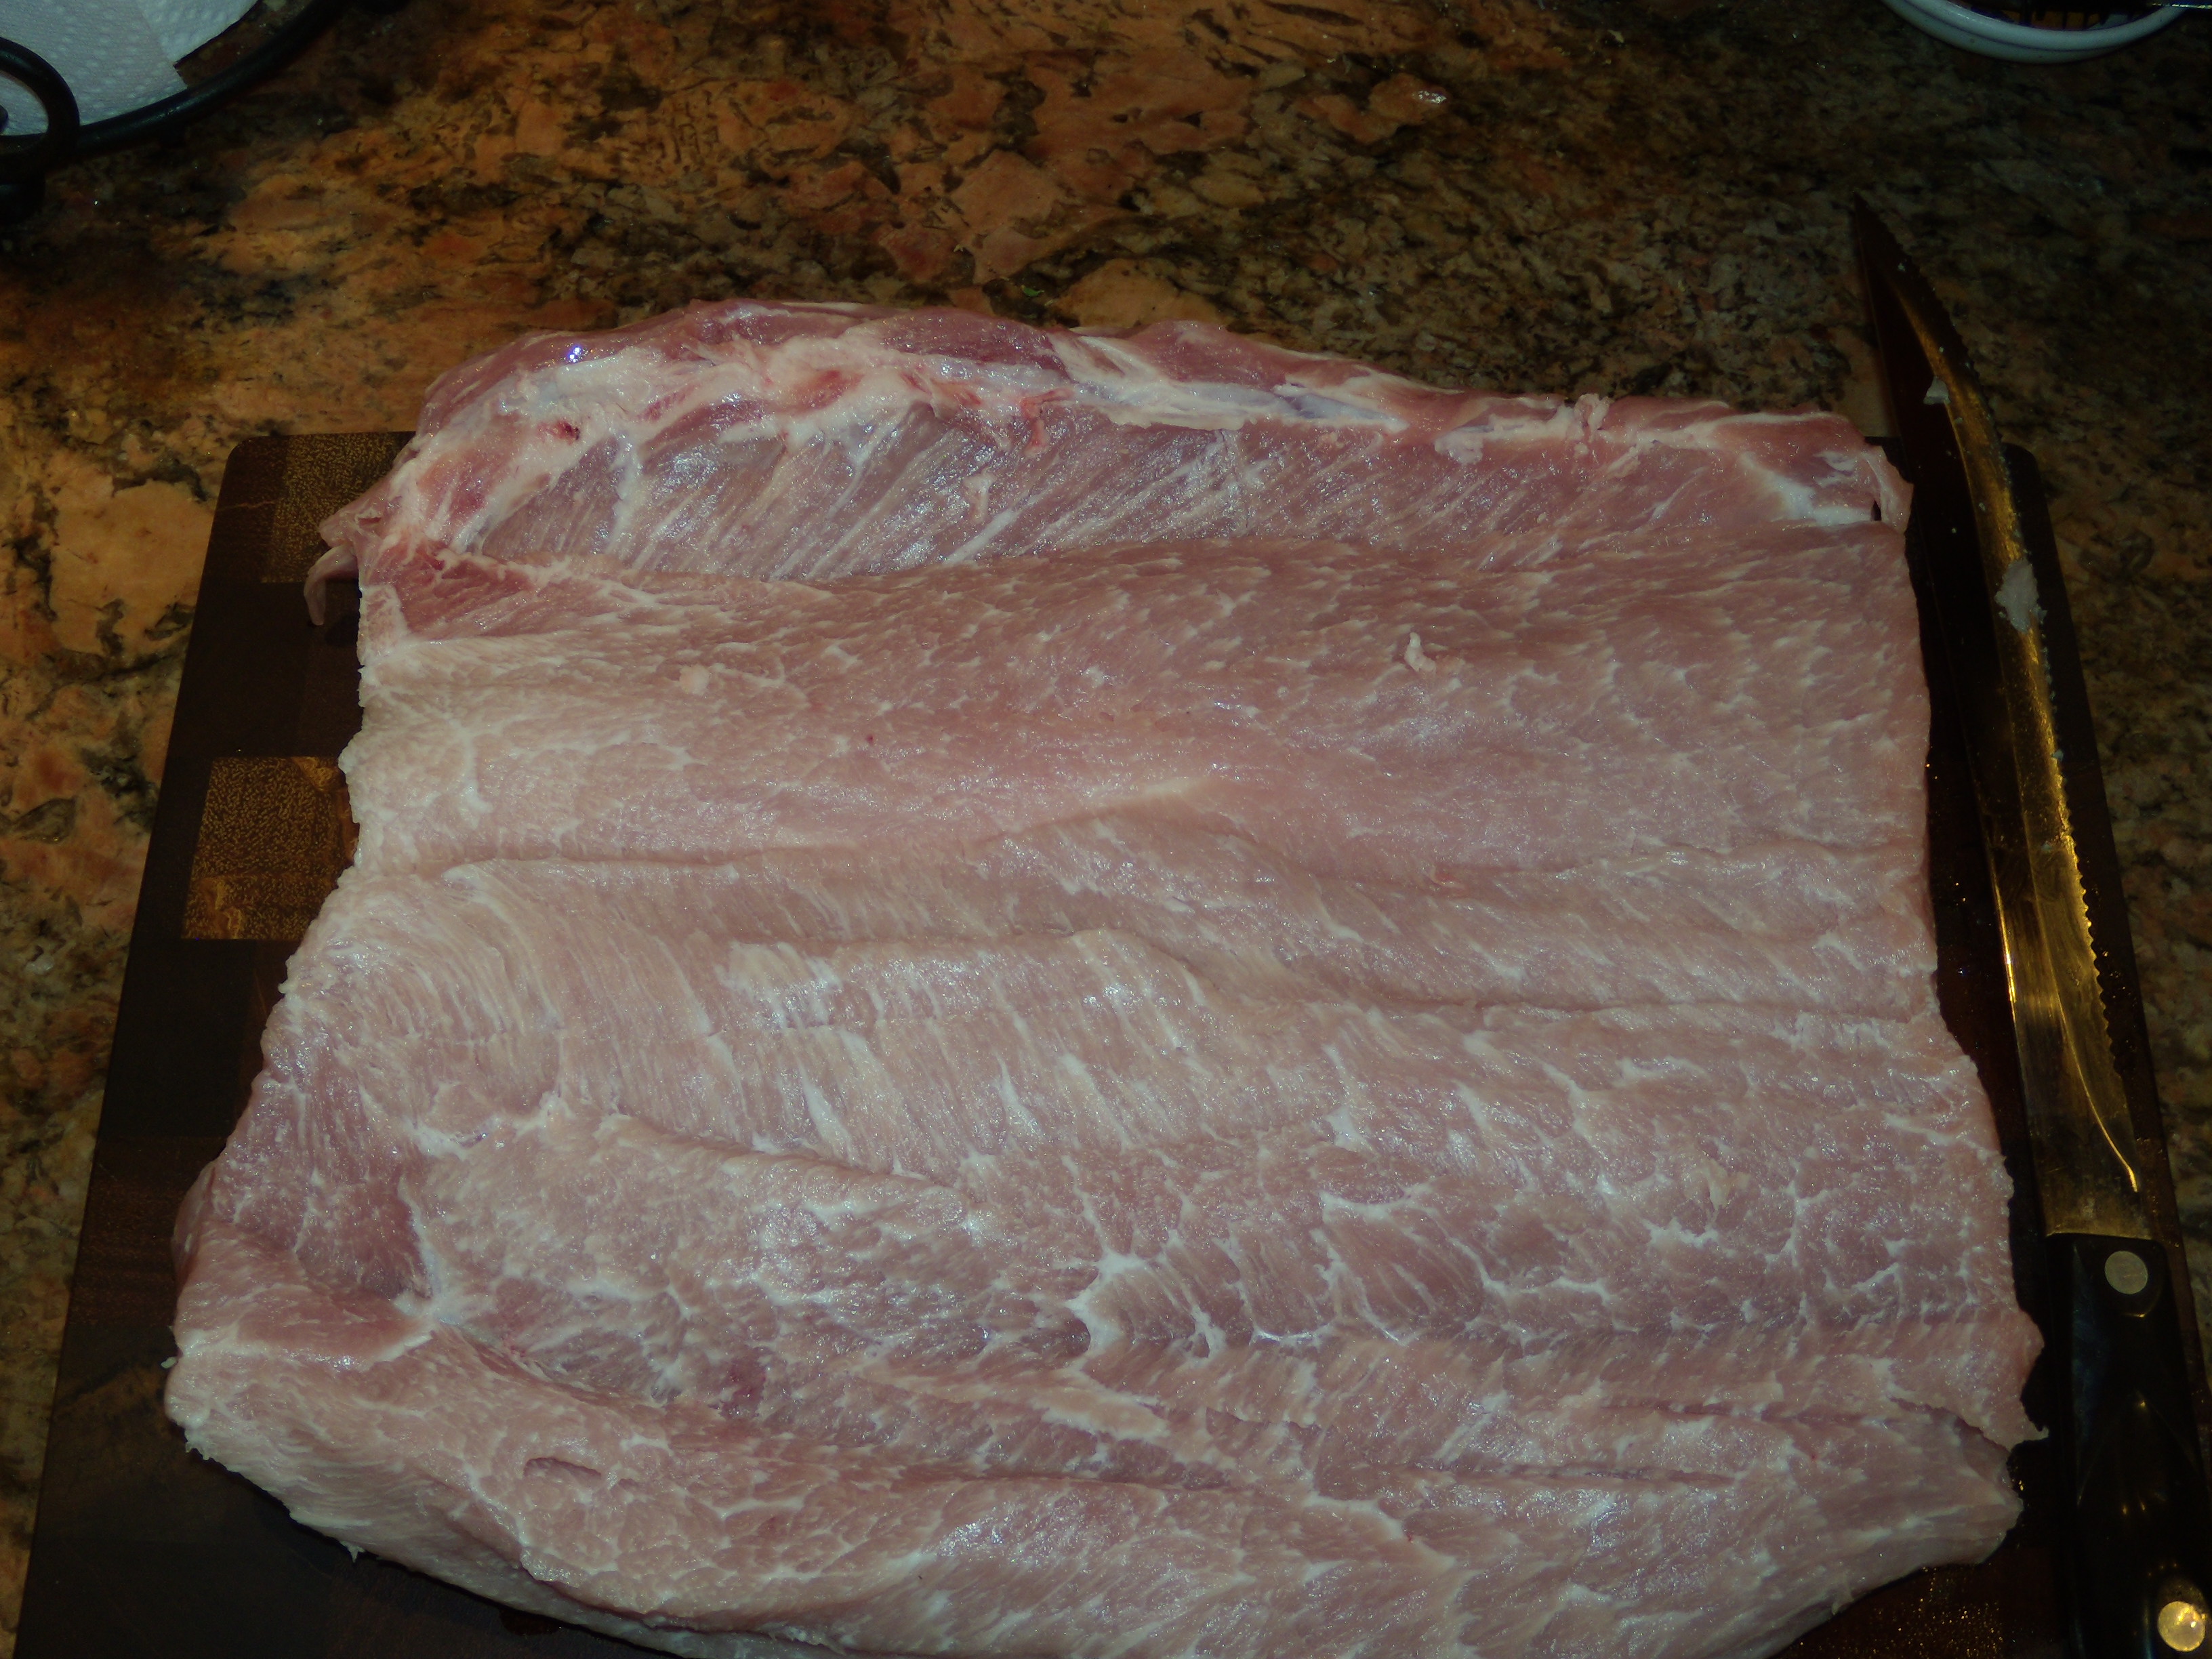
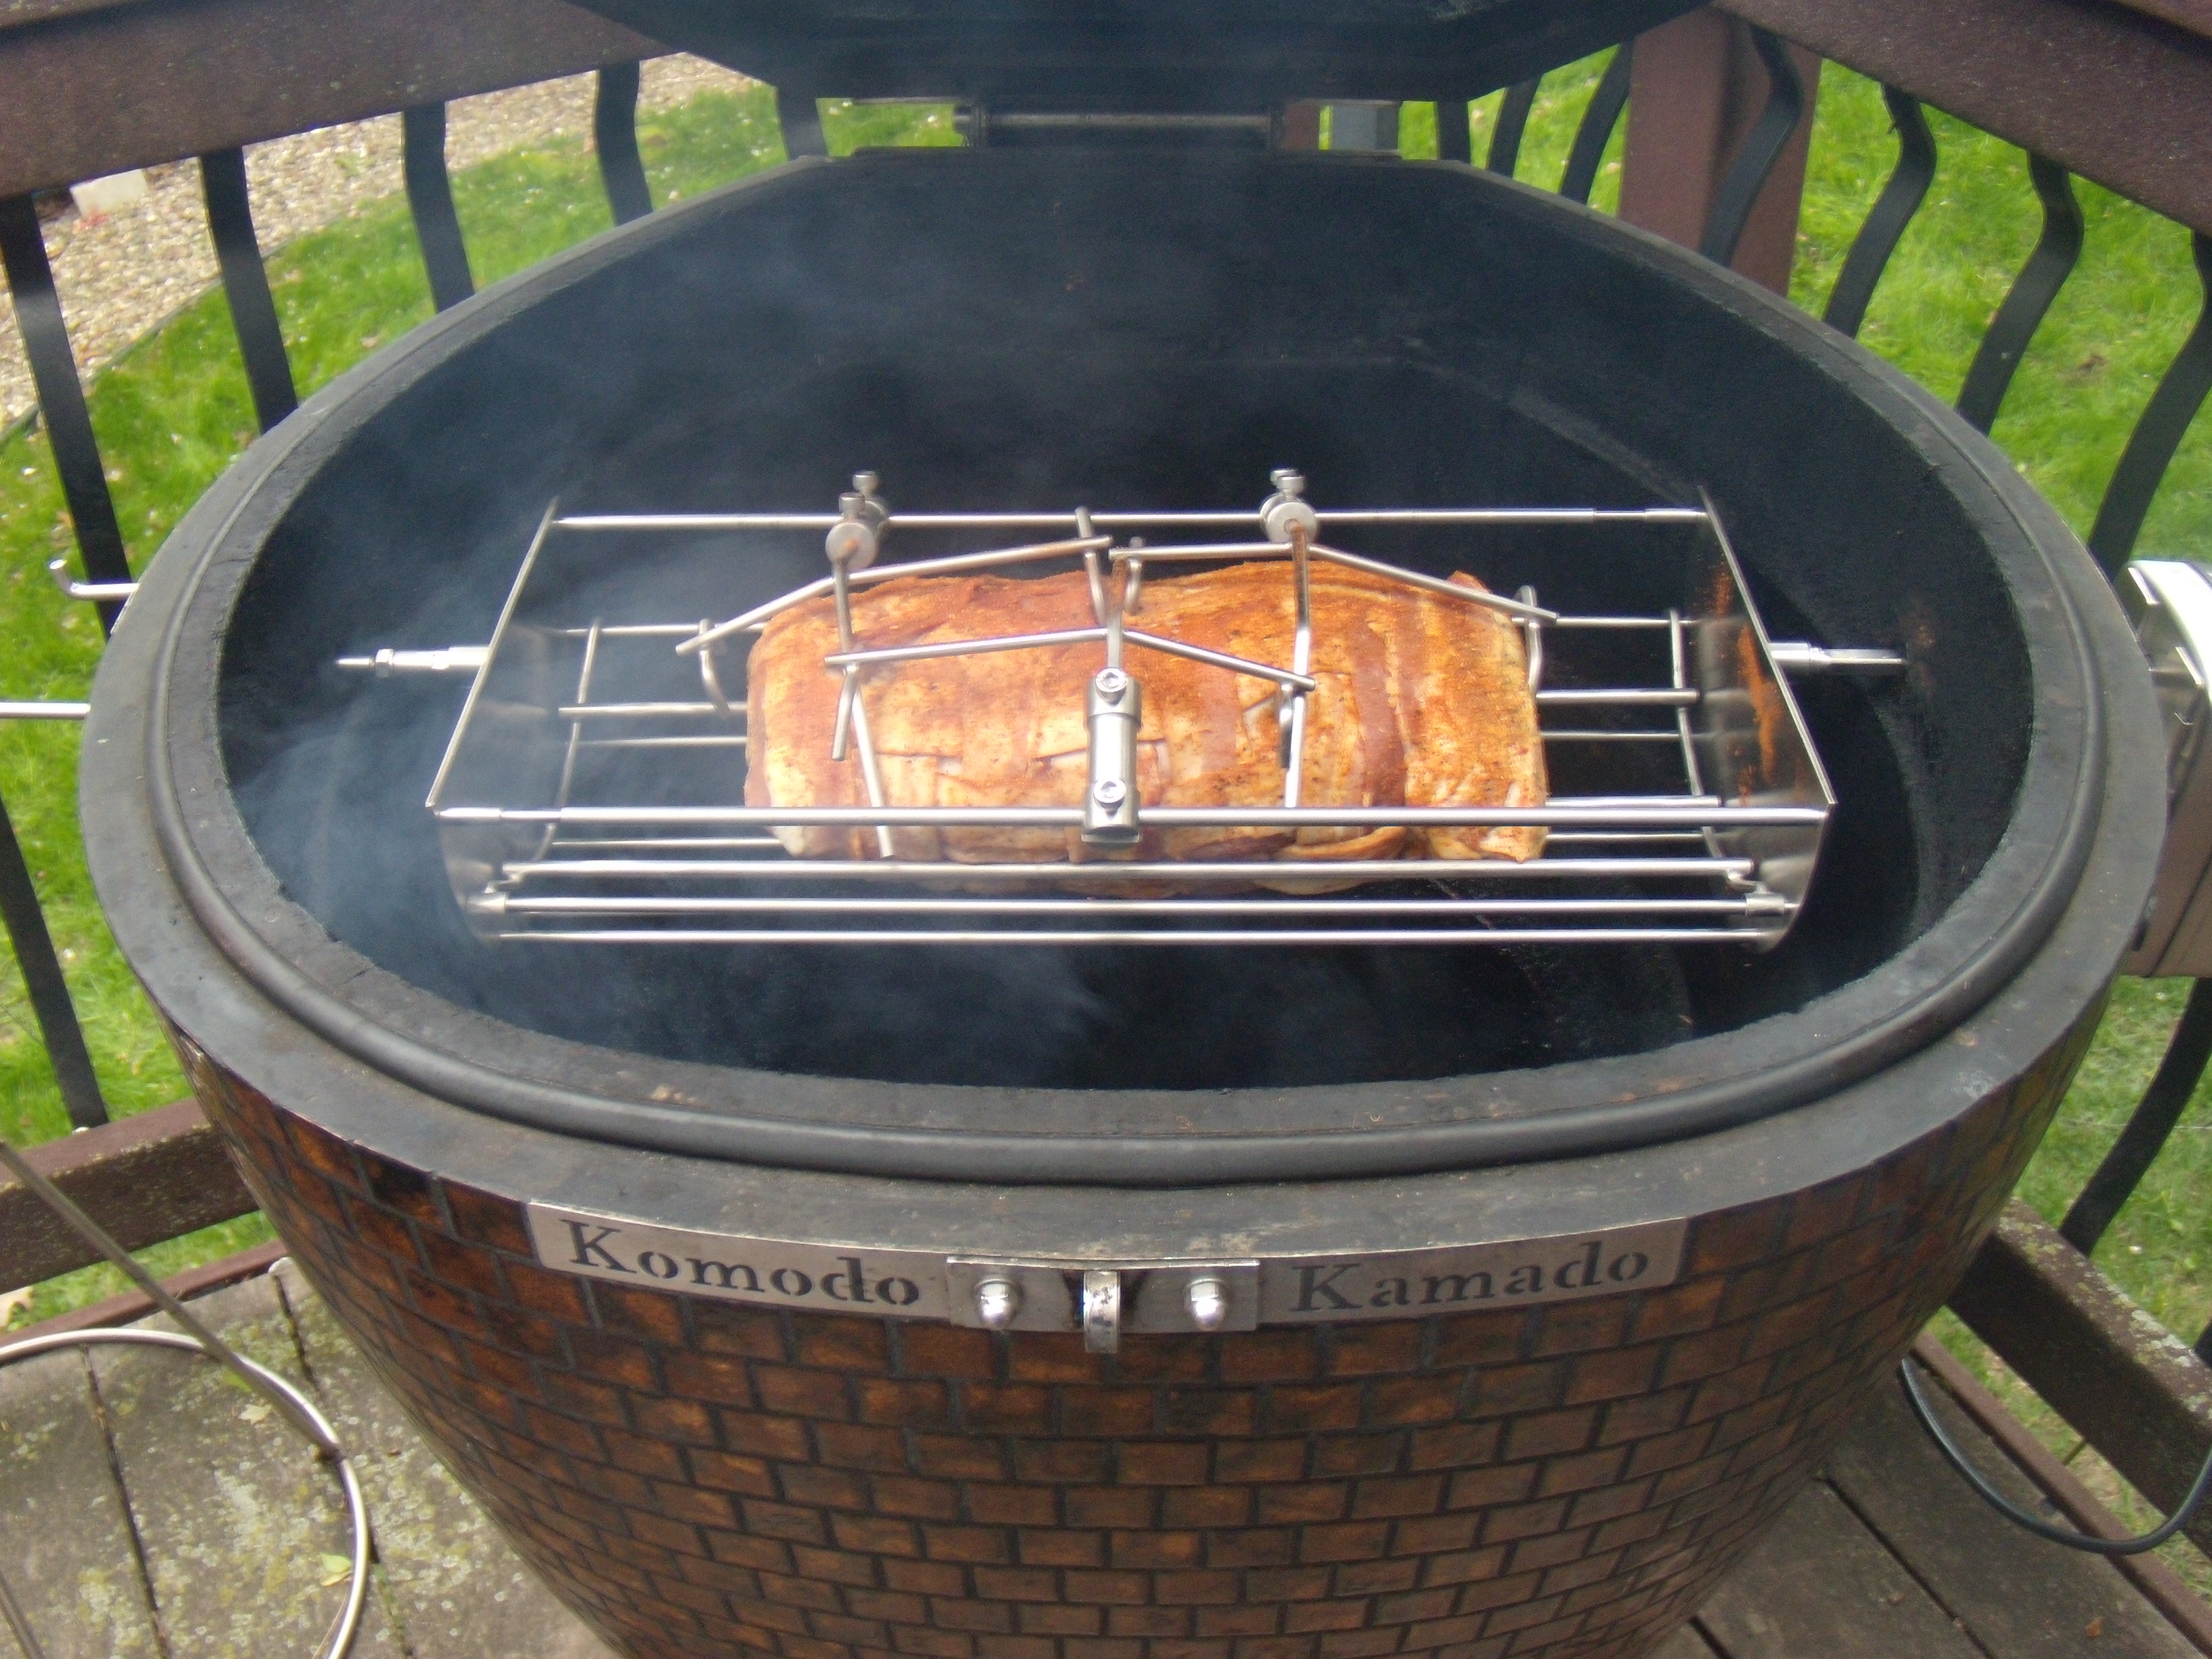
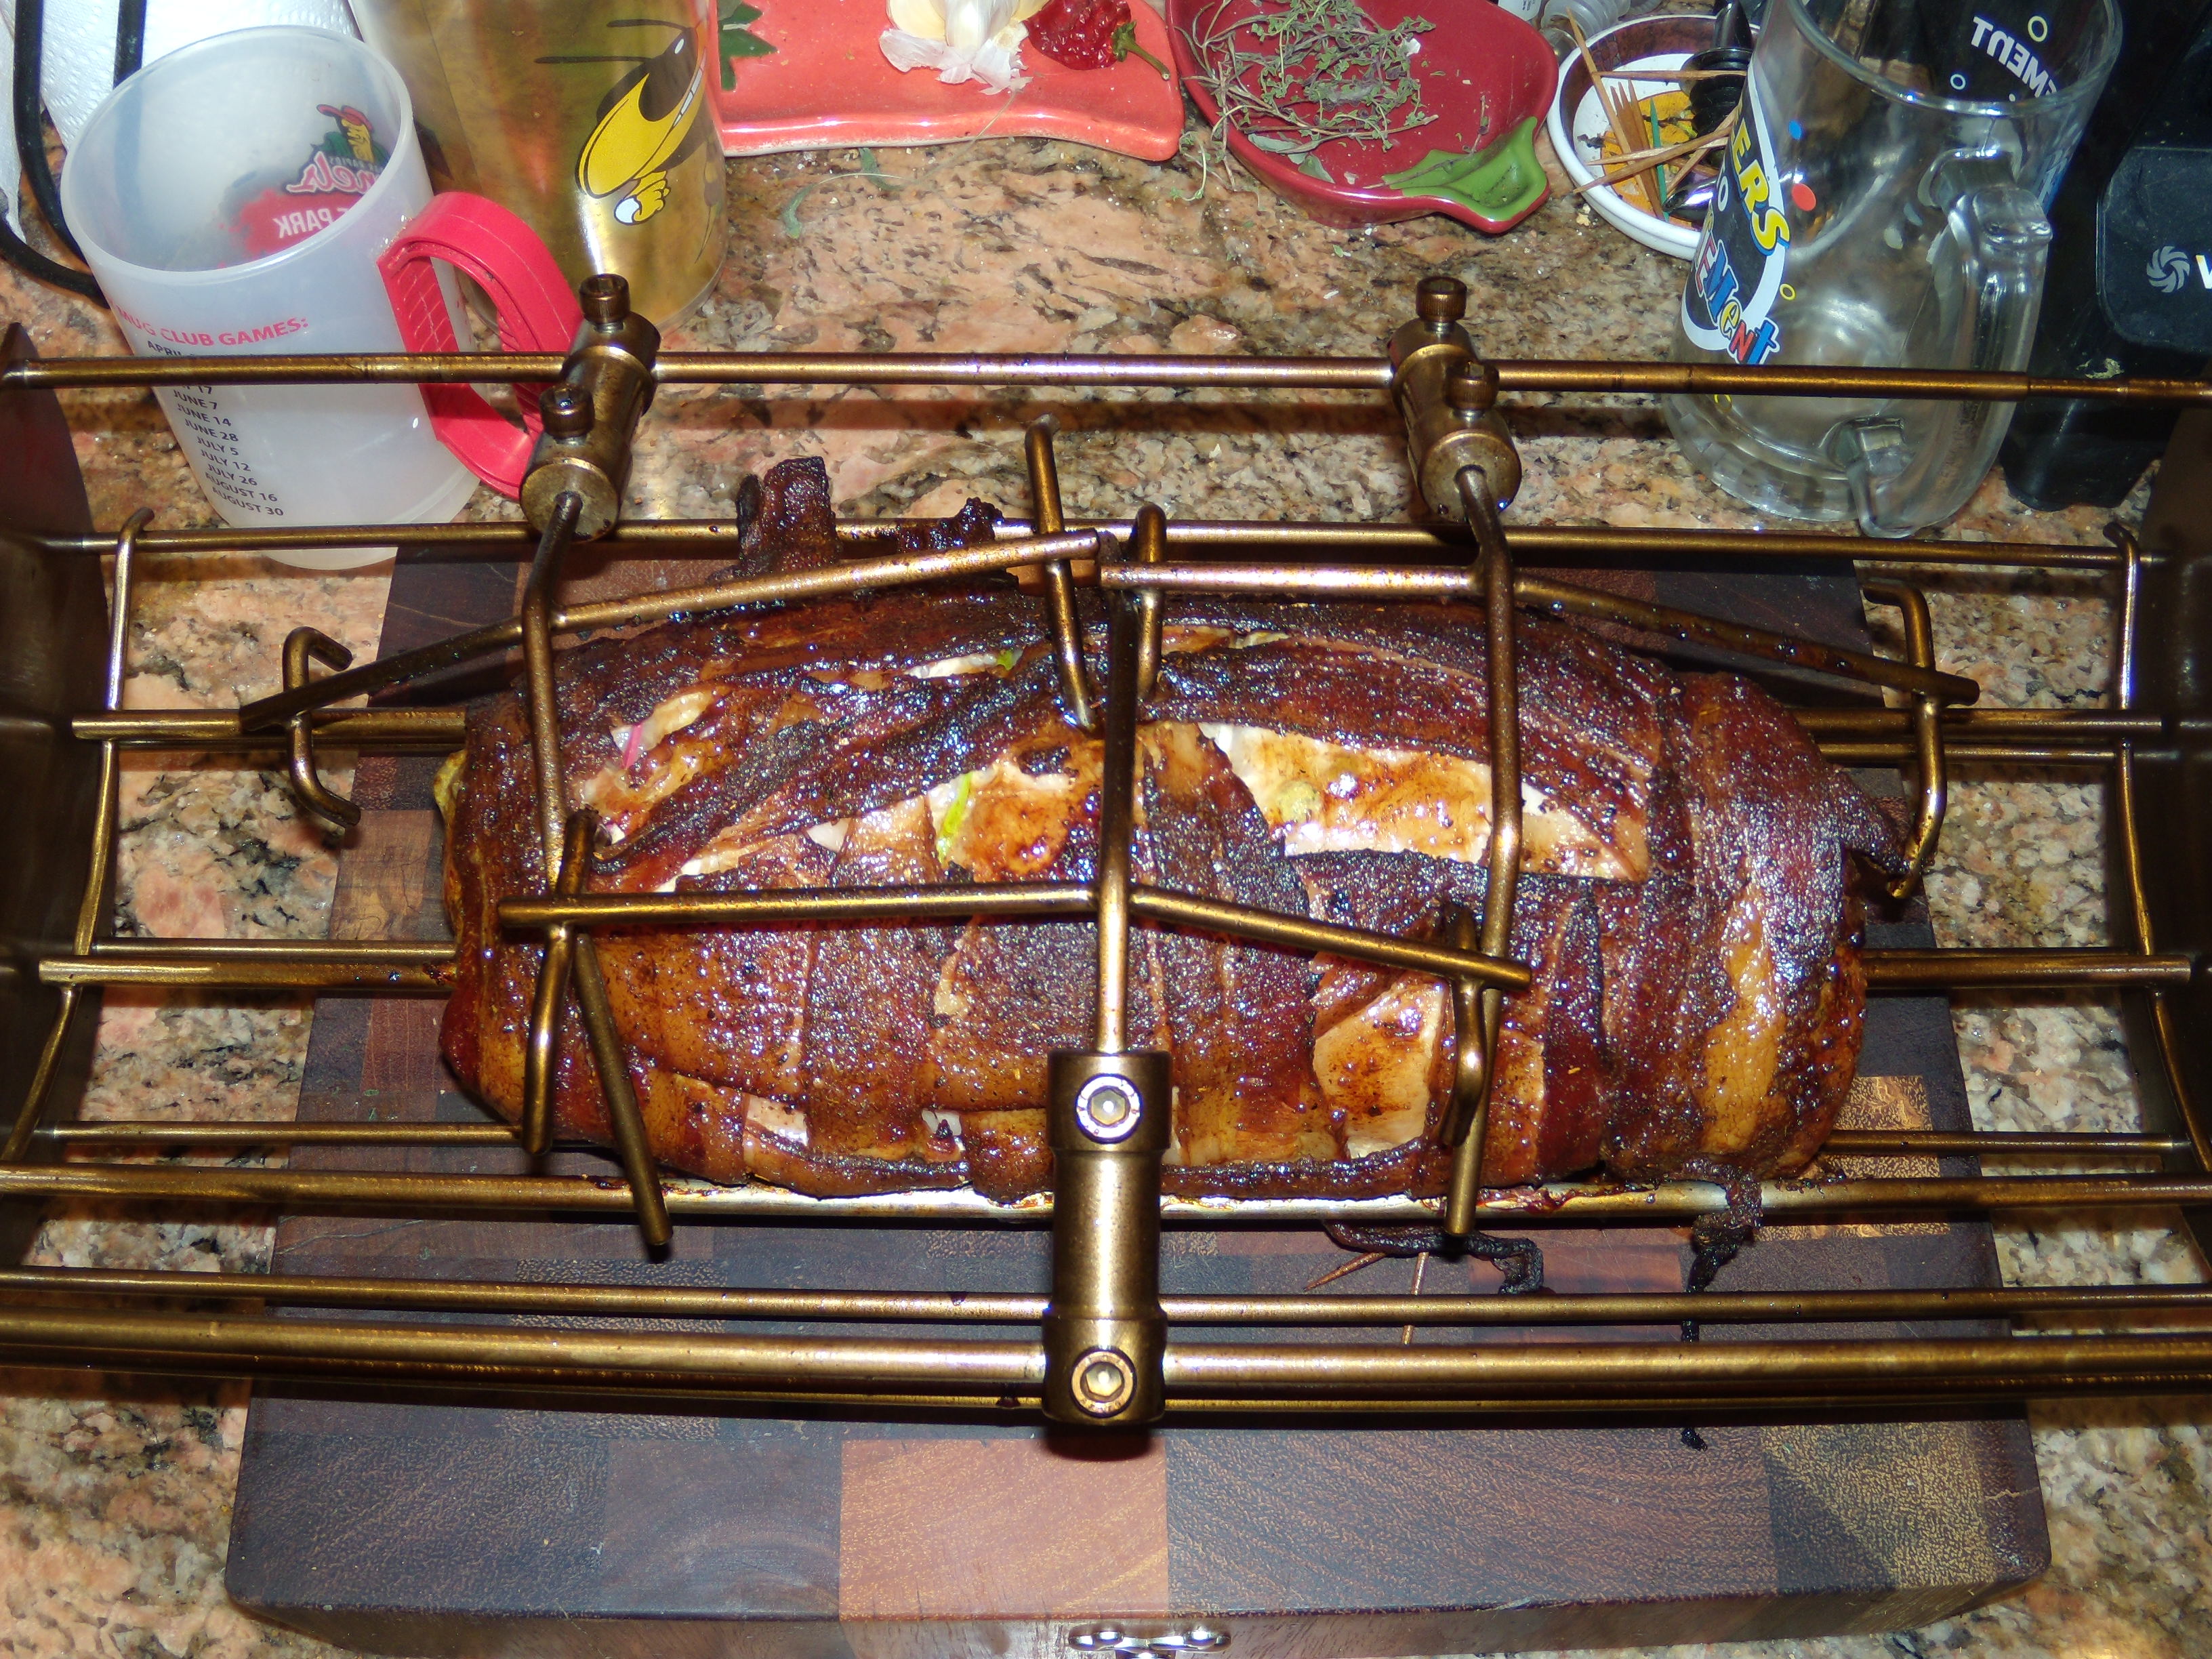
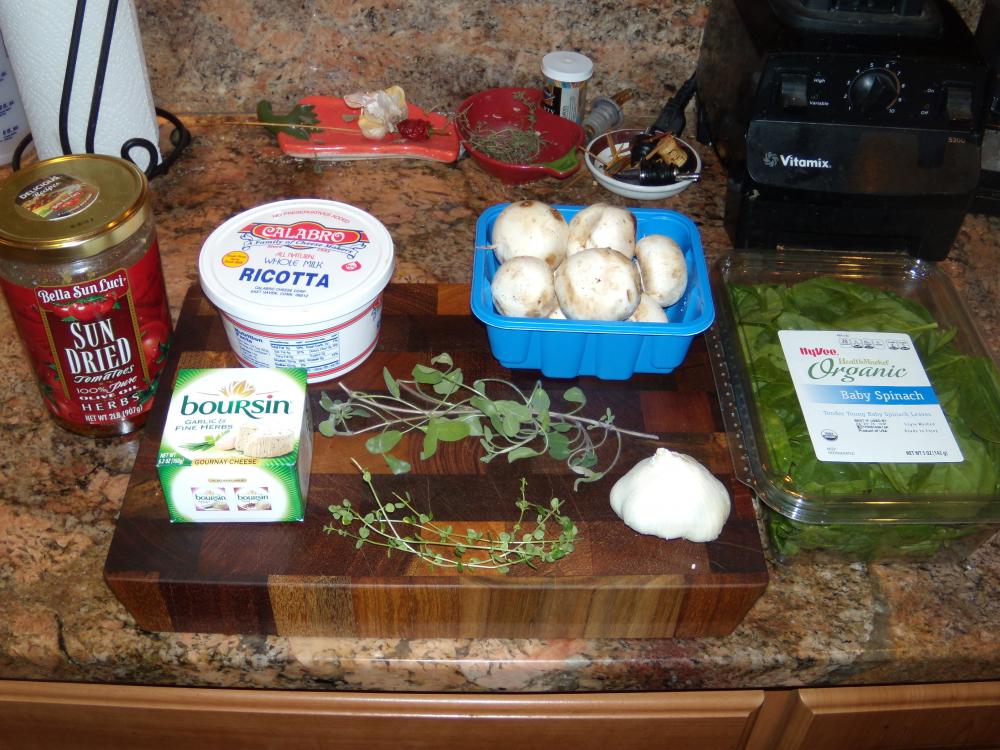
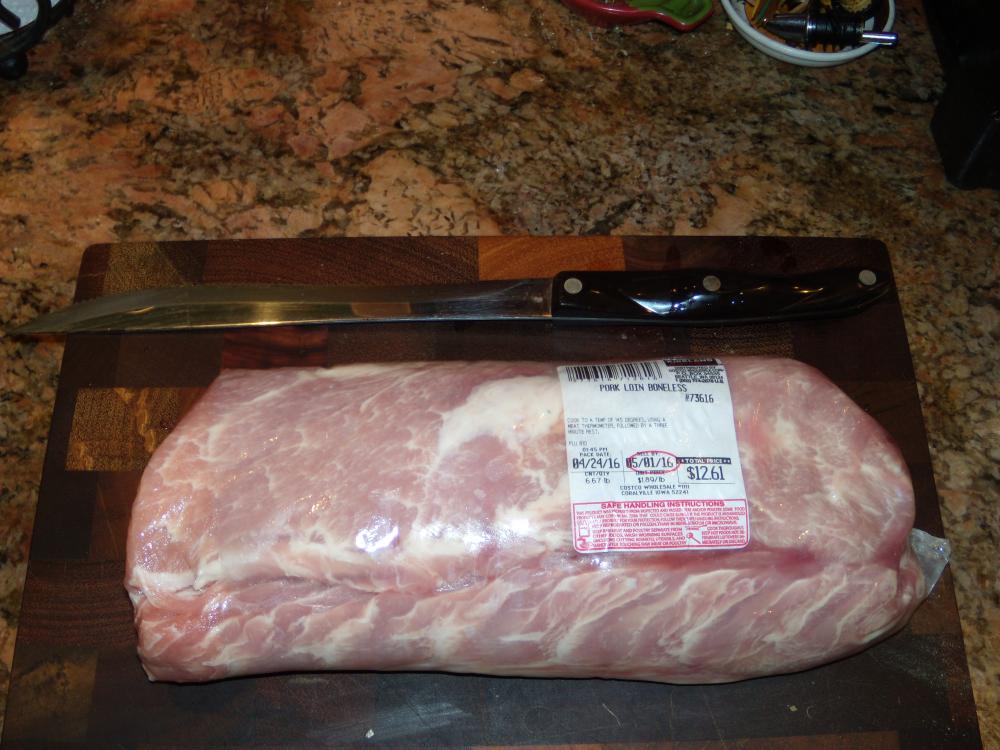
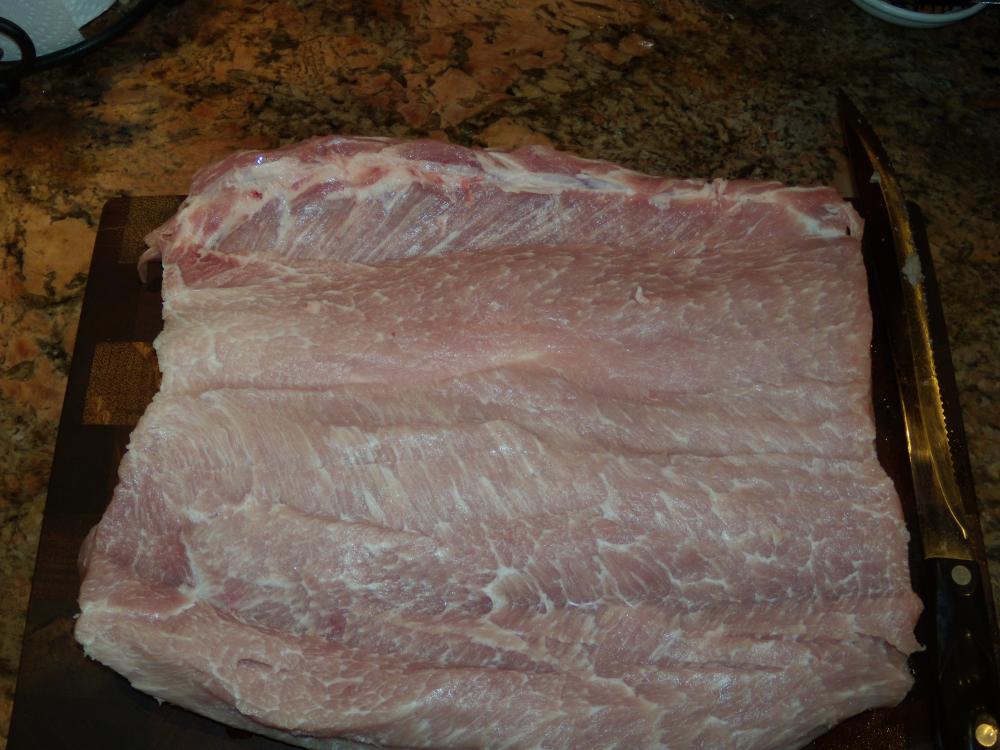
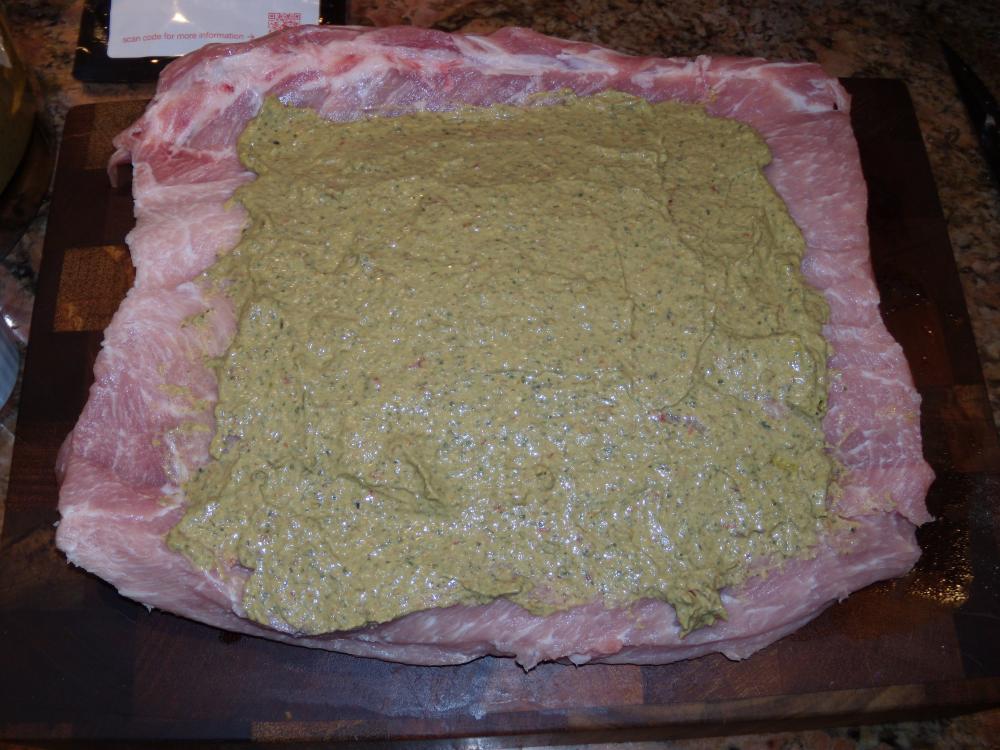
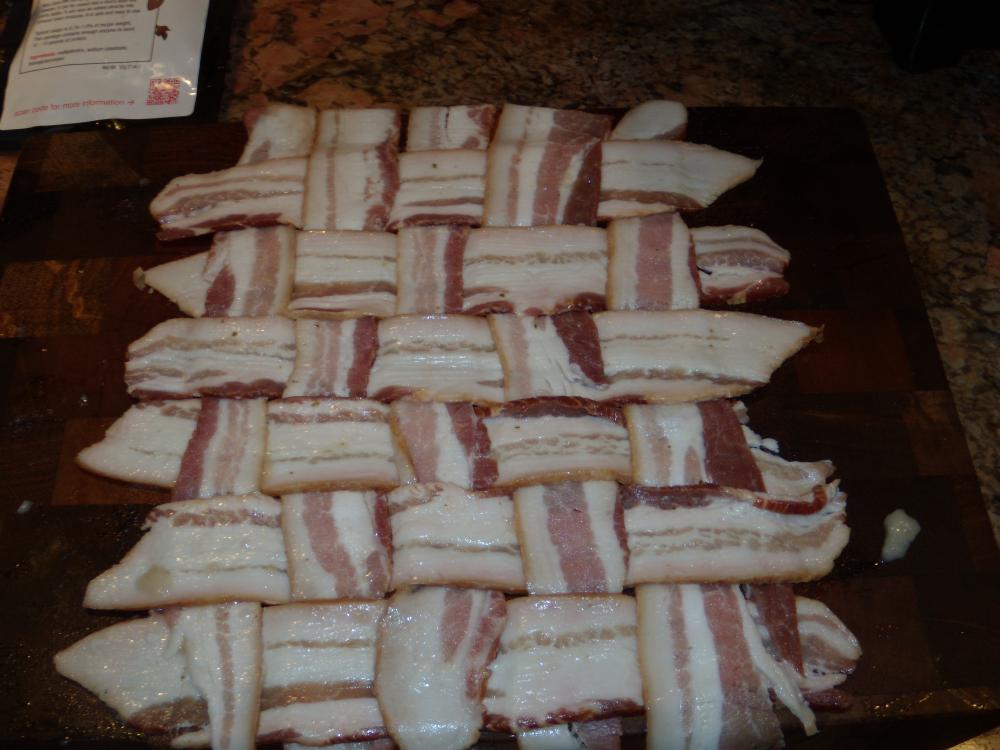
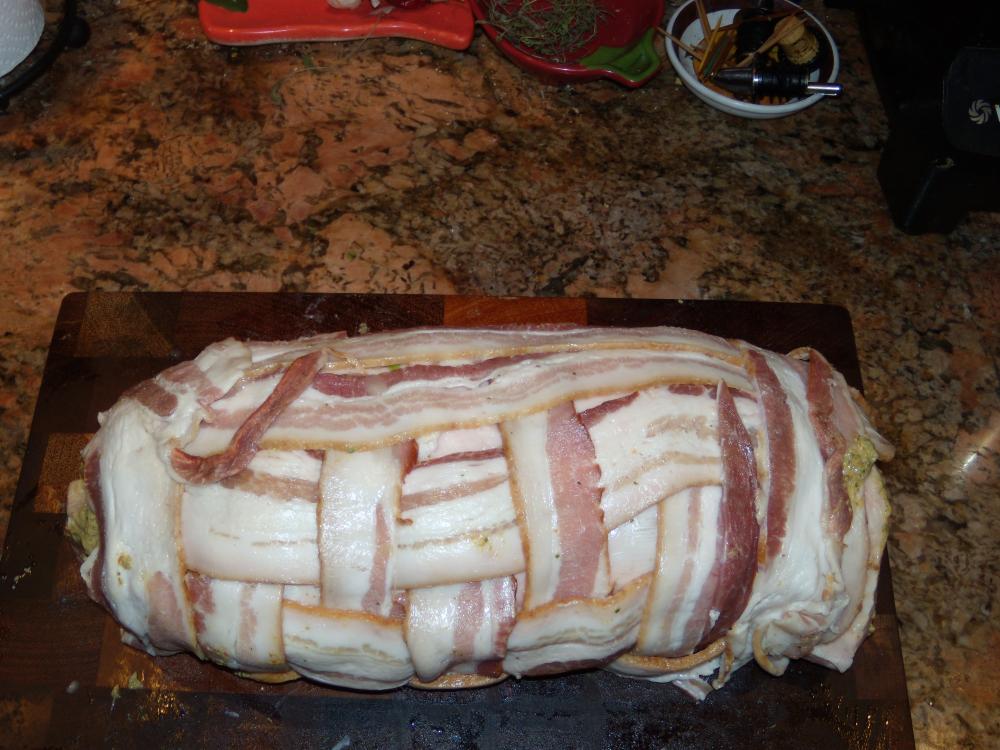
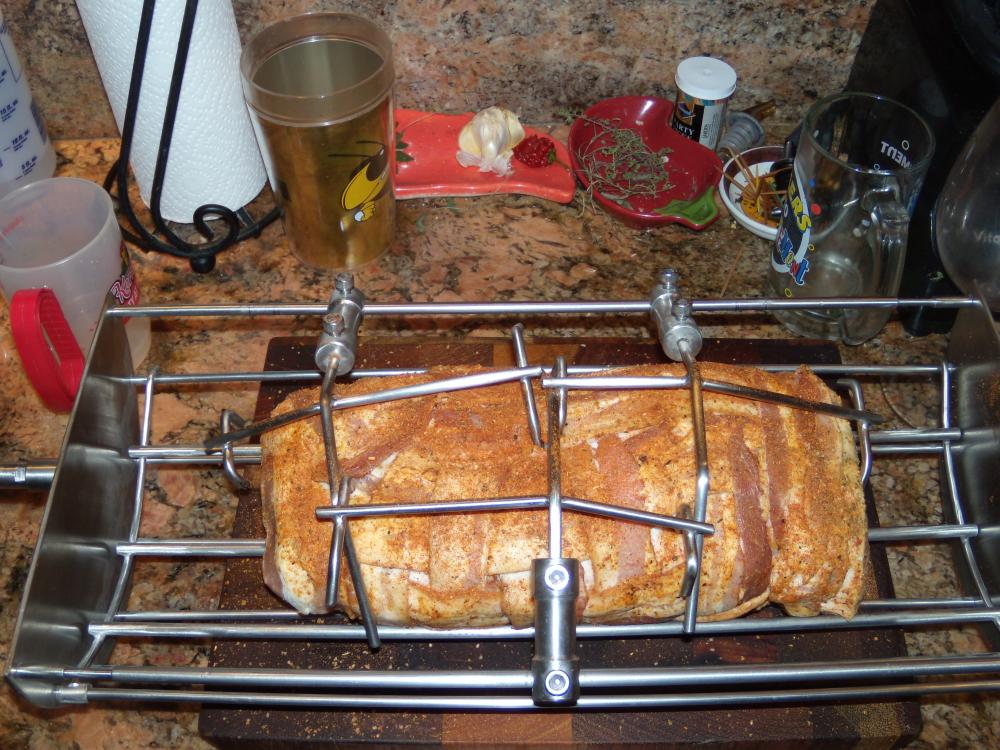
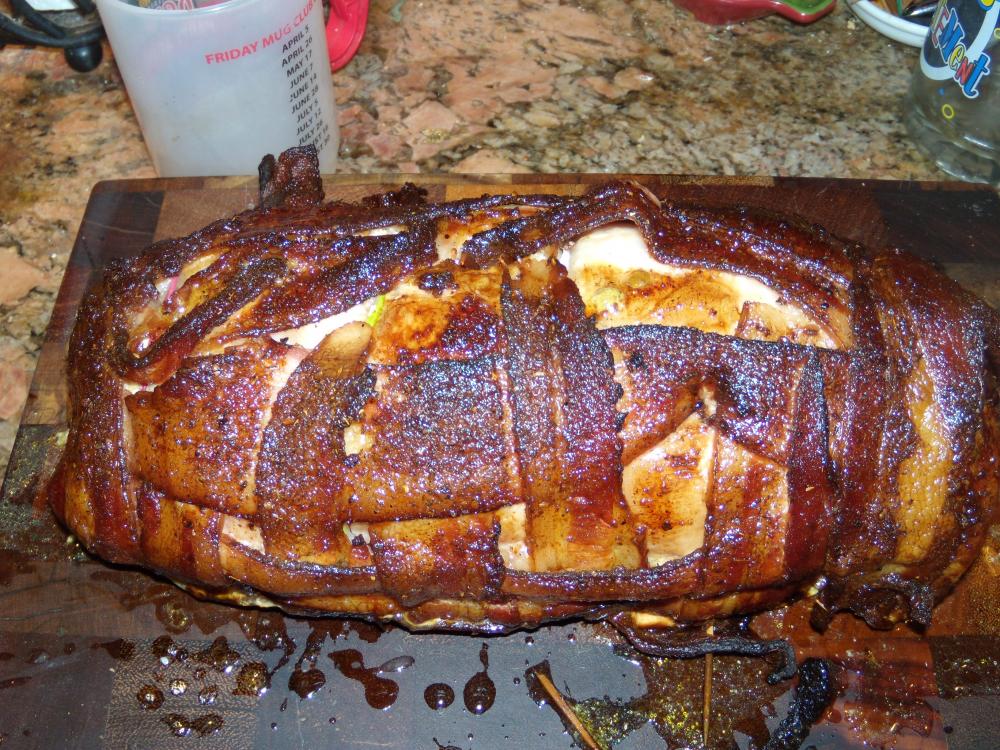
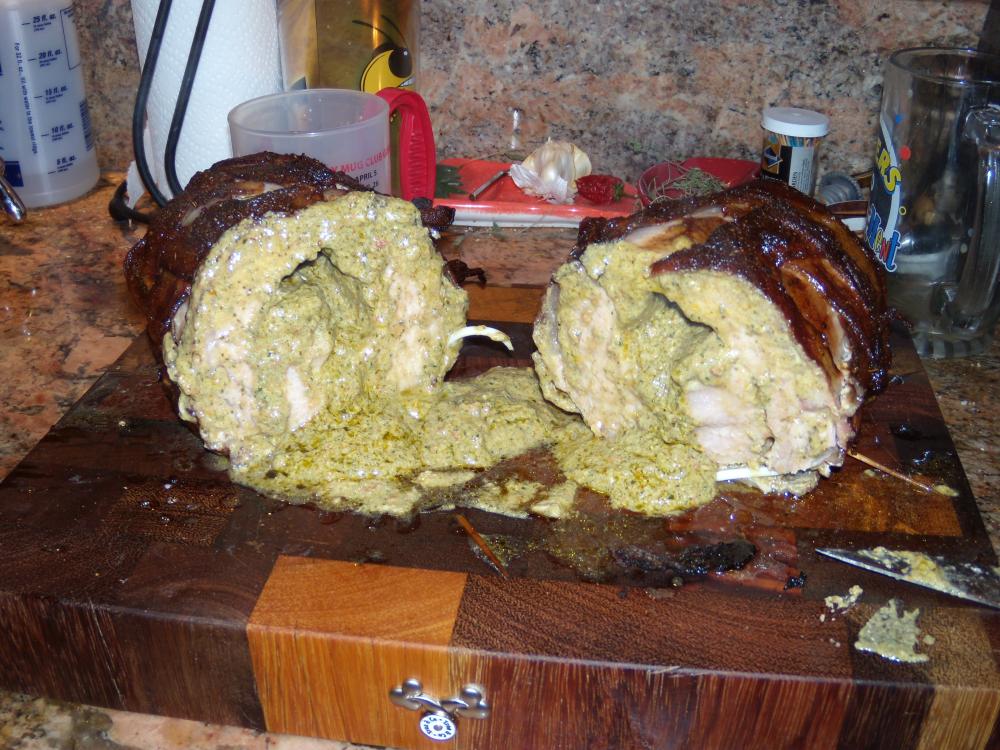
So, I finally got to use the new rotisserie basket on a cook (more on that part later). Was inspired by ckreef's stuffed chicken, so I started out with the filling materials. That's fresh sage and lemon thyme from my plants. I had an epiphany later after this picture was taken and tossed in some green peppercorns into the food processor. I bought a nice 6+ lb pork loin roast at CostCo, and cut it in half for this cook. Other half got FoodSaver bagged and frozen for another day. Cut open the roast for the stuffing. Slather on the stuffing. Next, the piece de resistance - the bacon weave. Coat everything with "meat glue" (Transglutaminase) to hold it all together. And, viola! Into the rotisserie basket. Onto the KK, @ 350F indirect, with a couple of chunks of hickory. Off the grill at an IT of 165F. That shiny new basket ain't so shiny anymore! It's soaking as I type this in a bucket of PBW. Uncaged. When I cut it open after about 15 minutes rest, the stuffing flowed out like lava! But, it was still damned tasty. No plating pics, as I had a dinner guest and I had dallied long enough with the pictures already. OK, now for the not good part. The rotisserie basket started to come loose about 15 minutes into the cook. The square end bracket started to unthread, as my motor spins "backwards" (counter clockwise - towards you when viewed from the front of the grill.) So, I left the roast in basket and just placed it on the main grate. But, the lid wouldn't close, as it was too long! So, in oven mitts, I had to get a wrench and take off the square shaft. The lid then closed. The violent flopping the basket was doing when the shaft started to loosen, cause some of the bacon weave to come undone, so I had to scurry and stick pieces back on with toothpicks. Not a fun way to start a cook! Now, the dilemma - do I just use blue LocTite on the square shaft threads in hopes that it will hold under load, and live with the difficulties of having to unseal it if I want to use the lower connection on the basket; OR, do I ship the motor back to OneGrill and ask for one that spins in the "correct" direction?? (The other option of taking the motor apart and reversing the rotation is not very high on my list, unless someone here who's done it, says that it's a piece of cake - no specialized tools or soldering needed!) Looking for a little help here, folks!


 1 point
 -
Exactly:)1 point
-
This is right in line with what those of us that cook using the Sous Vide technique know - it's the COMBINATION of temperature and time that are important for ensuring both tasty food and food that's safe to eat.1 point
-
I'm literally loosing sleep in anticipation..1 point
-
@EGGARY - at the time I got TheBeast, my 32" KK, I was cooking on a a Primo and had been for about 5 years. One of the guys at my church had always admired that cooker, but Larry said until he is an empty nester, buying a Primo wasnt even an option. He and his wife have 5 children … 4 boys and a girl. His wife a former high school teacher, home schools their children. As you can imagine, money is tight. After TheBeast arrived, I spoke with Jill, the wife and found out Larry's birthday was the next week and there was a party to which I was invited. I cleaned up the Primo spic and span, loaded it into a loaded pickup, stuck a bow on top, threw a bag of lump inside, and delivered it him. He loves it and uses it nightly. That Primo went to a wonderful home.1 point
-
The most challenging is the 16" cover because it's small. The larger grills have much more room and use the long T allen key that comes in from the other side.1 point
-
I too have a BGE, an XL, that I bought in 2009. Like a lot of you, it sits next to the KK. I use the table that it sits in to put the food on. The question is, have you just given away your EGGS or did you sell them ? The one bad thing about the BGE is one can spend as much in accessories as the EGG. I am considering a 32" down the road and having 3 Kamados might be a bit much. As to you Ed, I too have a Dark Autumn Nebula KK. I enjoy lighting it up every time. I have to wonder if the Queen will want to be invited for dinner. Hopefully the time will fly by fast.1 point
-
Congrats on the grill! You're gonna love it! As already mentioned, buy a bunch of CocoChar or CoffeeChar charcoal with your grill, it's great stuff and you'll never get a better deal on shipping.1 point
-
225° grill or dome, they'll equal out relatively quickly, indirect. The flat will be done first. At that point, you can do what you want with the point, I like burnt ends. It's tender at this point, so you can also cook some more, or serve the way it is. BTW, I prefer to cook at 275°, but it's not a big deal. Robert1 point
-
Do you mean 225 grill temp or dome temp? Also do you use the stone diverter under the main grill for indirect heat? I am trying to get the best method for a good bark. For a prime packer cut will the internal temp probe out the same temperatures for the flat & point ends? Sent from my LG-H810 using Tapatalk1 point
-
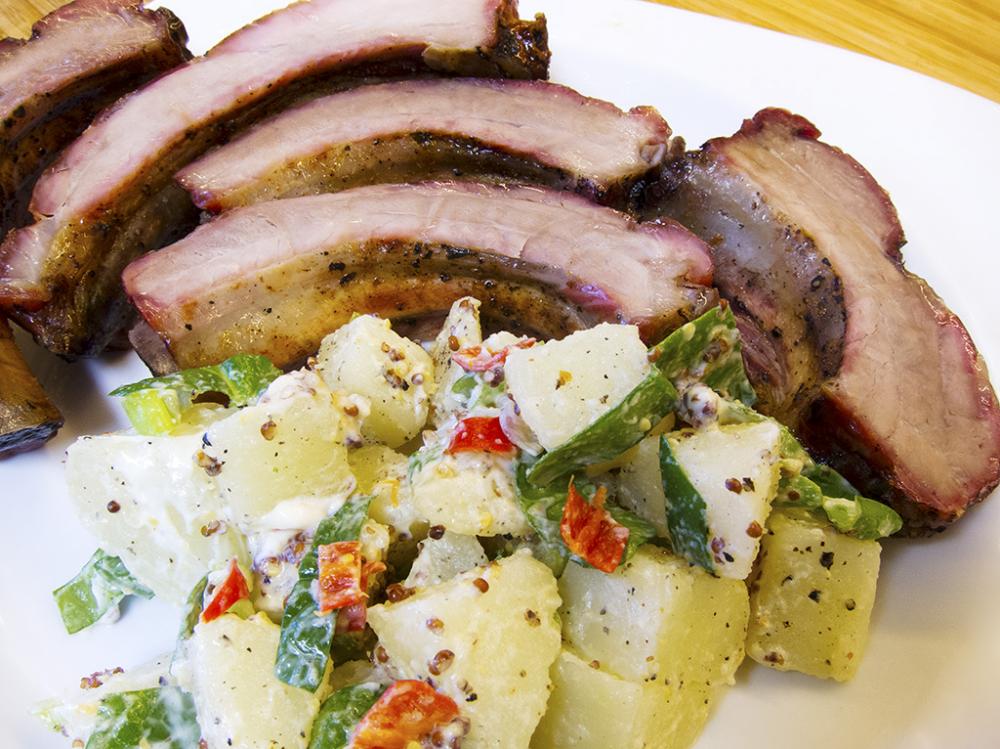
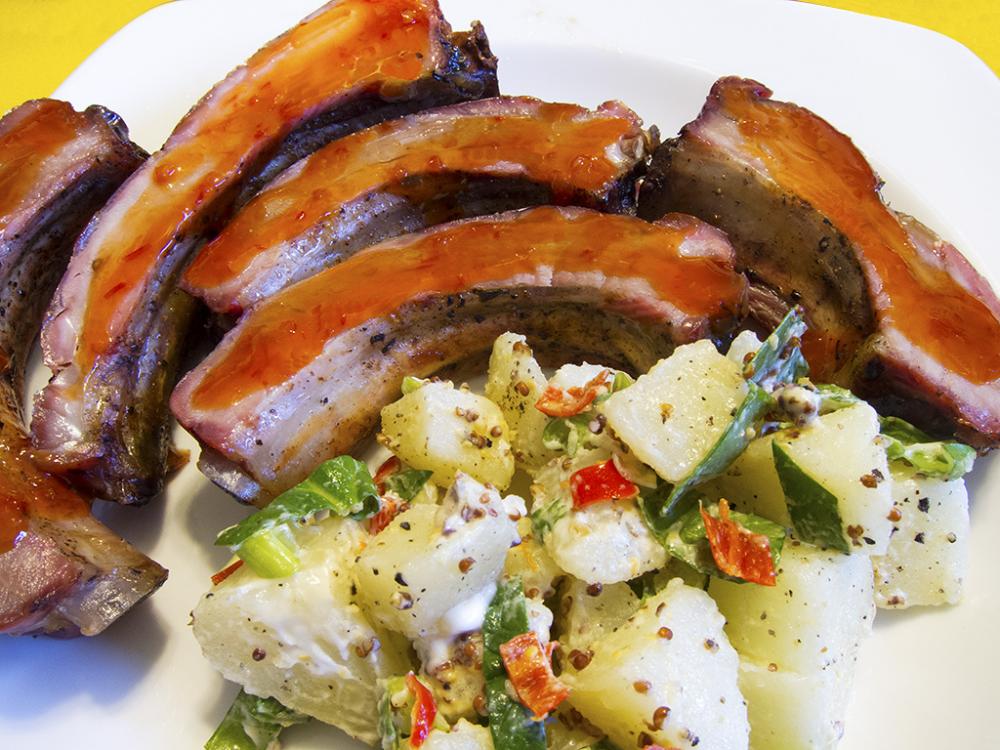
Snow is gone, it's nice and sunny so why not some potato salad and warmed up ribs. Now let's add a Maritime Hot sauce.
 1 point
 -
@ckreef I had to adjust my spring last night and your guide here - and more importantly, your in-person demo - made it a quick and easy process! Takes about 8 minutes. The hardest part is getting the cover back on with the washers in the right place. Those little buggers keep wanting to dance around while you are putting the cover back on.1 point
-
Well, I'll be, you make just enough of that delicious meatloaf to serve 3, guess that leaves me out.:(1 point
-
Absolutely gorgeous cook, Charles. Absolutely mouthwatering. Kudos to ya!1 point
-
Does mom have any old cars she wants to give away? Rob1 point

.thumb.GIF.006d23b9323146d2dd9055f4e195bc2a.GIF)