CeramicChef
-
Posts
3,246 -
Joined
-
Last visited
-
Days Won
29
Content Type
Profiles
Forums
Events
Everything posted by CeramicChef
-
Let's take a look at the charcoal basket splitter, or as the box says, charcoal basket shield. Now I"m used to a fairly heavy divider, the one for my Primo XL, and this feels about the same. Let's take a look at the KK BB 32" charcoal basket divider. Again, wrapped up in more swaddling than a newborn infant on it's first outing. After stopping to sharpen my knife, I went back to hacking industrial grade plastic wrap and after about 5 minutes, here are the components to the divider. Obviously I'm going to be spending some time actually RTFIng .... Reading The Freaking Instructions. This is going to be a journey rather than a slap dash fire 'er up and let's burn some meat! Ok, onward and upward. Nest stop, the first of two charcoal basket's I ordered.
-
Let's get on to something more interesting than charcoal. We'll start with the newly designed teak handle grill grabbers. These came swaddles in a cocoon of styrofoam and plastic wrap and looked like this when I extricated them from the styrofoam encasement. After a real struggle, and I do mean a real struggle they were so well wrapped in tape and plastic, here are the gorgeous teak handled grill grabbers! To say that these are merely grill grabbers is to do the craftsmanship a real injustice. These are like no other grill grabbers I've had in my hands! The handles are quite ergonomic and the solid construction is amazing. An amazing freebie ... yeppers, I said freebie. Dennis threw these in for free. Retail price elsewhere would be over $75. Ok, so let's move on to see something else.
-
Ok, so here we go. I don't mean to be pedantic with the number of photos and verbiage, but I'm going to try and bring each of you into my garage as I get this Big Bad ready to cook. The first thing I looked at was the Coconut Charcoal. I ordered 40 - 20# boxes. That came on it's own pallet. When or if I ever move again, I'm asking Dennis Linkletter if his guys can come and pack and ship my stuff. Here is a pic of the way each and every box of coconut charcoal is shipped. As you can see, every seam is taped, and I do mean taped very well! Now let's take a look at the coconut charcoal in its box. All charcoal is wrapped in plastic. To insure that condensation doesn't ruin the charcoal, there is a paper towel on top so that the charcoal doesn't absorb water and lead to problems in starting. Now to the charcoal itself. In the three boxes I inspected, only this one had a cracked piece of charcoal! Attached Thumbnails
-
Hey Doc - thanks for a great review. I've cooked these roasts from time to time and you're spot on ... they're actually pretty goo! They serve turkey roasts at the various military academies and the cadets eat 'em up! Of course, those chow hounds eat everything but the placemats, but my son sure liked 'em at the USNA. Never thought about trying them on the KK. I think I'll give it a try! Thanks!
-
Yeah, I understand what you mean tony. My Mom has been gone now for 4 years this coming Thanksgiving. Not a day goes by that I wouldn't give 5 years off the end of my,life for one more dinner at her table. That said, I guess I still have to say I HATE giblets. My Mom and Dad loved that stuff and I'd just pick the pieces out of the gravy, the dressing, and anything else! I always sat next to Dad and I'd just put those pieces on his plate. He'd look at mean, shake his head, and say "Boy, you don't know what you're missing!". I'd say that I hope I never have to find out! LOL! Tony, thanks for the kind words about the cook. I appreciate it and it means a lot coming from you.
-
Nolan8 - I used coffee wood for the smoke component of this cook. Dennis threw in a couple of boxes when I bought The Beast, aka the KK BB 32. It has been a real surprise. It has a nice delicate touch on the cook. It's not like the hammer, i.e. mesquite, but rather it's like a nice mild fruit wood. I didn't use the CoCoNut extruded charcoal. I had a basket full of Fogo lump already in The Beast and just lit it up. There wasn't all that ash after the cook. I cooked this turkey at 350F under control of the CyberQ WiFi. I started the fire at 9:00 AM and The Beast hit 350 at 2:00 pm in the afternoon. The CyberQ was choked down to about 30% so it was a nice gradual ramp up to 350F. I just lit the fire, plugged in the BBQ CyberQ, and went into my home office and monitored everything from my desktop. Talk about easy peasy! The Beast was heat soaked at 350F and the turkey went on at 3:00 pm. Temp was rock solid, and I mean rock freaking solid. The cook took a total of 3 hours. My target temp was 155F. I used a drip pan on top of a heat deflector to avoid direct heat on the bird. The skin was nice and crispy. I used grapeseed oil to cover the skin of the turkey. It has a higher smoke point than does olive oil. For a more even finish on the skin I could have upped the pit temp to about 400F for the last 45-60 minutes of the cook. Nolan, as you know, the KK makes kamado cooking just about effortless. Cooking on The Beast was about as simple as can be. I've cooked on kamados for 20 years and this was the absolute easiest turkey cook I've ever had. I hope I've answered your questions. If not, let me know what you'd like to know and I'll get you the answer.
-
Wilbur - how ya doing Pahdner? I cooked Tom at 350F for about 3 hours. He took to it like a duck to water! This is one of the easiest cooks I've done. This was the first cook using my new CyberQ WiFi. Look, temp control in the KK BB 32 is about as easy as it will ever be in a kamado. Thank Dennis for that. The KKs are easier than any other line of kamados to control and I firmly believe that the BB 32 is the easiest of all. The air control manifold on the BB 32 is a stroke of shear genius. But I have a boat load of turkeys to roast for my church this coming Thanksgiving, so I went and got a CyberQ WiFi and easy became even easier! I used the CyberQ to run this cook and it was the easiest cook on a kamado I've ever had. I had read everything here in this Forum about the CyberQ and how to use it. thanks to all you trailblazers for making life so easy for those who follow. I appreciate it greatly!
-
Howdy KKers! Below is a recipe for a vinegar based cole slaw from a very famous seafood restaurant, Herman's Seafood, here in OKC. The restaurant closed some years ago, but the recipe survives. I serve this about about half the cooks I do and it's a must have for pulled pork sammies! Enjoy! Herman’s Cole Slaw Ingredients: 1 head cabbage, thinly sliced 2 onions, thinly sliced 1/2 cup plus 2 tablespoons sugar 1 cup cider vinegar 1 teaspoon dry mustard 2 teaspoons salt 1 teaspoon celery seed 1 clove garlic, minced 1/2 - 3/4 cup vegetable oil 2 bottles of sliced pimentos Directions: Shred cabbage & onions. Cover with the 1/2 cup sugar. Set aside for about one hour. Boil vinegar, 2 Tbsp sugar, mustard, salt, and celery seed; pour over cabbage while hot. Add grated diced pimientos. Add garlic & salad oil. Let set 24 hours; serve cold. It is quite tart, so add sugar "to taste". Will keep in refrigerator for weeks.
-
Good Saturday Morning, KKers! Yesterday I did a turkey for a little get together here at Chez Chef. This was my first time using the CyberQ WiFi controller. I brined the turkey overnight and cooked it to an internal of about 155F. I injected a mixture of butter, garlic, thyme, rosemary, and a tad bit of maple syrup. Here's the guest of honor for the dinner party, Tom. Tom, meet the Gurus! Here are the contents of Tom's giblet pack and various other pieces/parts. From left to right we have the heart (i'm always amazed at how small the heart in any animal is relative to the body!), neck, (now from top to bottom), the plastic thing that keep the legs trussed up, trimmed fat & Pope's nose, and the single most useless invention of the late 20th century, the pop-up thermometer, continuing left to right we have the liver and finally the gizzard. All gone. I HATE giblet gravy and I HATE giblet dressing. Here's Tom joining the Polar Bear Club by taking a swim in some brine I made up especially for him ... salt, sugar, peppercorns, crushed cranberries, citrus peel, thyme, and rosemary. Tom all dried off after his overnight swim and about to be injected with the butter injection mentioned above. Two views of Tom all greased up, trussed up, and ready for his cook. Here's a pic of Tom with his new best plate friends ... roasted rosemary potatoes and roasted brussels sprouts that will be soon swimming in a nice mustard sauce. Here's the money shot! "Pete the Pink Pig" will ALWAYS have a place of honor at my table. Not shown is the Apple Cider based Cole Slaw that people rave about. I'll post that recipe in the recipe section. Finally, a shot of the surviving nit of desert ... a Blackberry Wine Cake. All in all a nice cook and a nice send off for Tom. Not one single tidbit left over for sammies during today's football action. Y'all have a great weekend!
-
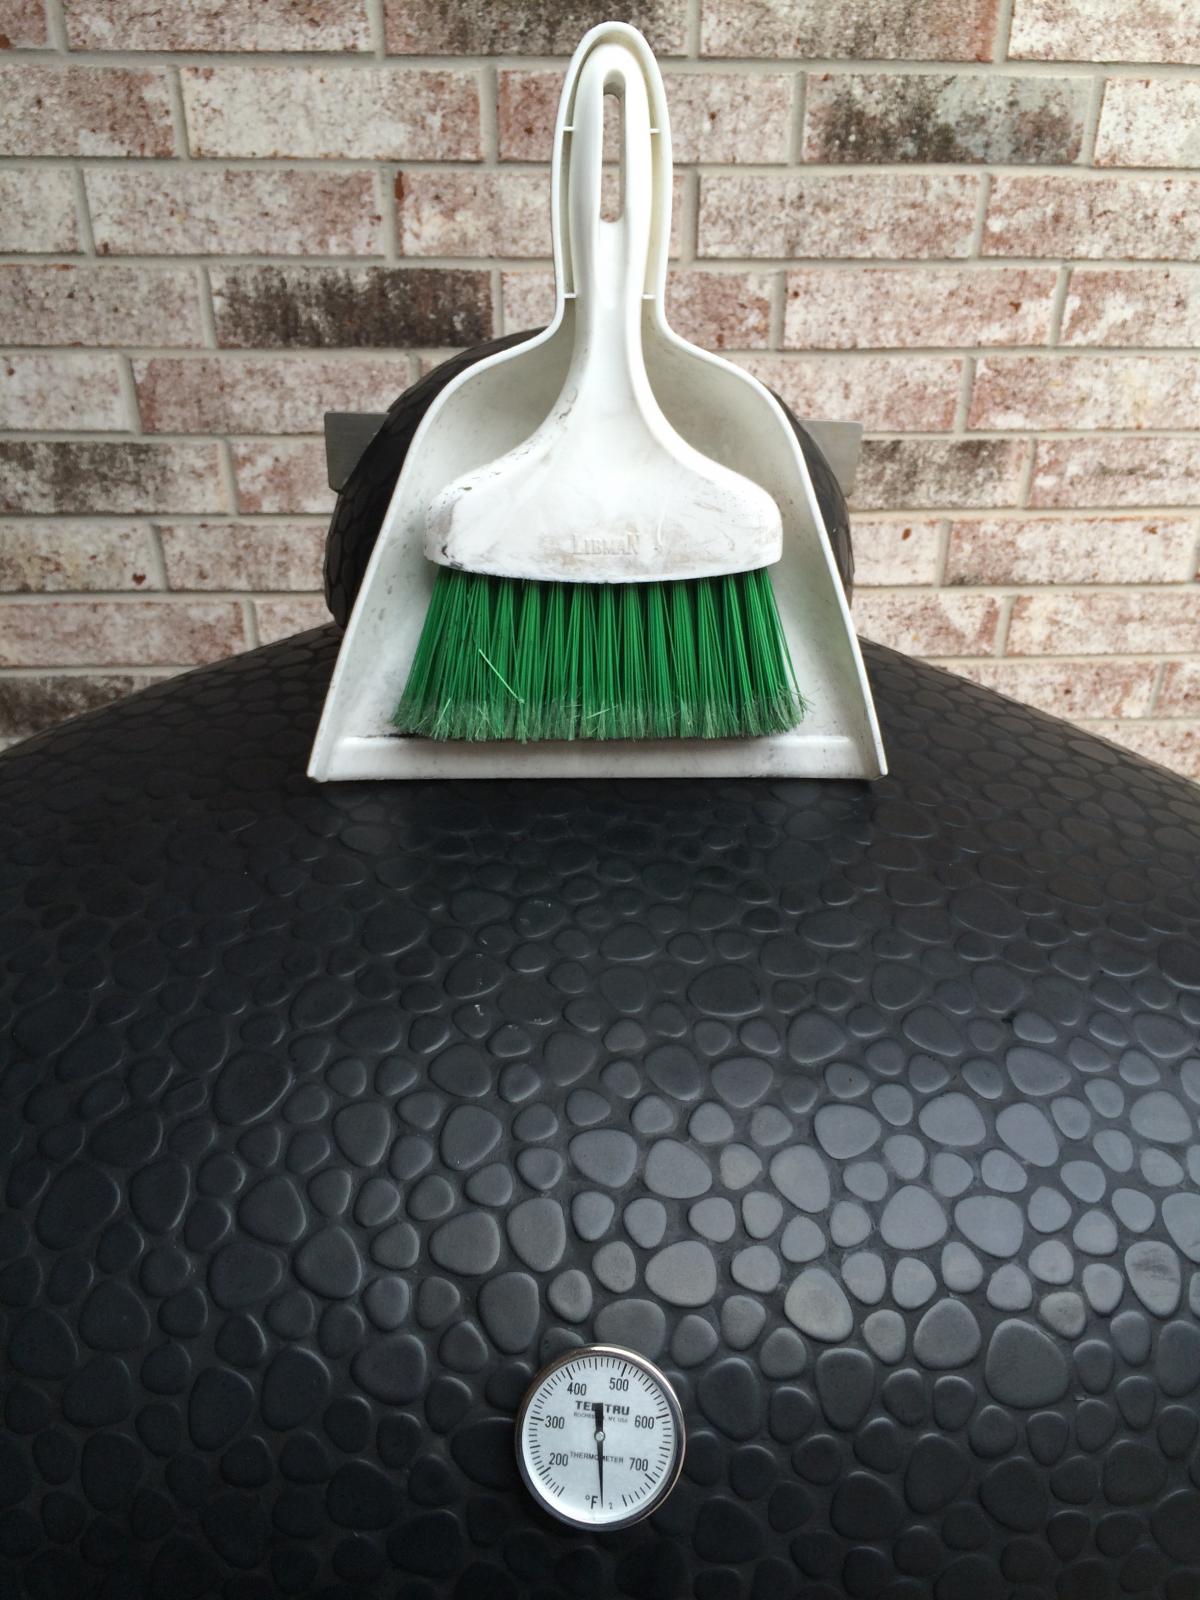
I'm a neat freak. I clean my ashes out of The Beast (a KK BB 32") about every week. I cook on The Beast 5-6 days a week, so between the regular lump that I burn on everything but my Low-n-slow cooks, I get a fair amount of ash. I, like most, used to use an ash tool and finish with my shop vac with drywall filter. I was at my local hardware store when I saw the following ... That little which broom/dust pan combo gets about 95% of the ash out quite easily. Then I just dump the ash in a galvanized bucket and let it accumulate. My neighbors want to ashes, so about once a month I tell 'em to send the kids over to get the ashes. I do a monthly run around on The Beast, making certain that all is ship shape. That's when I use the shop vac to really do a deep clean.
-
Holy smoke! That's one nice kitchen he's got there. Men and boys and the price of toys. But as we've said ... "You worked for it, you earned it, you deserve it, so damn well enjoy it!". Ted, that is one seriously nice outdoor kitchen! Nice, very nice indeed!
-
Wilco!
-
Amen! Guys, I've been up to my ears lately. I'll get this thread updated with the pics, 10 at a time, this coming week.
-
Wilbur, for your maiden steak voyage, I'd say you knocked this one out of the park! Heck, I'd sit down at your table and eat anything you cook! Very nicely done, my Friend, very nice indeed! Kudos!
-
Now those are some dadgummed good looking ribs! Nice cook, MadMedik! Thanks for posting those pics.
-
I have not had exactly this experience with the ECC. I have used the ECC on several occasions. What I have seen is that there does seem to be a little degradation of the ECC (not all of the ECC in the basket) to a powder. All the pieces I handled seemed to have some very small degree of sintering .... But nothing turned completely to powder when handled. I use two baskets ... one for ECC and the other for regular lump. I'm not very delicate when transferring baskets and I've never noticed large amounts of unburned ECC powder in the bottom of my KK BB 32 when changing baskets. I've done a lot of low-n-slow cooks and a fair number of high temp sears using ECC without any problems. Disclaimer: I haven't used the basket splitter on any cook with ECC.
-
Robert - congrats! A beautiful outdoor kitchen made all the more beautiful by the dual KKs! Here's to great cooks and even better memories with family and friends!
-
I'm terrible at cooking Chinese cuisine; simply terrible. I guess I forget that there is a lot of sugar in it and I burn stuff easily. I'm looking forward to learning from mguerra and Wilbur. Should be interesting!
-
tony - I've got probably somewhere in the neighbor of 40 pics documenting the unwrapping of The Beast back in early September. I guess I'll just take it slow and easy.
-
Wilbur - great idea for leftovers! Buddy, talk about Outside The Box thinking!
-
Hey Dennis - What is the limit with respect to the number of pics that can be posted at once? I keep getting an error saying I'm trying to post too many. Thanks in advance!
-
Howdy KKers! It's been almost 2 months since I took delivery on The Beast, a KK BB 32. While I initially posted what follows in another Forum, I thought I'd post it here in hopes that this will help potential KKers make their KK Purchase decision. I just finished taking delivery on the Komodo Kamado Big Bad 32" we've been waiting for! Also got 40 boxes of coconut charcoal. First, let me say that Dennis Linkletter is a joy to work with. Second, This thing is MASSIVE! I can't begin to tell you what this thing looks like crated. The top of the crate is just shy of 5' and its width is 44". With all the accessories, it stands over my head, and I'm 6'1". Third, this thing is so well packed/crated. Now a scratch on the crate at all. This came from Indonesia and it looks as if it were assembled right here in OKC. Very, VERY impressive. Ok, I"m on a mission. Here is a beginner photo to whet your appetites. More to follow! Attached Thumbnails
-
Damn! Am I THAT obvious! LOL!! Yeah I guess so. Darn the luck!
-
amir - every once in a great while even a blind pig like me finds a acorn! I've always figured that if you've got The Beast fired up and on flight idle you may as well take it around the pattern on more time. Y'all have a great day!
-
tony - i just got a mixer of that new Guinness Blonde in my refrigerator cooling down now. I finally found some ... it seems to be a BIG hit for Guinness based on what I hear for the owner of the liquor store where I do all my shopping. Also picked up some Harp and a mixer of regular Guinness. That's all my private stash ... only my very close friends know about it. Everyone think's I'm all over Miller. Save the best for family and very close friends! And yeah, I know Guinness is a diet beer! Here's looking up your old address!