


egmiii
-
Posts
171 -
Joined
-
Last visited
-
Days Won
4
Content Type
Profiles
Forums
Events
Everything posted by egmiii
-
Agreed. I've tried fat cap up, fat cap down, thin cap, thick cap, and every other possible variation over dozens and dozens of cooks. For me, fat cap completely off is the hands down winner. I can't get enough of the delicious bark. I normally wrap between 4-5 hours, which doesn't leave a lot of time for a fat cap to render much, or for the meat to become excessively dry. I've gone back and forth for years, and prefer the wrap.
-
another newbie question - how to use as smoker
egmiii replied to JDBBQ's topic in KK Pre-Sales Questions
When do you guys typically put the smoke pot on the fire? As the grill is heating up or when the food goes on? -
I used the deflector a lot when I first got my KK. I burned a ton of charcoal (full basket gone in 8 hours at 225). It seemed to keep the heat contained in the firebox and limited convection. I now use the smallest drip pan I can find to collect the drippings from whatever I'm cooking at the time. I place it on the rack under the main grate, or on the main grate if I'm cooking on the upper. The further away from the fire the better. My fuel consumption has dropped dramatically, the food is better, and the grill is far more consistent. Others may have a different experience, but this has worked very well for me.
-
I have the VP215, so I know what you mean about the incredible force exerted on the lid. Obviously the rubber pad is crushing the seal bar, to the point that air can't escape. The the thickness of the lid gasket and the height of the seal bar are two variables likely out of your control. The hinge fit and thickness of the rubber seal bar are variables you can control. I'd say get the hinges fixed, then shave the rubber seal bar to ease the pressure. There are plenty of Amazon reviews mentioning how the rubber seal bar needs to be installed by the consumer on that model. A little odd if you ask me, but if it came preinstalled, then it's possible they did it wrong. Especially considering it wasn't designed for your machine.
-
Stuff like this just rubs me the wrong way
egmiii replied to billg71's topic in Sauces, Mops, Sops, Bastes, Marinades & Rubs
It looks like my post ruffled a few feathers. As Charles stated, and I'll confirm, this was certainly not my intent. I value this forum, respect the members, and enjoy the spirited and friendly dialogue, so please allow me to clarify and elaborate on my previous remarks. My final comment was a reaction to the original post regarding the pricing of Lane's rubs for BBQ. I typically use around 8oz of rub on my weekly overnight BBQ (CyberQ has made it too easy). At Lane's prices, that's 3.21 x 8 = $25.68. My Chris Lily inspired mix runs about $0.50 for the same amount (I buy spices in bulk at Restaurant Depot). "filthy rich" was my over the top way of saying their "little jars" (4oz) are relatively expensive considering my "serious" usage patterns, and seasoning preferences. In retrospect that was a poor choice of words and could have been phrased better. There are plenty of excellent rubs sold online in larger quantities for far less than Lane's. Serious BBQ competitors and weekend warriors swear by them. I was simply commenting on the relative value proposition of a $3.21 per ounce rub used on a regular basis. In my case, that's over $1200 per year. In my opinion, BBQ and grilling are very different styles of cooking, and I really try not to interchange the terms. I consider roasting, smoking, and braising distinct techniques as well, but I digress. Raw ingredients used for grilling are almost limitless, and the seasonings to complement them are nearly as diverse. I tend to buy branded rubs to keep things exciting and convenient. As I said before, the price per ounce is high, but the cost per use is low. I grill once or twice a week depending upon the time of year, and just for my immediate family. Rubs usually expire before I run out. I believe raw ingredients for BBQ are limited to the high collagen cuts of pork, beef, and the occasional chicken leg. I explored various store rubs early on, but eventually settled on just salt and pepper, or a sweet heat blend. I find the familiar flavors comforting, and my guests discourage experimentation. "If it ain't broke, don't fix it" they say. Quoting ckreef - "There is a lot more to the world of BBQ and grilling then just ribs, butts and brisket." I agree. Your forum posts are likely one of the most comprehensive resources demonstrating the versatility of the kamado style cooker. You not only talk the talk, but you walk the walk. Many readers across the forums are better cooks because of your contributions. Myself included. Quoting ckreef - "Personally I like almost everything McCormick" Something else we can agree upon! Here's a shot of one of my McCormick drawers.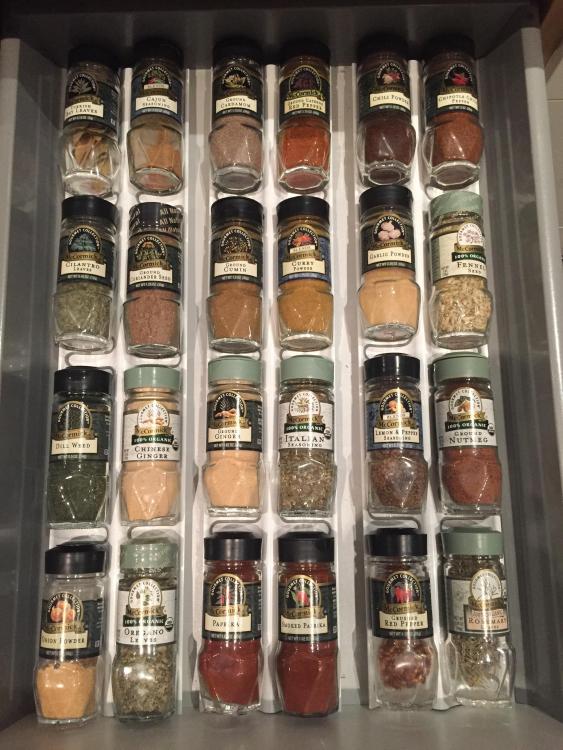
-
Stuff like this just rubs me the wrong way
egmiii replied to billg71's topic in Sauces, Mops, Sops, Bastes, Marinades & Rubs
Until I bought the KK, I used a variety of store bought rubs. Some were great and others so so. The price per ounce was insane. But since my grilling was limited to small cuts and only required a light sprinkle, the overall cost per serving was minimal, and it allowed me to explore a variety of flavors. That being said, once I got into smoking multiple packer briskets, pork shoulders, and ribs, I started making my own rubs. If I used the store made blends, I'd spend more on the spice than the meat! Store rubs still have their place in the grilling world, but anyone serious about BBQ, who's buying little jars of rub is either filthy rich, or clearly not seasoning adequately. -
I vacuum pack my leftovers and freeze them. Like others have said, just reheat it in simmering water around 145F. If you go hotter, once opened it will lose too much moisture before serving. The softer bark is the only way I can tell it didn't come straight from the smoker. I reheated a brisket point using this method the other day and it was outstanding.
- 16 replies
-
- 1
-

-
- storage
- pork shoulder
- (and 1 more)
-
I'm a huge fan of the CyberQ. Rob said it best " it makes simple even simpler".
-
I've only done a few cooks wth my new CyberQ but plan to use it every time (for low & slow / roasting). I burn far less charcoal, get thin blue smoke faster, and have consistent temps over long periods. I've been setting the top vent 1/8 turn open and the guru damper 1/3 open. Results have been great. Based on Rob's comments, I might try opening the guru damper all the way next time. My method has worked, but I'm always open to new ideas.
-
Happy 4th to all my KK friends and family
egmiii replied to DennisLinkletter's topic in Komodo General
Happy 4th to you as well! I'm currently at hour 16 on my 8# pork shoulder. Thanks to you, we're going to have the best 4th of July BBQ we've ever had. -
You'll have to post a pic of all that meat on the grill. I'd really like to see how it looks.
-
Welcome and congrats on your new toy! Ever since getting my KK last October I've been on a mission to get a clean burning fire as quick as possible. I'd consider anything under an hour success, but 45 minutes would be nice. I typically use Royal Oak ($7.88 a bag, can't go wrong) but have used Coffee Char as well. Both produced equal amounts of the white smoke for the first hour. I think the white smoke is more from the chunks of cherry wood embedded in the basket, but I have also noticed a fair amount from a full basket of fresh straight charcoal as well. Here are two things I've discovered that helped tremendously: 1) Top off your charcoal basket before every cook. The fire is way more consistent, and you only burn off the volatiles from a small amount of fresh charcoal. The stuff underneath tends to burn very clean on the second cook. 2) Using a CyberQ, I set the top damper to 1/8 open or less, and the fan damper to 1/3 open. I start the CyberQ right after lighting the charcoal. This has shaved at least 30 minutes off my wait time. My next experiment was to ignite a small amount of lump in the charcoal chimney and dump it on top of a nearly full basket. Thankfully the tips above have produced results satisfactory enough to make the involvement of another piece of equipment less than appealing.
-
Best vacuum packer? (FoodSaver alternatives?)
egmiii replied to Syzygies's topic in Relevant Product Reviews
I picked up the VP215 during the 30% off sale. I'm very happy with it so far. I no longer worry about freezing meat and ruining it with freezer burn. Defrosting is better as well. Just drop the sealed food into some room temperature water. Reheating BBQ is great. Toss it into the sous vide at 160, and you are good to go in 30 minutes. Tastes just like it came fresh from the smoker. It's a great compliment to the Komodo Kamado. -
If you plan to do long unattended cooks, the CyberQ is worth it for the piece of mind. I picked one up a few weeks ago and have used it on the last 3 cooks. While the KK is simple to control and holds steady, the CyberQ seems to get me to the thin blue smoke phase much faster. It also seems to improve the natural convection within the grill. I burn noticeably less charcoal while using a deflector, and the outside of the grill is cooler around the firebox. Going forward I plan to use it on every cook.
-
Dennis, you gave me a good chuckle with that one. I can't wait to hear his first cook review.
-
Collagen can denature at low temperatures. It breaks down in the human body over a period of days and is recycled. As the temperature rises, it breaks down much faster. I quoted 180-200 before because it breaks down at a pace quick enough tenderize the meat before it dries out. Like you said, it's a very complex process, and varies significantly across different animals / cuts of meat. I routinely add powdered gelatin to my pan sauces. It provides great texture and adhesion to the meat. Kenji Alt-Lopez does an excellent job breaking down the concepts in his book "The Food Lab".
-
Many of the roasted chickens I've seen are very dark and have taken on far too much smoke for my taste. Your roto cook, on the other hand, looks outstanding. Congrats...
-
@CeramicChef I made up the three stages based upon my experience to date. Please don't treat these as generally accepted BBQ facts. Throwing some meat on until it probes tender is a simple and proven technique for awesome BBQ. The only problem is it requires some planning and flexibility. It's done when it's done, not a minute sooner. In theory, given sufficient knowledge of the three stages, you could produce similar results to the tried and true method, but in a time span than better matches your time constraints. Possibly even better. Instead of spending 6 hours in the stall and 3 hours breaking down collagen, would you be better off spending 3 hours in the stall and 6 hours breaking down collagen. I couldn't give an opinion either way. But if I were forced to shave off some time to get dinner on the table, it would be nice to know where to cut. Regarding a drop from 300 to 225. I say, just toss it in the oven. Or just let the grill cool down on it's own. Maybe start the cool down an hour early. Or wrap it in a cooler for a bit. Lots of options! Maybe all of this is for nothing, but it keeps things interesting, in my opinion. BBQ science and art are not mutually exclusive concepts. Chemical reactions and secret spice blends make for some good eating! (FYI, if you're accustomed to using SAS / SPSS, check out R. It's slowly become the dominate statistical package. Virtually every university student now uses it, and it's free...)
-
I find this thread fascinating and feel compelled to chime in, despite my mere 7 months of experience. While solving for the baseline degree temperature may make sense as a starting point, I believe the formula must become a bit more complicated to be useful. Forgive me for using very loose numbers below. I break my cooks down into three phases, specifically tied to the meat temperature. 35F-150F - "Smoke Ring": During this phase, I do my best to maintain a very clean (light blue) smoke and low temperature. The top damper is choked way down to maximize moisture, smoke condensation, and development of the smoke ring (from NO and CO). I firmly believe this phase can't be rushed. Lets assign it a constant, A=4 hours. 150F-180F - "The Stall": Smoke condensation drops significantly and the meat temperature stalls somewhere in this range. This is the phase where you can generally run the grill hot to accelerate the moisture loss, or wrap it to avoid moisture loss. The weight, shape, and water/fat content are significant variables when unwrapped, and would amount to a unique BBQ DegreeHour for a given permutation. Lets assign this phase variable B, where B (in hours) = BBQ DegreeHours / (Grill Temp - Base Temp). When wrapped, a universal constant could be substituted for BBQ DegreeHour, versus the highly subjective number for unwrapped. 180F-210F - "Collagen Breakdown": Collagen breaks down into gelatin, giving BBQ its wonderful texture. Arguably, this is the most critical phase. All the wonderful smoke flavor and moisture in the world won't help if you can't chew your food. I believe an exponential relationship exists, similar to the bacteria kill curve. Anyone who cooks sous vide is generally familiar with the concept. Everything dies instantly > 160, but with enough time, it will also die in the low 130s. Gelatin will form eventually in the 180s, but a brisket will be ready in short order at 208. I believe this is why probe tender rules for doneness, not the final temperature. The journey is more important than the destination. Unfortunately I have never taste tested the difference in texture between a brisket held for 8 hours at 190, vs 30 minutes at 208. I have, however, eaten many corned beefs boiled for a couple hours, and can say the corned beef simmered at 190 for 10 hours was far superior. I suspect this is true for smoked meat as well. Lets call this final period C (in hours). Putting it all together and you get A + B + C = Total cook time. A traditionalist may go 18 hours at 225 unwrapped. An optimizer may go 225F x 4 + 300F X 3 + 225F x 3 for a 10 hour cook (with a wrap in phase 2). And a late sleeper might go 250F x 3 + 325F x 3 + 350 x 1 for a 7 hour cook (with a wrap in phase 2). Ideally I'd love to produce consistently good BBQ. Knowing all the variables involved makes that a difficult proposition. Understanding the phases above, their contribution to overall quality, and the techniques used to reduce the time spent in each has been a focus of mine. I've eaten more pork butts alone after midnight than before, so consistency has become a priority. Hopefully my new CyberQ will allow the exploration of these concepts in a consistent way. I look forward to your thoughts.
-
I've been watching the episodes on the website. We have 4 PBS stations on my cable lineup and none of them were airing Project Smoke this weekend. Of course I'm in the Northeast where BBQ isn't very popular at the moment, so they might only appear as a marathon run randomly this summer.
-
Congrats. Wait until your grill actually appears in an episode. So far only episodes 201 and 202 are available in my area.
-
It might also be helpful to know the intended audience for this FAQ. Is this a top 10 list for new visitors to KomodoKamado.com, who have never used a kamado before? Or is this for new owners who could use some help on the first few cooks. A new owner FAQ would likely be too large for a casual visitor to digest.
-
I'll start; How to light your grill and get it ready for low n slow, grilling, or baking pizza. For example, after lighting a few coals using whatever method suits you, do you shut the lid right away, or leave it open for a few minutes? How many turns on the top hat? How should the draft door be set? How long do you let it rip before closing things down? Is it time or temperature based? When do you add the smoking wood? I have lit my grill around 30 times since last October (when I took delivery) and have not been satisfied with my technique. It seems to take at least a full hour or more to get clean smoke and 240 F. I'm convinced it's just me, and would like some advice on how to speed up the process and reduce the tinkering. I'm clearly over complicating this basic task.
-
I use a Wagner heat gun. But you need an outlet right next to the grill to make it easy.
-
For those of you near a Home Depot, they are blowing out 7KG bags of Royal Oak today only (5/20/16) for $7.88 per bag. Obviously it's not nearly the same quality as Komodo Kamado brand, but I'm willing to overlook the flaws at that price.
