

ckreef
-
Posts
6,228 -
Joined
-
Last visited
-
Days Won
157
Content Type
Profiles
Forums
Events
Everything posted by ckreef
-
Dang it man. That is awesome. Can't wait to see some more pictures. Reef's Bistro
-
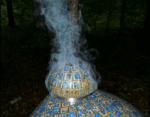
When we were out and about Saturday morning we came across a really cute, little CI Dutch Oven. The original idea was to cook a small two person peach cobbler ......... But then I got thinking ......... . So Sunday morning when I broke out the drill Mrs skreef said (with a pouty lip) "Bye Bye little cooker." Of course I replied with "But it's for the good of mankind!" . That's 5 decent sized chunks of smoke wood that I split (with a machete) so it would all fit. Get the kamado up to temp (250* in this case) then put the smoke pot right down on the coals. Install your diffuser, grate and food. Close the dome. It took the smoke pot about 5 minutes to heat up. After that it was about 3 1/2 hours of the best smelling thin blue smoke I've ever had. Constant the whole time. So glad I listened to CC with this idea. Reef's Bistro
-
Now that I've found a small Dutch oven that will work in my 19" TT how many holes should I drill in the bottom. I'm thinking 3 x 1/8". Reef's Bistro
-

Virtual Tour Lane Packing - Peaches
ckreef replied to ckreef's topic in Jokes, Ribbin' & Misc Banter!
We did grab two 1/2 bushel boxes of peaches. They had prime #1 grade, one box $35 or two for $65. They also had #2 select grade, one box for $20 or two for $30. . We got the two for $30. #2 selects are the imperfect peaches. May not be perfectly round but the boxes had a better mix of sizes. They work good for canning but they are not fully ripe yet so you have to let them sit on the counter for a few days. A much better price and only a slight Hassel to deal with. . Grill Peach Reef Jam coming soon. Will probably can some peaches too. Reef's Bistro -
Nice looking KK. Those tiles are awesome. . One thing I noticed. In the hinge picture (4th picture) I believe you are missing a cotter pin. Should go in the little hole at the end of the hinge pin to keep the hinge pin from slowly working itself out. Reef's Bistro
-
The Reef's love kamado buns. Looks good. Reef's Bistro
-
Very nice picture. Reef's Bistro
-
I've posted pictures of this place before but this time I thought I would do a virtual tour of their packing machine. Me and Mrs skreef went there today to buy some cheap peaches. Lane Packing is the only peach packing facility in the US that still packs the boxes by hand. Fasten your seat belts the tour is about to begin. The peaches are picked and put in large plastic bins. Those bins are put in a large water refrigerator (large plastic covered doorway in the first picture). Once the peaches are cooled to the appropriate temperature they are brought out by fork lift and put on the packing machine receiving area. A machine picks up the bins and dumps them on the conveyor belt. The peaches then get split up and go through a machine that removes the fuzz, washes then waxes them. They then go through an inspection area. The really good ones are culled out and put on the small upper belt. Any remaining leaves or bad peaches are put down the small square trash shoot next to each inspector. The peaches meet again and go up to the grading belt/computer. This new belt holds each peach in a known spot. They pass through a laser/computer area (under the green plate). The laser inspects each peach. The computer registers it's size, grade and position on the belt based on the laser inspection. They then pass through the sticker machine. They proceed along. Based on what the computer registered about that peach it's kicked off and goes down the appropriate slide to the correct boxing station located on the other side of the cat walk. Here the peaches are hand boxed for different markets/customers. You can see the different boxes at the various packing lanes. This is a really kewl place to visit. We go here every year during peach season. They have a decent store where you can buy everything peach and more. If you live in GA or are passing through on I-75 take a small detour to check it out. Reef's Bistro
-
Great pictures, great looking KK. The story of your wife is priceless. Reef's Bistro
-
That's a really kewl idea. Great breakfast. Reef's Bistro
-
Great pizza and that is a great entry. I love Tikka Masala. Will have to make this sometime. Reef's Bistro
-
Whenever somebody asks I always tell them to post pictures directly to the forum. When everyone uses third party picture hosting it eventually wreaks Havoc on a forums content. Reef's Bistro
-
Never had smoked trout. Interesting cook. Reef's Bistro
-
Love those homemade cones. Reef's Bistro
-
Nothing wrong with that burger meal. I like mine md well but can go md in a pinch. Reef's Bistro
-
That is awesome. Can't wait to see some pictures. Reef's Bistro
-
King Arthur Artisan Pizza Tutorial
ckreef replied to ckreef's topic in Bread, Pizza, Pastries or Desserts
Interesting you tune into probably the most important piece of information in the entire post. It's the piece of information that allows the edge to experience the most oven spring as possible. . For thin and crispy it really kills me to see people take a rolling pin to their pizza dough. Rolling pins are for pie crusts not pizza dough (with a very few exceptions). Reef's Bistro -
Meat looks good but that is a really fantastic view. Reef's Bistro
-
King Arthur Artisan Pizza Tutorial
ckreef replied to ckreef's topic in Bread, Pizza, Pastries or Desserts
Updated post #2 to complete the tutorial. I hope you have a decent high speed connection - LOL Reef's Bistro -
That's one of the best stretching of the truth I've heard yet when buying a kamado. LOL . Doesn't work so well when your wife cruises the forums. . Reef's Bistro
-
King Arthur Artisan Pizza Tutorial
ckreef replied to ckreef's topic in Bread, Pizza, Pastries or Desserts
TY CC - I was trying for step by step that would yield repeatable results. I've done this a bunch of times lately to make sure I had everything just right. Reef's Bistro -
King Arthur Artisan Pizza Tutorial
ckreef replied to ckreef's topic in Bread, Pizza, Pastries or Desserts
It's been 24 hours time to build some pies. . Get your proofing station ready. Regardless of dough used in the recipe I use plain all purpose flour for this. A wooden work surface sticks less. A dough scraper helps a lot. 2 floured plastic bowls. . The dough after the 24 hour counter rise. . Using a spatula coax the dough out of the bowl onto the floured counter top. . Sprinkle the top with flour then using the dough scraper divide in two. . Transfer half to the board. . Start with well floured hands. Stretch and fold from the right then stretch and fold from the left. . Give it a 1/4 turn then repeat the above stretch and fold procedure ending with this. . Flip it over into your hands so the bottom is now the top. . Form a proper dough ball by using your fingers to curl the edges over and under the ball. . Place in a floured bowl. Repeat with the other dough half then cover with cling wrap. . This needs to proof for a minimum 1 hour but 2 hours is OK. Now is a good time to fire up the kamado and get it and a pizza stone heat soaked at 600*. Also a good time to get your toppings together. . Setup your building station. Parchment paper tucked under a wooden peel for now. (scared to try launching straight from peel due to high moisture content - LOL) . Put a dough ball onto the work surface and begin to stretch starting from the middle and working out. Very important not to disturb the outer edge. . Flip it over. . Stretch a little more then repeat the flip and stretch. Stretch a little at a time. . Using the dough scraper lift an edge and get your well floured fists up under the middle. . Lift it up and transfer to the parchment paper allowing gravity to do a little stretching. Don't spread your fists or you'll stretch it too much. This lifting/transferring procedure only takes 10-15 seconds. . Now you can do a little more stretching and a final shaping. Once again don't disturb the edge. . A thin layer of sauce and hard cheese (parmesan, Asiago etc....). . Add mozzarella cheese and toppings then cut the parchment paper as close to the edge as possible. For thin, hot, fast pizza I limit it to 2 toppings (not counting cheese). Too many topping and the top doesn't cook correctly. . Two pies ready to go. . Cooked in the Blackstone at 600* for less than 3 minutes. The Blackstone is a much different beast compared to a kamado. In a kamado at 600* I imagine it will take 4-6 minutes. I left the parchment paper in the whole time. If you want to pull the parchment paper make sure the edge is done rising first (about 2 minutes). . One money shot (not sure how many pictures I'm allowed to post at once) . As an added bonus I'll pass on this final yummy step. Save some of that soft delicious crust for afterwards and serve with some honey for dipping. Awesome pizza desert. (got that from Ozark Mountain Pies in Idaho Springs, CO.) . Any questions please feel free to ask. Although this seems like a long complicated procedure it is not. Once you get familiar with it you'll stretch and build a pie in 1-2 minutes. . ............................................. . A few final pictures and thoughts. . . Of all the flour combinations I've tried the one I like the best is 2/3's KA Pizza Blend and 1/3 '00' flour. Better color and taste. . They say after the 24 hour rise you can refrigerate for up to 6 days. I've tried that but it seems to stretch better if used right after the 24 hour counter rise. If you are going to do a few days in the refrigerator allow it to come to room temperature for 4 hours before stretching and folding. . Even if you use a different dough recipe there are a few techniques that could apply to that recipe. . Stretching and folding. Proper ball formation. Board stretching. Air stretching. Final shaping. Leave edge undisturbed. . .......................... . I would say this post is "Pic Heavy" even by my standards but if you've made it this far I guess you know that already - LOL Reef's Bistro -
I was asked (by a guru member) to do a tutorial on the King Arthur No Knead Artisan Pizza dough recipe. Here it is in picture format (sorry just not prepared to do a video - maybe one day). This will span two days. . This recipe will make 2 medium sized pies. I chose this amount because it's the easiest to learn the stretch technique. . 375 grams KA all purpose flour. 1/4 tsp Active dry yeast. 3/4 tsp Sugar. 1/2 Tbsp Table salt. 277 grams Warm water. . Note: I've done this with both KA all purpose flour and KA pizza blend flour. I've also used a mix of the above flour with 00 flour. The 00 mix will yield a slightly softer more silky smooth crust but I would do no more than 50% 00 flour. . Active dry yeast in a packet is fine just make sure it's new/fresh yeast. Yes this is a tiny amount of yeast - it works don't add extra. . Let's get started......... . Set your scale to grams and zero it out with a large glass mixing bowl on it. I like using glass for this stage because cling wrap sticks to glass really well. . Measure out 375 grams of flour. . Measure out your other dry ingredients. . Mix your dry ingredients together with a fork. . Measure out 277 grams of warm water. I just use hot tap water as mine comes out at about 110*. . Dump the water into the dry ingredients and mix with a fork. . Half the way through mixing it's going to look dry. DO NOT add any more water!!! Scape from the sides and keep mixing. . Once it's fully incorporated stop mixing. . Cover tightly with cling wrap and set aside on the counter for 24 hours. . That's it for mixing the dough. Check back tomorrow night for stretching, building and cooking the pies. . ...................................... . Here is the recipe for making 1 large pie or 2 small pies. . 250 grams KA all purpose flour. 1/8 tsp Active dry yeast. 1/2 tsp Sugar. 1 tsp Table salt. 185 grams Warm water. . Reef's Bistro
-
Why do you think I cook everything outside - I hate my kitchen but I love my KK's - LOL Reef's Bistro
-
Mrs skreef saw a YouTube about it this spring. Figured we would give it a try. Reef's Bistro
