-
Posts
5,290 -
Joined
-
Last visited
-
Days Won
177
Content Type
Profiles
Forums
Events
Everything posted by DennisLinkletter
-

Proud New Owner of BB 32" with a few questions
DennisLinkletter replied to Mureed's topic in Komodo General
at the lower right corner when you are posting there is a box that says "More Reply Options" click there and you will see how to attach pics.. Thanks in advance for the pics! -
I do it dry and then use mustard as the binder.. Mustard makes magic bark.. You will never know it was mustard also..
-

Proud New Owner of BB 32" with a few questions
DennisLinkletter replied to Mureed's topic in Komodo General
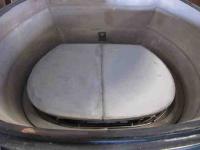
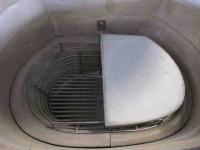
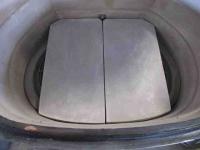
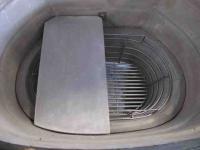
Thanks for the kudos.. yes the 32 is unexpectedly big and beautiful... So the 32" BB now has two meanings.. Please remember that charcoal burns down so the gas burner is really only for lighting the entire basket for high temp cooks or as a source for additional heat. That being said, no it can be left in.. you will need to pull it (2 seconds) and tap it out in a box or on a newspaper after the cook. The heat deflectors are for creating a shielded/indirect cooking area/zone.. You want to position your meat out of the inverted waterfall of hot air coming off your charcoal.. any port of the meat getting direct flow will get hotter /cook faster/ probably be a bit toasted . I ship these beasts with two different types because I like my indirect hear two different ways.. and so the grill deserves both.. One has a uniform distance around the grill.. this creates lots of uniform airflow.. two pieces so you can only use half and easier to handle. The more rectangle shaped ones are to completely seal off the entire middle of the cooker leaving only the extreme left and right sides open.. this gives you a huge indirect area where food can be filled from the font wall to the rear wall.. both main and upper grill.. This will be a huge volume and I'm dying to see a shot of this done.. The firebox keeps the charcoal from falling out the sides and the charcoal usually has other charcoal below it so by the time it's burned down to be small enough to fall thru it's caught by the charcoal under it.. It's impossible to finish that charcoal basket in a low and slow cook if you are starting with a fill basket (which you always should) But yes at high temps when you are down to nothing the smallest pieces will fall thru the cracks.. that being said, please remember not to pour the small pieces from the bag into the middle of your basket.. they will cut off your airflow and limit your temps.. only pour them around the extreme outside of the firebox/charcoal basket where they still burn but to not kill your airflow.. Always remember airflow creates your temperature. The floor of the cooker is flush to the lower draft door frame so you can sweep the ashes right out the door into a box from the inside of the grill.. I pack the ashes back under the firebox to extend the time between cleanings and only empty it when the pile starts to restrict incoming airflow.. Have fun it it and feel free to call me.. -
But as you only use it a few pinches at a time.. it's actually a great value!
-
For low and slow cooks the 23" Ultimate's capacity of 40-60 lbs of meat is more than most people will ever need. That being said if you are grilling for a dinner party of 6 or more the 23 fills up very quickly. There are workarounds that can be done like cooking all you meat indirectly first - i.e. reverse sear that lets you finish many steaks in a short period of time. While the 32 is large for a ceramic grill it is by no means a large grill for grilling.. remember 48"- 54" gassers are fairly common. The 32 is really nice for cooking corn/potatoes and steaks at one time for 6+ people... I like the basket splitter because it reduces the btu's down below and lets you more easily leave your well gloved hand down in the grill to play with your food.. I'm more into browning these day as opposed to just grill marks. This is a 23" main grate sitting on the 32's main
-

Wow! It's been 5 years...
DennisLinkletter replied to steelerguy's topic in KK Reviews / Happy Campers
Thanks for the kudos.. and this post. I have tip.. When using the coco char cover the floor of the charcoal basket with small lump so the air does not take the path of least resistance and go around your charcoal.. Remember temp is airflow so we want to direct it thru the coco. The rib rack was also designed to sit the other direction, front to rear. Will more uniformly fill the grill. -

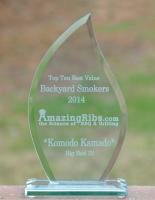
2014 AmazingRibs.com - Best Value Backyard Smokers
DennisLinkletter replied to DennisLinkletter's topic in Komodo General
-
Great photo.. I just shared it on the KK Facebook page.. Thank you!
-
Myself and all of us here at KK would like to wish you a happy Independence day. Please post pics of your holiday cooks!
-
- 1
-

-
Welcome to the forum... Please remember to feel fee to call me if you have questions...
-
That being said, I shipped 14 more tons last container...
-
There was a much too long painful transition where we migrated to another forum that was pathetic and painful to use. We then had to migrate to this one.. I'm pleased as it has the features and security we needed but in the 6 months or so it seems we also lost our traffic.. I'm about to launch a new website and mailings to get back in and keep in touch with owners. Hopefully this will invigorate this forum..
-
Please shoot shots of the food one the grill.. I then can use them on Pinterest and Facebook.. THANKS in advance.. dstr8 Great looking pie.. Please get some in grill shots next time..
-
Dem be da rules.. No Photo.. it did not happen! LOL
-
The very early knobs were held in place with a wood screw.. If you have one of these I will need to send you one of the new airflow dials that have a bolt out front because the new knob has a threaded sleeve inside.. It just spins right on.. Please call me if you need help..
-

8 Years Later - The Happiest of Kampers
DennisLinkletter replied to twharton's topic in KK Reviews / Happy Campers
Thank you for the kudos.. Never tire of hearing them.. That being said, I'd love to get more posts in the Happy Campers area.. -
Those look great.. with beef ribs I often splurge and eat too much and end up feeling uncomfortable from eating too much fat,, Do't get me wrong.. I love fat just can feel a bit uncomfortable afterwards like i just drank oil or something.. I have a butcher here who sometimes leaves a layer of fat and the muscle above pork ribs on the ribs.. I guess it's like having more/some of the belly on the ribs.. makes them really thick and lots of meat.. problem is there is also a layer of fat there which dramatically increases how much fat you eat.. I always try to remember not to eat too much but never have the discipline to stop.. It's like pulling pork and not filling up with pieces of bark.. I've never eaten brisket or pulled pork at the table because I'm stuffed from eating all the lil fatty gems in the bark..
-
Definitely something I need to do.. sadly I've never been to any BBQ event or famous BBQ joint. I went to a chain last summer but my Q was much better.. You wrote "Rules prevent visitors from randomly sampling competitors Q.... So no way to taste Q from all the teams? What's the point? I had fantasies of getting a mouthful from all the camps..
-

19 Hi Cap on granite countertop? Will it crack?
DennisLinkletter replied to YemYam's topic in Komodo General
I'm new to the countertop game..but I Googled this and all sits say heat from your pots and pans or burning liquids will not affect granite.. That being said a lot of granite is treated with a sealer or jell coat. These are applied to both protect the stone from stains but also to allow many stones to be polished. These coatings can be quite sensitive to heat and abrasion and once damaged are hard if not impossible to fix. So you might want to check with the store where you bought it to be safe.. Also oil can change stone's color.. Is the plan to cook on the grill from the high side standing on the pebbles? -
Love the shots of the smoke leaving the grill.. They will be great for Pinterest.. Thank you
-

New SS Drip Pans in the works
DennisLinkletter replied to DennisLinkletter's topic in KK Announcements
Two-layer bottom.. The elevated bottom of course still needed the use of a heat deflector.. We adjusted the size a lil' bit and now are making a new version that has a very solid lower plate then a 1/4" space/gap and a plate above that to hold the drippings.. -
I try not to think in hours with ribs because there are soo may variables. How thick, how meaty, how fatty, how big are the bones etc. I pick them up with tongs and bounce them to test doneness.. I don't want the meat to tear from the bounce.. just before that the meat still needs to be chewed. The bones should be clean but definitely not fall off the bone mushy..
-

Everyday Misc Cooking Photos w/ details
DennisLinkletter replied to DennisLinkletter's topic in KK Cooking
Wow.. those very long dry ages Porterhouses look really reduced in size and super dark. Did their flavor seem concentrated and dramatically stronger? Looks like the dried skin took quite a bit of their mass when trimmed off too. So when all was said and done do you feel the aging was worth the wait and loss? -
Great looking bark.. Prime has enough fat that you don't need the lil' splash of oil to get brown/blacken them. Can't beat old school simple salt and pepper when you have great meat.. lets the meat do the talking.
-
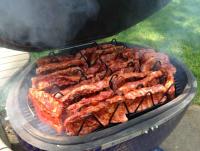
A customer sent me this today.. 41 lbs of Ribs on the 32's main grill, my guess is that one could get at least 30-35 on the upper so a grand total capacity of 70-75 lbs of ribs.. if necessary another 30lbs on the lower for a whopping 100 lbs That would feed a few hungry mouths.. This is not a KK rib rack.. would have filled the area near the handles a bit better with the KK rack.


