-
Posts
840 -
Joined
-
Last visited
-
Days Won
8
Content Type
Profiles
Forums
Events
Everything posted by dstr8
-
Although I have not made pizza dough without even a short rise period I would guess you'd end up with something akin to cracker crust (all things being equal). You might be able to get away without kneading, there are plenty of "no-knead" dough recipes on the net, but you'd need to use softer wheat flour. Whereas my Neapolitan style pizza dough needs 10-12 minutes machine kneading using KA bread flour @ 12.7% protein (higher protein content/harder wheat). Further, assuming you might not be aware, you can (as I do with my pizza dough) make the dough and then let it "condition" in the refrigerator for up to 1-week. Then just remove the pizza dough balls from the refrigerator about 2-3 hours from when you want to make pizza and you're good to go. This method also amps up the dough flavor so its a "win-win"...
-
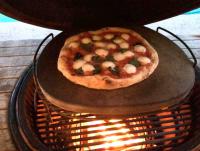
Thumbs up! I've been using a well broken in pizza stone but inconsistent results, especially at the higher temps the KK can deliver for true Neapolitan pizza dough bake-offs, made me pull trigger on the new KK 23" shaped baking stone. Just made 3-Neapolitan pies using the same sourdough starter recipe I've been using the past year + and the difference is incredible! And thanks to amir for his potato pizza idea! I added homemade bacon (smoked on the KK of course ) lardons and a drizzle of aged balsamic from Modena: Benissimo! Sorry for the crappy iPhone pics...no time for the big DSLR on these runs Thanks Dennis for designing and bringing the new shaped baking stone to market: It made a significant difference for me!
-
Resistance at the end of my index finger
-
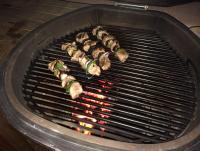
Recipe courtesy of Lidia Bastianich's "Common Sense Italian Cooking" cookbook. Pork tenderloin, cubed into 2" chunks Red onion, quartered and separated into skewer size pieces Prunes (optional: macerated in marsala or port wine) Fresh bay leaves Olive oil Skewers (soaked in warm water) Crazy simple recipe but the sum flavor total surpasses the simple ingredient "parts"! Toss the pork chunks, red onion and fresh bay leaves in olive oil. Skewer the ingredients and course/kosher salt to taste then onto the KK grill until the pork is to medium doneness. To guild the lily, so to speak, I reduce marsala wine (port or late harvest red wine works too) about 75% to a syrup consistency to drizzle over the cooked kabobs right before serving. Lidia's, from the same Common Sense Italian Cooking, easy baked fennel bulb with cheese makes a wonderful side dish along with a leafy green salad. http://shopping.lidiasitaly.com/lidiascommonsenseitaliancooking.aspx
-
Good looking pies amir! Yes, although I use an Italian sourdough culture starter for my Neapolitan type dough, I am interested in trying your dough recipe! I currently have a batch of dough proofing in the refrigerator for pies to be baked on my KK 23" later this weekend. I'm going to try your potato version for one of my pies: I assume you steam or parboil the potatoes? In fact this will also be the break-in for the new KK shaped baking stone I recently received from Dennis; pics to follow.
-
New Grill Shaped 304 Stainless Drip Pans
dstr8 replied to DennisLinkletter's topic in KK Announcements
^ X 2 -
bump
-
Nice...very nice! Was this a rehearsal for the big T-Day coming?
-
Have been using same unit...the Bluetooth topology sucks for this application. Other than that I like it
-

What foods do you direct grill on the main grate and the lower grate?
dstr8 replied to wilburpan's topic in Techniques
I use the upper main grate, typically with a small fire at the onset, for slow temperature bring up for the first part of a reverse sear (steaks). Then once the meat is up to temp I'll pull the main grate, stoke the coals and sear to finish on the lowest position of the sear grate. I also use the upper grate for general baking/finish roasting. And I use the sear grate positioned atop the main/large grate for pizza...to take advantage of the radiant effect of the heat soaked lid... The middle grate, at least here, gets used for cooking the least. That's not to say I never use it but more than likely its duty is for catch pan when low & slow cooking/smoking sessions... -

Impressive speed in coming up to temperature
dstr8 replied to wilburpan's topic in KK Features & Accessories
Same discovery here...and NOT missing all those trips to get propane tanks filled! -
like an early Christmas
-
Great looker tri-tip. Big tri-tip fan here too and IMHO, per the original Santa Maria style tri-tips, red oak makes it. Although I tend to not use marinades I will give your marinade recipe a try next time we do a tri-tip.
-
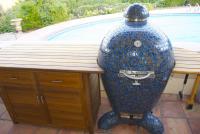
Originally, about a year ago now, I started with "just" the 23" KK and two side shelves. But shortly after taking delivery and using it I realized I should have also ordered one of Dennis' teak side tables and subsequently placed the order. No regrets...other than maybe it would have been even better with two side tables I also use a small 2x4" "Lifetime" plastic table to set the various SS grates. But the teak cabinet stores the heat deflectors, pizza stone, smoking wood, 'coal baskets, etc. The drawers are also super handy for gloves, utensils, etc.
-
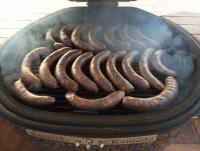
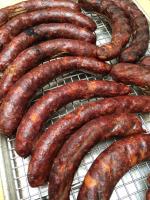
Susan, Thank you for your compliment! Given I didn't have a dedicated sausage stuffer the links did come out reasonably uniform. The elk meat was trimming pieces outside of the 4-quarters, loins and t-loins. I'm persnickety about getting all the neck meat, belly, brisket, flap, etc. off the animals we harvest. This can be a problem if the weather heat is high with commensurate flies, yellow jackets, etc. But once the hide has been removed we wipe the carcass liberally with vinegar, as necessary to repel 90% of the flies and yellow jackets. Its also vital to not get the animal's hair on the meat and/or remove it ASAP as hair can taint the flavor of the meat especially with North American Pronghorn aka Antelope. Having said that this elk kill occurred at 7:00AM on a cool morning after a night of rain; ambient weather conditions were perfect. We were able to skin and get the carcass cooled down very, very quickly. And because of the early AM kill along with cooler weather we were able to take our time and remove as much extra meat trimmings as possible. From the kill sight we were back in camp 2-hours later, carefully hand washed any remaining hair, dirt, etc., with another wipe down with white vinegar. The weather conditions at our 8,000+' campsite could not have been better: The day was cool with a nice gentle breeze and as such we were able to lay all the meat out on tables (well shaded of course), covered with clean cotton sheets, and allow the pellicle to develop over the next near 24-hours. Then once back home I, using a fish fillet knife, went through all the meat trimmings and removed silver skin, tendons, etc. I'm super fastidious ("anal-retentive" ) about this as it results in an even more enjoyable product at the table. Most hunters don't bother with all these details but this is the major reason you hear "...I don't like wild game...it's too gamey...etc.". You can certainly get, just like with domesticated meat products, variations in flavor, texture and tenderness (or the lack of) but if you pay attention to all the details once the animal hits the ground it will reap big benefits at fork time After using a Kitchen Aid meat grinder/sausage attachment for a couple decades I finally, a couple years ago, upped to a dedicated grinder...I use a #5 LEM meat grinder here: http://www.lemproducts.com/product/lem-5-electric-grinder/butcher-meat-grinders The #5 is perfect for 10lb meat grinding sessions or less. Arguably the #8 might have been even a better choice but I had to draw the line (mostly storage space limitations) somewhere . Although I have not used a dedicated sausage stuffer and instead relied on the KA and now LEM grinder for the stuffing process I will be getting a dedicated sausage stuffer press as it is easier to manage with more consistent results rather than the second pass process through the grinder. So, all the meat was cut into approximately 2" chunks prior to seasoning, resting and then grinding. I did hand cube about 1/3 of the meat (and fat) to 1/4" dice that was mixed into the ground meat, per the above recipe, and it provides a very nice textural component to the andouille. I always use and prefer natural casings. Whole Foods, at least in Reno and Monterey, have fresh hog casings available: $5.99 that will do about 5-7lbs of meat. As with most things handmade, making it at home is a spoiler: All things sausage included. Being 1/2 Italian I grew up surrounded by home canning, sausage making, gardens, etc. so sausage making is in my blood. We have amazing fresh local fish and seafood that comes out of our local Monterey Bay. I picked up some live Spotted Prawns, from Monterey Bay, and along with the sliced and warmed Elk Andouille had an amazing 'salad dinner' last night! My version of 'surf and turf': Nothing better!
-
Was lucky enough to spend the past near 3-weeks camping out, searching and getting an elk in Nevada with a close buddy. Following up from some venison andouille I made a few years ago using the same recipe and, again, with meat obtained from gracious friends, I decided to turn some of the elk trimmings into andouille. Here's a link to the recipe I followed: http://www.nolacuisine.com/2005/11/14/andouille-sausage-recipe/ I made just a couple alterations to the Nola Cuisine recipe above including cutting the salt back by 33% (still amply salty...YMMV); adding a minced smoked habanero and 2-3T finely ground coffee beans; used 50-50 mix of elk meat and pork shoulder aka Pork Butt. And I added about 1/2-3/4 pound of pure pork belly fat. I did not use pink salt; smoked at 130-ish in the KK over pecan for 2-hours then an additional 90-minutes or so at 165-ish. Although I should have pulled this batch a little sooner and/or shortened both smoke sessions it came out super delicioso!
-
Lamb, side and wine look wonderful! If you ever find a source for baby/"kid" goat racks...by all means give them a try. We are puzzled, given all the goats we see being raised here and there, why this truly out of this world meat (white, mild and sweet...) is not widely available here (at least in the western USA).
-
Very good 411! Can't wait to hear how it does with a cook-smoking session. Seems the tube and pellet route would also be the perfect and simple solution for "cold" smoking on the KK too! I find it amazing the pellets would smoke in the 'little' 6" tube for 3-1/2 hours; I would not have guessed it would output smoke for that long...
-
^ very interesting Syzygies! The difference in fresh vs commercial "prepared" flour makes sense (now)...thanks for posting this up!
-
I'm with you on anything tomato in a can. I grew up with a large garden in our backyard...all day canning sessions for tomatoes, fruit, etc. Nothing you can buy compares. I have the same problem with canned roasted chile peppers...they all suck (jarred or can, same difference, because of the need to increase acidity for roasted canned peppers...)...something else I do in batches and use the deep freeze. And ditto on most restaurant experiences! Amazing the sacrifices "we" make for convenience
-
I get great results, too, with a dry rub cure for salmon (Alton Brown's recipe). But per tony b all my salmon gets smoked at 150-ish*F...unless I'm intentionally doing a hot smoke process for dinner entree type fare. Not sure, since I've never done it, how you'd get a KK or similar to hold 100*F for longer period of time for "cold" smoking. But I'll be watching this thread to see the ideas pour in I would think you'd need a two chamber smoker for good cold smoking...
-
Its a great way to put the heat soaked KK and remaining hot coals to further use after a previous cooking session. And given its on the downslope it just hums along at 175-200*F!
-
Super and congratulations!


