Syzygies
-
Posts
1,753 -
Joined
-
Last visited
-
Days Won
57
Content Type
Profiles
Forums
Events
Everything posted by Syzygies
-
Best vacuum packer? (FoodSaver alternatives?)
Syzygies replied to Syzygies's topic in Relevant Product Reviews
Today (December 11) VacMaster is offering $150 off the VP120, the successor to the machine I have. Normally $780 on Amazon, $799 at VacMaster, this brings the price down to $649. Coupon: DAY11 VacMaster VP120 Home Chamber Vacuum Sealer I'd get the VP215 instead, but one needs more space, a friend to help lift it in place, and the advantages of the oil pump come with having to think about the pump. I'm happy with my VP115 and very happy with their customer support. They resolved my falling seal pad to my satisfaction. I quoted my earlier post in its entirely as otherwise I'd want to say it again. (I just bought one for California. Our location is cold, so an oil pump might not be a good idea.) -
TelTru FAQ TelTru is a premier manufacturer of replacement thermometers; various of us have several (trading sensitivity for range). They state a low temperature operating limit of -50F for bimetal thermometers with silicone fill. My speculation is that their other bimetal thermometers have no such lower limit. The display quite naturally goes off scale low well before this point. Whether this causes loss of calibration is both an empirical question and a question for each manufacturer. My thermometers often see 25 F over winter nights, and on low & slow cooks the comparison with my BBQGuru is at least a sanity check (the different locations take a very long time to converge to the same temperature, even if all instrumentation has perfect accuracy). So, dunno. I've been able to ignore this issue and my food tastes good. As I said, ultimately an empirical question. Who has witnessed loss of calibration after freezing nights? For the regulation issue, the operating temperature range would be a good question for Dennis to take up with his supplier. Don't get me wrong; I deeply respect asking this question. What's the poster child for asking this question? Apollo 13 returning home alive after a severe explosion in space. The ultimate cause of the explosion was bare wire inside an oxygen tank, which sparked the contents during a routine in-flight stir. Earlier on the ground, NASA needed to boil off the contents of that tank, missing a voltage design change that accidentally fused a heating element always-on. They asked some guy to sit on a folding chair and say something if a thermometer read over a certain limit. The thermometer quickly reached and got stuck at this limit; it wasn't designed to read off scale high. The guy didn't say anything, and the tank problems went unnoticed.
-
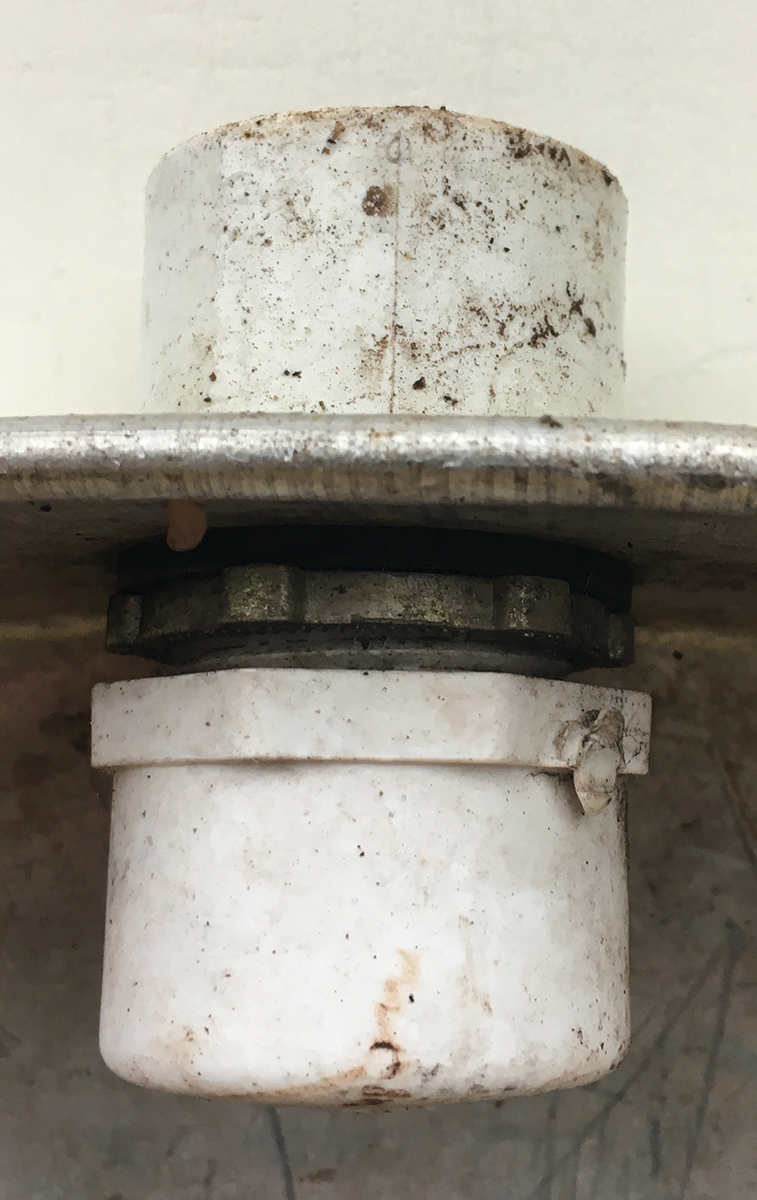
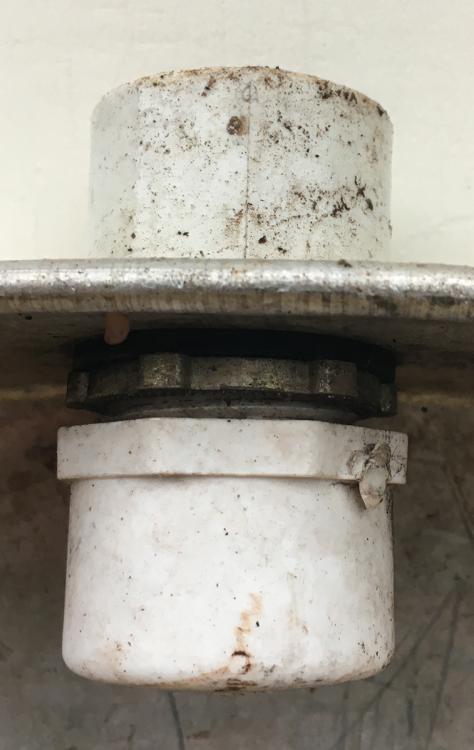
Here's my improvised hole plug. It looks to me like threaded PVC plumbing parts, and perhaps the gasket that came with the pan.
-
My original post just said to figure it out. Perhaps not so helpful, but you are standing in a box store (Lowes, Home Depot) with the hole you're trying to plug right in your hand. When Apollo 13 had to patch the command module air scrubbers to work in the LEM, they had to make do without a box store at their disposal. I wasn't more specific because the kinds of parts one might consider don't come branded, and different water heater pans have different sized holes? I found some plastic parts that screwed together like a bolt and nut, nearly filling the hole, and added some gaskets to make the plug watertight. I thought about simply filling the hole (solder? glue? weld?) but my first draft plug worked, I stopping thinking about this. I'm actually on my second pan. The plastic one didn't last; get metal. The other shoe needs to drop, here. Oil change pans are nice idea; can one find one that is round, or large enough? I've seen cake pans this big; a cooking supply store? Though jury-rigging a water heater pan is likely to be the economy choice.
-
I used the little wishbone to find the URL of a post, which can be used anywhere on the web including this site. One can use a link to anywhere, on this site, using the little chain link (Link? Link? it's a pun) on the edit bar (fourth from left, after B I U ). For example, here's a link to your post: Your post I did that exactly as I explained. So one can share posts within this site.
-
See posts 49 and 52 in Grill Cleaning That's what I do between two low & slows, to get the rancid grease off. The most impressive technique I've tried is closing the grate in a contractor bag with a bowl of ammonia, and leaving the bag out in the sun for a day. I'm amazed I don't end up with a sink hole in my back yard.
-
http://komodokamadoforum.com/topic/7396-numbering-posts/ http://komodokamadoforum.com/topic/7396-numbering-posts/?do=findComment&comment=83716 This is thread 7396. One doesn't need a number for the original post; ckreef's reply is comment number 83716. Why would one want to use a natural language sentence to refer to a post, when one could use a direct link? The icon to the very far right on the gray bar above each post, that looks like a sideways wishbone, expands to give a link one can copy. The chain icon on the edit bar (fourth from left, after B I U ) lets one enter this URL into a new post. At my college we distribute internal links using natural language, because the IT folks are terrified that we're too naive to spot a phishing email. They may be right. How can Antartica be so dry, with all that water? Because it's all frozen onto the ground. Academic intelligence is all frozen onto obscure subjects of little real world interest. Yet banks manage, and they deal with everybody. One of my banks shows me an image I chose when I log in, for reassurance. This issue drives me crazy. So, yes, the spirit of this thread is that we should all be better spiders, weaving hypertext in the modern way, referring to other posts using the contemporary idiom supported by this forum software.
-
Not mashed potatoes, but my sous vide potato fries impressed a very critical friend. He was dumbfounded that the texture I produced was even possible. Yet to a less critical eye they didn't tip their hand "sous vide". Rather, modern technique applied to plain traditional food. Peel, portion, and vacuum pack potatoes. Sous vide starting in cold water, 86C for 60 to 90 minutes. Unpackage, set pieces on a drying rack, and train a fan on the rack for several hours. Now, pan fry with prejudice in ghee. Salt, Pepper, perhaps a bit of Maras or other chile pepper. Serve.
-
Maybe ten years ago one could call it a recipe. It's gotten simpler with time. Grind 120g to 150g of red winter wheat, sieve through #35 screen, and top up with semolina flour to 180g. Add and mix well 1/2 tsp salt. Add and mix well 1 TB (or less) olive oil. Now, crack 2 to 6 eggs (to taste) into a cereal bowl. Use a tablespoon measure to lift out the yolks and transfer to the flour mixture. Mix well. Now add water as necessary till the dough is not too dry, mix well and rest twenty minutes. (Fresh flour hydrates like crazy.) One can hand knead first, or not. Cut into two pieces (180g flour is the limit for this). Knead each piece well by a dozen passes, folding in half and passing through the widest setting of a crank pasta machine. Here, one sees what is impossible to explain, what is the right moisture content? I never measure, I sense and adjust, and sometimes miss. Too dry dough will create a rough, ragged edge on both sides as it passes through the pasta machine rollers. One wants the dough just moist enough to handle well, with clean abstract edges as one rolls, but no wetter. Adjustments are possible both ways: Keep dredging in white flour as one folds and rolls, if the dough is too wet. Wrap flat pieces of dough in damp paper towel as one works on the other piece, if the dough is too dry. Rolling out the dough, roll fairly thin and tender (the dough is sturdy otherwise). We go to 5 for thick, or 6 for thin, on an Atlas. Let the sheets dry somewhat before cutting. One wants the dough to handle beautifully, and not clump when you cook it. All's fair, other than that. This dough is robust and unlikely to clump while cooking, no matter what. Stuck pasta? One is thinking of dried pasta, and bad restaurants, or that twenty-something group house where everyone went into the other room to smoke a joint, and forgot about the pasta. If one stirs immediately after adding the pasta to boiling water, it always separates. One hears that fresh pasta cooks at the mere sight of boiling water, but this pasta needs a minute or two, even if it will cook further in the sauce as Mario Batali preaches. Taste it, learn what you like. Undercooked is no fun, and this pasta doesn't overcook as easily as pasta made from white flour. In Giuliano Bugialli's classes, I always went first making pasta, as others feared the inevitable critique. He would have a heart attack watching me work whole grain pasta, even though that is closer to Italy's ancient spirit. It's sturdy, and one works it like it is sturdy. We skin, partially dry, and freeze a year's worth of tomatoes each summer. A sauce with a tomato packet, always olive oil, garlic and black pepper, perhaps capers or olives, perhaps pancetta, sometimes garden herbs or our parsley, with grated pecorino cheese, is our signature dish on this pasta. We make it if we have no other ideas, and it's the single best thing we make.
-
Exactly. I have one of these on each coast. My wife Laurie uses the western one nearly daily, for any flour-based dessert, pasta, bread. I use the eastern one for pasta and bread. I'm sure this is most of the reason my bread tastes so good. As always, sourcing makes the cook. The poster child for the issue here is headphones. One spends $25 then $50 then $100 then $200 only to realize one has already spent nearly the $400 for the headphones one wants. All less expensive grain mills are loud, prone to static, messy, ugly, and don't grind fine enough. One can do better, but this mill is good enough. The burrs are replaceable, once a decade depending on usage. For efficiency I prefer to sieve using a 12" diameter sieve. The two essential sieves are a coarse sieve for mixing, and a fine sieve for partial extraction. Inexpensive fine sieves are too fine; I went with a lab grade test sieve to choose the exact fineness, going with #35 which gives me 75% or more extraction (yield by weight). Great for whole grain pasta with the technical properties of white flour. I'd be curious to go coarser for bread, though I am happy now. Vollrath makes a 12" bowl that fits beautifully under these sieves. I have sets of 3, 4, 5, 8 quarts in this heavy duty 690xx series on each coast, and they get used for everything. (3,4,4,8,8 west; 3,4,5,8,8 east; the west bowls store nestled in wooden drawer pull knobs screwed into the front of pantry shelves, for easy access.) A friend admired these but cheaped out buying for his house (to save money for wine I can't afford), and his wife is continually aware of the quality differences. We are pleased every time we touch ours. VOLLRATH MIXING BOWL, STAINLESS STEEL 8QT - 69080 Stainless Steel Flour Sieve, 12 in. (roughly #17) Gilson 12in Round Test Sieve, All Stainless Steel - #35/500um Laurie prefers a 10" sieve. These fit nicely into a five quart Vollrath bowl. One can find these hit-or-miss everywhere with unspecified screens, for example in Chinatown kitchen supply stores, or online cookware sites. I noticed one source that specifies #40 or #50 fine sieves; the #40 would yield very refined whole grain products. Vollrath (69050) Heavy Duty Mixing Bowl (5-Quart, Stainless Steel) Flour sifters Finally, Chad Robertson inexplicably makes no mention of the perils of "green" flour, in his books. (Flour needs to be aged to behave as we expect, and one doesn't want to age freshly ground flour, because the germ will go rancid.) He may be opposed to any additives, or he simply might not know. This is not widely understood, and it took me forever (dozens of loaves flattened like flying saucers) to learn what to do. Michel Suas, in a bread book meant strictly for professionals, discusses the use of 20 to 40 parts per million of ascorbic acid, to compensate for this and other issues. (For comparison, in The Banh Mi Handbook, Andrea Nguyen calls for roughly 1000 parts per million; she has no idea. After feeling what 30 ppm ascorbic acid does to bread dough, there's no way I'm taking a gram of Vitamin C for my health, ever again.) How does one measure such small quantities of ascorbic acid, commercially or at home? Thoroughly mix ascorbic acid 1:20 with white flour, and save in a labeled jar. Thoroughly mix some of that 1:20 with white flour, for a 1:440 mixture one can actually measure with a gram scale. I'm trying to figure out how to ask Chad Robertson about this. Cookbooks are often an unlabeled mix of what the author knows and what the author surmises. For example, Paul Bertolli's Cooking by Hand got us started grinding our own flour for pasta (thank you!) but we quickly concluded that he had restaurant experience with very fresh flour from local mills, but no actual experience with home-ground flour. Here, Chad Robertson has tight relationships with artisanal suppliers, is that the same as grinding at home? Are his suppliers sneaking in flour conditioners, knowing what he'd say if they asked, but not wanting to lose his business? Or has he, and he alone, mastered the delicate puzzle of working with green flour without experiencing the usual perils. Dunno. As usual, beware any comment that translates to "I don't do that, but the best I do is the best I know!" Adding 30 ppm ascorbic acid to green flour makes a difference.
-
Why we do this...
-
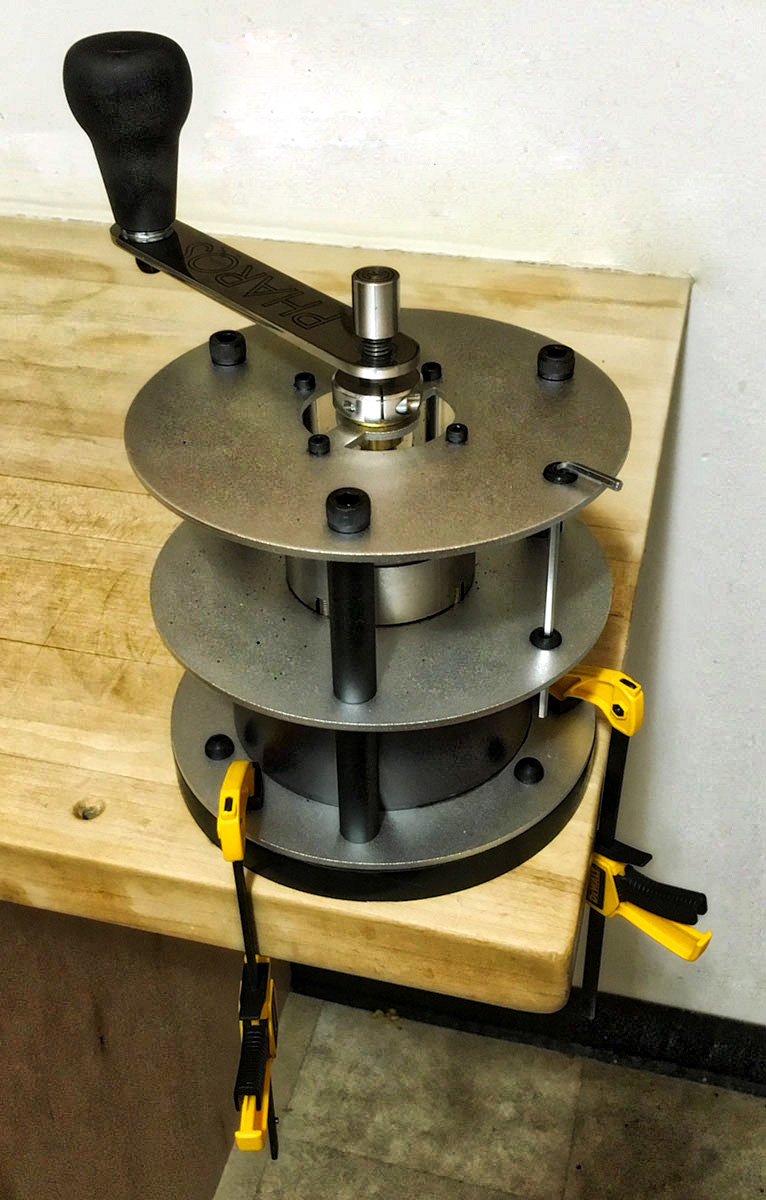
Well, this thread sent many of us reeling into the internet cosmos. Hopefully most of us spent a mere few hours Googling, and returned home safe, without the radiation exposure inherent in, say, a trip to Mars. I have a pre-Millenium La Pavoni Europiccola lever espresso machine, as do many people I know. We're not about to change machines; two of us learned recently to service these machines, and found that paid overhauls rarely clean the parts you can't see. What a difference, doing it yourself! We're sticking to this machine to conserve cognitive load for fourteen similar obsessions. Like devising smoke pots, steam pots for the Komodo Kamado, ... Yet one review site realized they weren't reviewing the machine, they were reviewing the basket. My Pavoni portafilter takes a 49mm basket, and many (not all; buy a bottomless portafilter if necessary) portafilters from this era are deep enough to handle the 49mm Elektra double basket. This is a great price for this basket; we've bought eight so far to distribute in our circles. Big difference! Using my Pharos grinder and dosing with a digital scale and the Lyn Weber Blind Tumbler, each basket takes 19g of grinds, up from 15g for the regulation Pavoni double basket. I don't fully understand why this makes as much of a difference as it does, but a "stuck lever" now seems virtually impossible; one is well into over-extraction territory long before the grind gets fine enough to freeze the lever. Take a few slow, easy pulls, and the result is more deeply flavored espresso than my Pavoni yielded before. If one likes predictability, dosing each basket, rather than fiddling by eye with unpredictable results, the Lyn Weber Blind Tumbler is a very nice accessory. One can buy it without buying their grinder.
-
Tartine Book No. 3: Modern Ancient Classic Whole Amazon has many Kindle books on sale for Cyber Monday, and I picked up Tartine Book No. 3 for $3. Some amazing extensions on what various of us here have been doing with bread: Fermented porridge, ancient grains. I'm excited to try some of these ideas.
-
The ice is a nice slow fuse, enough time to get the KK closed again. I like a thin flat slab, formed in a ziplock bag or a chamber vacuum bag (sealed with an impulse sealer as one would for freezing stock). A thin slab will melt sooner than a block of ice, and one does want the steam at the very beginning of the bake. A theory review: Commercial bread ovens introduce ample steam at the beginning of a bake. Baking a boule in a cast iron pot is one home fix for this, effective but not quite the same. While this is associated with "no knead" breads, the Tartine Bread book (now $2.99 on the Kindle) has a fresh take on kneaded loaves (similar to ours) and also advocates baking in a cast iron pot. Instead introducing ample steam allows arbitrary bread shapes, multiple loaves. We routinely make two bâtards. The idea of using ample steam at home was recently popularized by the Bouchon Bakery cookbook, though it can be found in earlier professional sources. 350g of water will produce enough steam to fill a home oven or a 23" KK several times over. In contrast, a few spritzes from a spray bottle will be 10g of water if one is lucky. Scale matters. It takes 80 calories to thaw a gram of ice, 100 calories to bring that gram to the boiling point, and a whopping 540 calories to then turn that gram of water to steam. By weight, steel holds about 13% as much heat energy as water. These numbers explain why one needs so much metal to boil the water, and why it hardly matters whether the water starts out as ice or hot water.
-
Try sealing the grates in a contractor trash bag, along with a bowl of ammonia. As for a tub, water heater drain pans are perfect for 23" KK grates. One does have to improvise a way to plug the hole.
-
I mix paste just before use, in a ziplock sandwich bag. Start with some white flour, dribble in tap water till the texture massages to a wet paste, stiffer than toothpaste. Then I nick a corner, to squeeze a bead around the lid rim. I pretty much forget to do any routine at least once, and notice if it didn't matter. I find that the paste matters, as others observe. If I don't seal on the lid, I sometimes get convection through the pot. I have daydreamed about stabilizing the paste with some food safe preservative, and loading up a "u fill it" toothpaste tube, so paste is always ready. One would think these tubes would be easiest to find at outdoor stores, but I usually see them in artist supply stores. Artists like to mix up their own paints, for example.
-
I'm likely to order a pallet of charcoal to arrive mid-December in Concord, CA (half hour east of Berkeley, ten minutes north of Walnut Creek). I have enough extruded coconut to get through another decade, but only a few boxes of coffee lump, which I'm increasingly unable to live without. I can probably store a large enough order for shipping rates to flatten out, but it's always fun to meet other owners, and sharing helps bring the shipping down further. I'm posting now, a month before I want to take delivery, because I've seen that these shares tend to organize slowly. Early December, them's the bus schedule. Are you on the bus?

-
Hey, don't look at me. I've already cast blame elsewhere!
-
I don't actually know, because I can't use a 58mm basket. Your post sent me into an exploring spiral, and I believed what EspressoForge proposed was an upgrade. For the La Pavoni, I just ordered a couple of larger capacity 49mm Elektra Microcasa double baskets. It appears my portafilter is deep enough, but if not I'll get a bottomless portafilter. Being able to use 58mm baskets is parallel to my home torchio pasta extruder taking standard "Dolly" brass pasta extruder dies. Pricey but lots more choices. Pasta has actually been the constant in my life; we grind our own flour using a KoMo Classic Grain Mill (nothing less expensive works acceptably), sieving out some bran for a fixed extraction using a Gilson 12in Round Test Sieve over a Vollrath 69080 8 Quart Mixing Bowl. (I have several sets of these fine bowls. A friend cut corners matching them, and his wife could tell.) To be honest, barbecue is a peripheral hobby for me, like coffee, I just have this issue where I get obsessed with whatever I'm thinking about at the moment. In other words, this is all your fault. How does the EspressoForge actually compare (critically, if you're counseling someone who might spend the $300 but doesn't have to) with other machines not costing thousands of dollars?
-
Wow. I actually believe that my coffee activities are casual, get in and get out, but you're probably the only person who would see it that way. The Kafatek looks amazing but out of budget. Where did you get the Mahgut Grist? It looks like what Orphan Espresso meant to do. (I left out the part of the story where my blind return sat on Orphan's country house porch for months while they were in Asia, because I stripped the adjustment screw and I was too pissed to fix it myself.) At the dawn of the internet (around the time Jeff Bezos decided to open an online bookstore) I wrote this Pavoni web page as an experiment in web authorship: Coffee: Resources for home espresso
-
So do you have your Reg Barber tamper yet? Reg Barber coffee tampers I'd go with the Decent Espresso double baskets, which call for a 58.5mm tamper. My friends argue endlessly about the best tamper shape, but I went flat. Decent Espresso basket That Espresso Forge looks very interesting. I like how it uses standard parts, like my Venetian Bigolaro pasta extruder. My morning ritual involves a Pavoni Europicola lever espresso machine, and an Orphan Espresso Pharos grinder. That's a $300 manual grinder that sports conical burrs normally found in $3,000 motorized grinders. It was a nightmare to get into a routine (Dewalt small trigger clamps to fix it to my butcher block, a mister to prevent bean static, a 600ml Bamix immersion blender beaker to snugly receive the grinds while I shake) but now I have it down, and the routine is what wakes me up. The coffee is a bonus. Orphan Espresso Pharos

-
The double-walled drip pan is on my short list. What I have long used is a 16" terra cotta plant saucer (plain from Italy; one doesn't want lead) lined with a couple layers of heavy duty aluminum foil. The foil makes for easy cleanup. The saucer cracks every year or two and I replace it.
-
I gave up on fat separators long ago. I rely on "leverage". Find a ladle or ladle-like spoon that fits into a large glass or measuring cup. If one is buying from scratch for this, buy a "jam jar" glass and one of those hanging stainless steel ladles ending in a half sphere spoon, that fits partway into the glass. Now, use the ladle to skim the surface of the stock, by setting it just far enough into the stock for the very top film of stock to flow into the ladle. Do this all over the surface, pouring the result into the cup. The goal here is to eventually get all the fat, and some of the stock. It's ok if one ends up with half fat, half stock in the cup. That's a huge improvement on the ratio in the stock pot. Now, let the fat rise to the top, in the cup, and this time ladle off just the fat. Be conservative; one you've removed most of the fat you can always add more stock, to get the remaining fat near the surface. Or one can just dump the stock and bits of remaining fat back into the stock pot, and do this again. This is way easier to do that to say. Why it works is obvious once you see it in action. I can't imagine dedicating space in my kitchen to a bulky fat separator that doesn't work as well.
-
I think mine is named Kay, but I'm not sure. We never consciously named it. We've named every GPS Audrey; I have no idea why. Some things should be left unnamed. One can go either way with a cooker.
-
If a $10 little bottle of spices could make an ordinary meat source taste like a special meat source, it would be worth every penny. This hasn't been my experience, which is one reasone that I buy meats from artisanal local sources. Even the bump in price for the cheap cuts is more that the spices would cost if they worked. I love spice-centered cuisines like Moroccan or Indian, and like flour I grind my own spices when possible. I have a psychological block to plain-cooking an ingredient for dinner, rather than cooking a recipe. Nevertheless, my bias is that the best barbecue doesn't depend on complex spicing. Instead, one cooks an ideal piece of meat with no more than salt, pepper, and chiles, controlling the fire and smoke to the best of one's ability, and letting the meat speak for itself. This is the ideal described in Legends of Texas Barbecue Cookbook, served out the back door on butcher paper to area workers. I don't like flavored coffees, or flavored olive oils, or dehydrated garlic and onions, and I bring this suspicion to store-bought rubs for barbecue. They remind me of the middle ages: One perhaps rightly feared baths as an infection vector, but humans smelling like healthy wild animals had fallen out of favor, so one masked with perfumes. Nevertheless, one could generalize the idea of "umami" to any subliminal technique that enhances a flavor. And as noted above, the best practitioners of spice blending may have talents beyond us. So I'll decide one blend from the recommendations above, and try it. Always good to fight one's prejudices...