mameola Posted March 6, 2017 Report Posted March 6, 2017 Well, I finally got back from Vacation and was finally able to work through my first cook. I had lots of idea on what to cook but I thought I'd keep it simple and go with a beer can chicken but with a slight twist. I went with an 8 Lb. oven roaster. I thought that would be a nice size for five adults and two small children. I also wanted to end up with some leftovers that could be enjoy later in the week. At the end of the day, that worked out perfectly. Now on to my first cook. As I always do, I brined my bird overnight in a saltwater, spice and aromatics bath. This goes a long way in enhancing the flavors, while also producing a very moist bird as long as you don't overshoot your targeted internal temp. I always pull my poultry when I hit an internal premature of 160-deg. I also give it a good 20 to 30 minute rest before I go cutting into it. The results are always spot on for me. Okay, now on to the cook. This being the first time I would ever fire up my KK 32, or any Komodo style cookers for that matter, I started about three hours before my scheduled cook time. I should also add in that it was a brisk 34-dergs outside when I got started. I gave myself three hours because the one constant in everything I've read about Komodo cooking is to take it slow and at all cost, don't overshoot your cook temp or you will have a long wait getting back to where you want to be. I loaded the basket full of hardwood lump charcoal and hit it in three or four places with a propane torch. She fired right up. With the dampers wide open and the dome three full turns opened, things started heating up fairly quickly. By the time I was 30-mins in, I want to say I had the bottom damper opened about 1" and the fine adjustment on the smallest setting. The top was opened to maybe 1 1/2 turns at this point. The temperature was still climbing but very slow now. At this point I knew I had control over everything and would have everything dialed in shortly. I left the bottom dampers where they we set and started closing the top maybe an 1/8 turn at a time until I hit and held at 325. I was shocked at how easy it was to dial into my desired temperature. In less than an hour, I hit my 325-deg mark. Still being nervous and unsure, I intensely watched that dial thermometer for the next two hours. With a slight tweak or two, she held steady the entire time. Wow, was I impressed. Things went exactly as everyone on this form said they would go. I was very impressed. I should also mention that I also monitored the temps with two Maverick 73s. I attached a probe to the grate and one to the KK dome thermometer. I would eventually use a third probe to monitor the internal temperature of the meat. I was very impressed to learn that the KK’s dome thermometer was dead-nut-on. I've never had any grill thermometer I’ve ever owned be worth a crap. Again, I was very impressed. Next, I loaded my beer can chicken onto the top grate with a drip pan underneath and let the KK 32 do the rest of the work. I planned on cooking my bird for about 2 1/2 to 3 hours at a temperature of 325-degs. As mentioned above, I would be shooting for an internal meat temperature of 160-degs. Two hours and 45-mins. into the cook I hit my targeted internal temperature and pulled the bird off. Needless to say, I was very happy with the result. Oh, I almost forgot to mention the "Twist" I mentioned above. Instead of using a regular old can of beer, I decided to go with an Angry Orchard cider beer. I also poured 1 ½ cans of Angry Orchard into the drip pan. I complimented that with apple wood chunks for smoking. Man oh man did that turn out to be a good idea. You could smell the cider and wood smoke aroma coming out of the dome of the KK. It was awesome to say the least. Here are some pics for your viewing pleasure: 2
Pequod Posted March 6, 2017 Report Posted March 6, 2017 Nice first cook. Sounds like you've figured this out pretty quickly. 1
tony b Posted March 6, 2017 Report Posted March 6, 2017 Excellent job for a 1st cook for sure! As the old saying goes, "slow and steady wins the race!" The KK dome thermometer is a Tel-Tru, one of the best out there. Dennis only goes with the best stuff on his KKs. Glad to see that you used a vertical roaster rack and not an actual beer can. That myth's been debunked for a while now. http://amazingribs.com/tips_and_technique/debunking_beer_can_chicken.html 1
Keith OctoForks Posted March 6, 2017 Report Posted March 6, 2017 Nice first cook! For a different way to add to your chicken repertoire is spatchcocked chicken...definitely a must try. Start with the skin up and then flip skin down 1/2 way through. 1
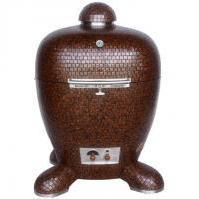
Bruce Pearson Posted March 6, 2017 Report Posted March 6, 2017 Nice looking chicken dinner and better looking KK what color is that? 1
MacKenzie Posted March 6, 2017 Report Posted March 6, 2017 mameola, what a beautiful KK, and you did a fantastic job on the 8 pound chicken. I am sure everyone was impressed with the chicken as much as they were with the KK. 1
Aussie Ora Posted March 7, 2017 Report Posted March 7, 2017 Nice have not done a beer can in ages but the last one I did was a nice fruity cider turned out good I'm more into spinning or road kill now lol great first cookOutback Kamado Bar and Grill 1
mameola Posted March 7, 2017 Author Report Posted March 7, 2017 23 hours ago, Bruce Pearson said: Nice looking chicken dinner and better looking KK what color is that? Bruce, Thanks for the comment. The color is Dark Autumn Nebula.
DennisLinkletter Posted March 7, 2017 Report Posted March 7, 2017 Great first cook.. Just a suggestion, next cook, pass on the fluid in the drip pan, The low airflow created by all the insulation creates high humidity on it's own.. with a drip pan full of fluid you are often just steaming your food and you will find getting a great bark / crisp skin more difficult. I don't know anybody who adds water or fluid to their KK's drip pan, just my 8 cents. 1
_Ed_ Posted March 7, 2017 Report Posted March 7, 2017 Nice first cook! If we're all making suggestions, you could try eliminating the drip pan from the equation entirely. The amount of distance you can get between the fire and the chook by putting it high in the dome means that you don't need to go indirect, and I've always liked the flavour compounds developed by rendering chicken fat hitting the coals directly... and, as @tony b says, nice colour choice. It is a well-known and not-at-all-disputed fact on this forum that Dark Autumn Nebula cooks by far the best. Because quantum. or something. 1
mameola Posted March 7, 2017 Author Report Posted March 7, 2017 @DennisLinkletter Thanks for your 8 cents! I guess it's hard to teach an old dog new tricks but I'll take your recommendation and run with it moving forward. I added the hard cider to the pan for the taste not the moisture but it didn't really make much of a difference and the skim was anything but crispy. Ed, No drip pan makes me nerves but like I said, this was my first ever komodo cook and it was loaded with what I've mastered prior to owning this fantastic piece of art!!!l. Saying that, I will definitely try your idea because the skin was delicious but not crispy at all. This was also probably due to putting liquid in the drip pan and that also seems to be a no, no as well. @tony b and Ed, I love the color and I'm very happy to me a member of your elite group You both get a style point from me!!! Now to a question I have. I loaded the charcoal basket to the top and needed to add more charcoal in the final hour of the cook. That means I got about four hours out of the load while cooking at a steady 325-degs the whole time. Does this sound normal? The charcoal I used was bought at Loews so it was their store brand. The packaging looked awesome so I bought it. That's how it's supposed to work right I've never used their brand before so I don't know how it well it was rated. I bought a load of charcoal from Dennis when I purchased my grill but wanted to use this up first.
Pequod Posted March 7, 2017 Report Posted March 7, 2017 (edited) 17 minutes ago, mameola said: Now to a question I have. I loaded the charcoal basket to the top and needed to add more charcoal in the final hour of the cook. That means I got about four hours out of the load while cooking at a steady 325-degs the whole time. Does this sound normal? The charcoal I used was bought at Loews so it was their store brand. The packaging looked awesome so I bought it. That's how it's supposed to work right I've never used their brand before so I don't know how it well it was rated. I bought a load of charcoal from Dennis when I purchased my grill but wanted to use this up first. Not normal at all. I can go much longer than that on a full load. At 325 you shouldn't need more than a single turn of the top cap and a small vent setting on the bottom. Use the top cap for large movements of temp, and lower vent to fine tune. Maybe try plain old Royal Oak Lump and spend some time with the vent settings. You'll find it doesn't take much airflow at all to sustain 325. Edited March 7, 2017 by HalfSmoke 1
mameola Posted March 7, 2017 Author Report Posted March 7, 2017 @HalfSmoke I had the lower vent opened about 1" and the top opened about one turn. Sounds like I match what you typically do when you're cooking at 325. That is, unless your lower vent is opened less then 1". I'm just wondering if I bought some garbage charcoal.
Pequod Posted March 7, 2017 Report Posted March 7, 2017 9 minutes ago, mameola said: @HalfSmoke I had the lower vent opened about 1" and the top opened about one turn. Sounds like I match what you typically do when you're cooking at 325. That is, unless your lower vent is opened less then 1". I'm just wondering if I bought some garbage charcoal. Once I'm heat soaked I can turn down as low as 1/2 turn and barely open on the lower vent. Maybe not garbage charcoal, but you were operating with a higher flow rate, with higher combustion rate and higher heat release via the top cap. You can clamp it down, reduce the burn rate and still sustain 325. 1
mameola Posted March 7, 2017 Author Report Posted March 7, 2017 @HalfSmoke This sounds logical and I was wondering the same thing watching the heat escaping from the top. The temp overnight was around 16-degs F and about 34-degs F when I started heat soaking so she was cold. How long should it typically take to heat soak a BB 32 that cold and how soon do you start choking things down?
Pequod Posted March 7, 2017 Report Posted March 7, 2017 1 minute ago, mameola said: @HalfSmoke This sounds logical and I was wondering the same thing watching the heat escaping from the top. The temp overnight was around 16-degs F and about 34-degs F when I started heat soaking so she was cold. How long should it typically take to heat soak a BB 32 that cold and how soon do you start choking things down? An hour of heat soaking should do it. I'll start spinning down the top cap when the temp gets within about 50 degrees of my target. You'll find the temp will likely drop a bit on the dome therm, but wait a few minutes and it will start creeping back up. As it approaches the target you'll reduce the lower vent to dial it in. If you know the vent setting for a particular temp, you can just dial that in immediately and let it run up slowly. Just give yourself enough time. 1
tinyfish Posted March 8, 2017 Report Posted March 8, 2017 Sounds like your first cook was a success. 1