.GIF.0c507fdd0aaa5c1cae84b6c43af405e7.GIF)
tony b
-
Posts
12,680 -
Joined
-
Last visited
-
Days Won
558
Content Type
Profiles
Forums
Events
Everything posted by tony b
-
You're just too much, MacKenzie. Fresh pea shoots from your garden, seriously?
-
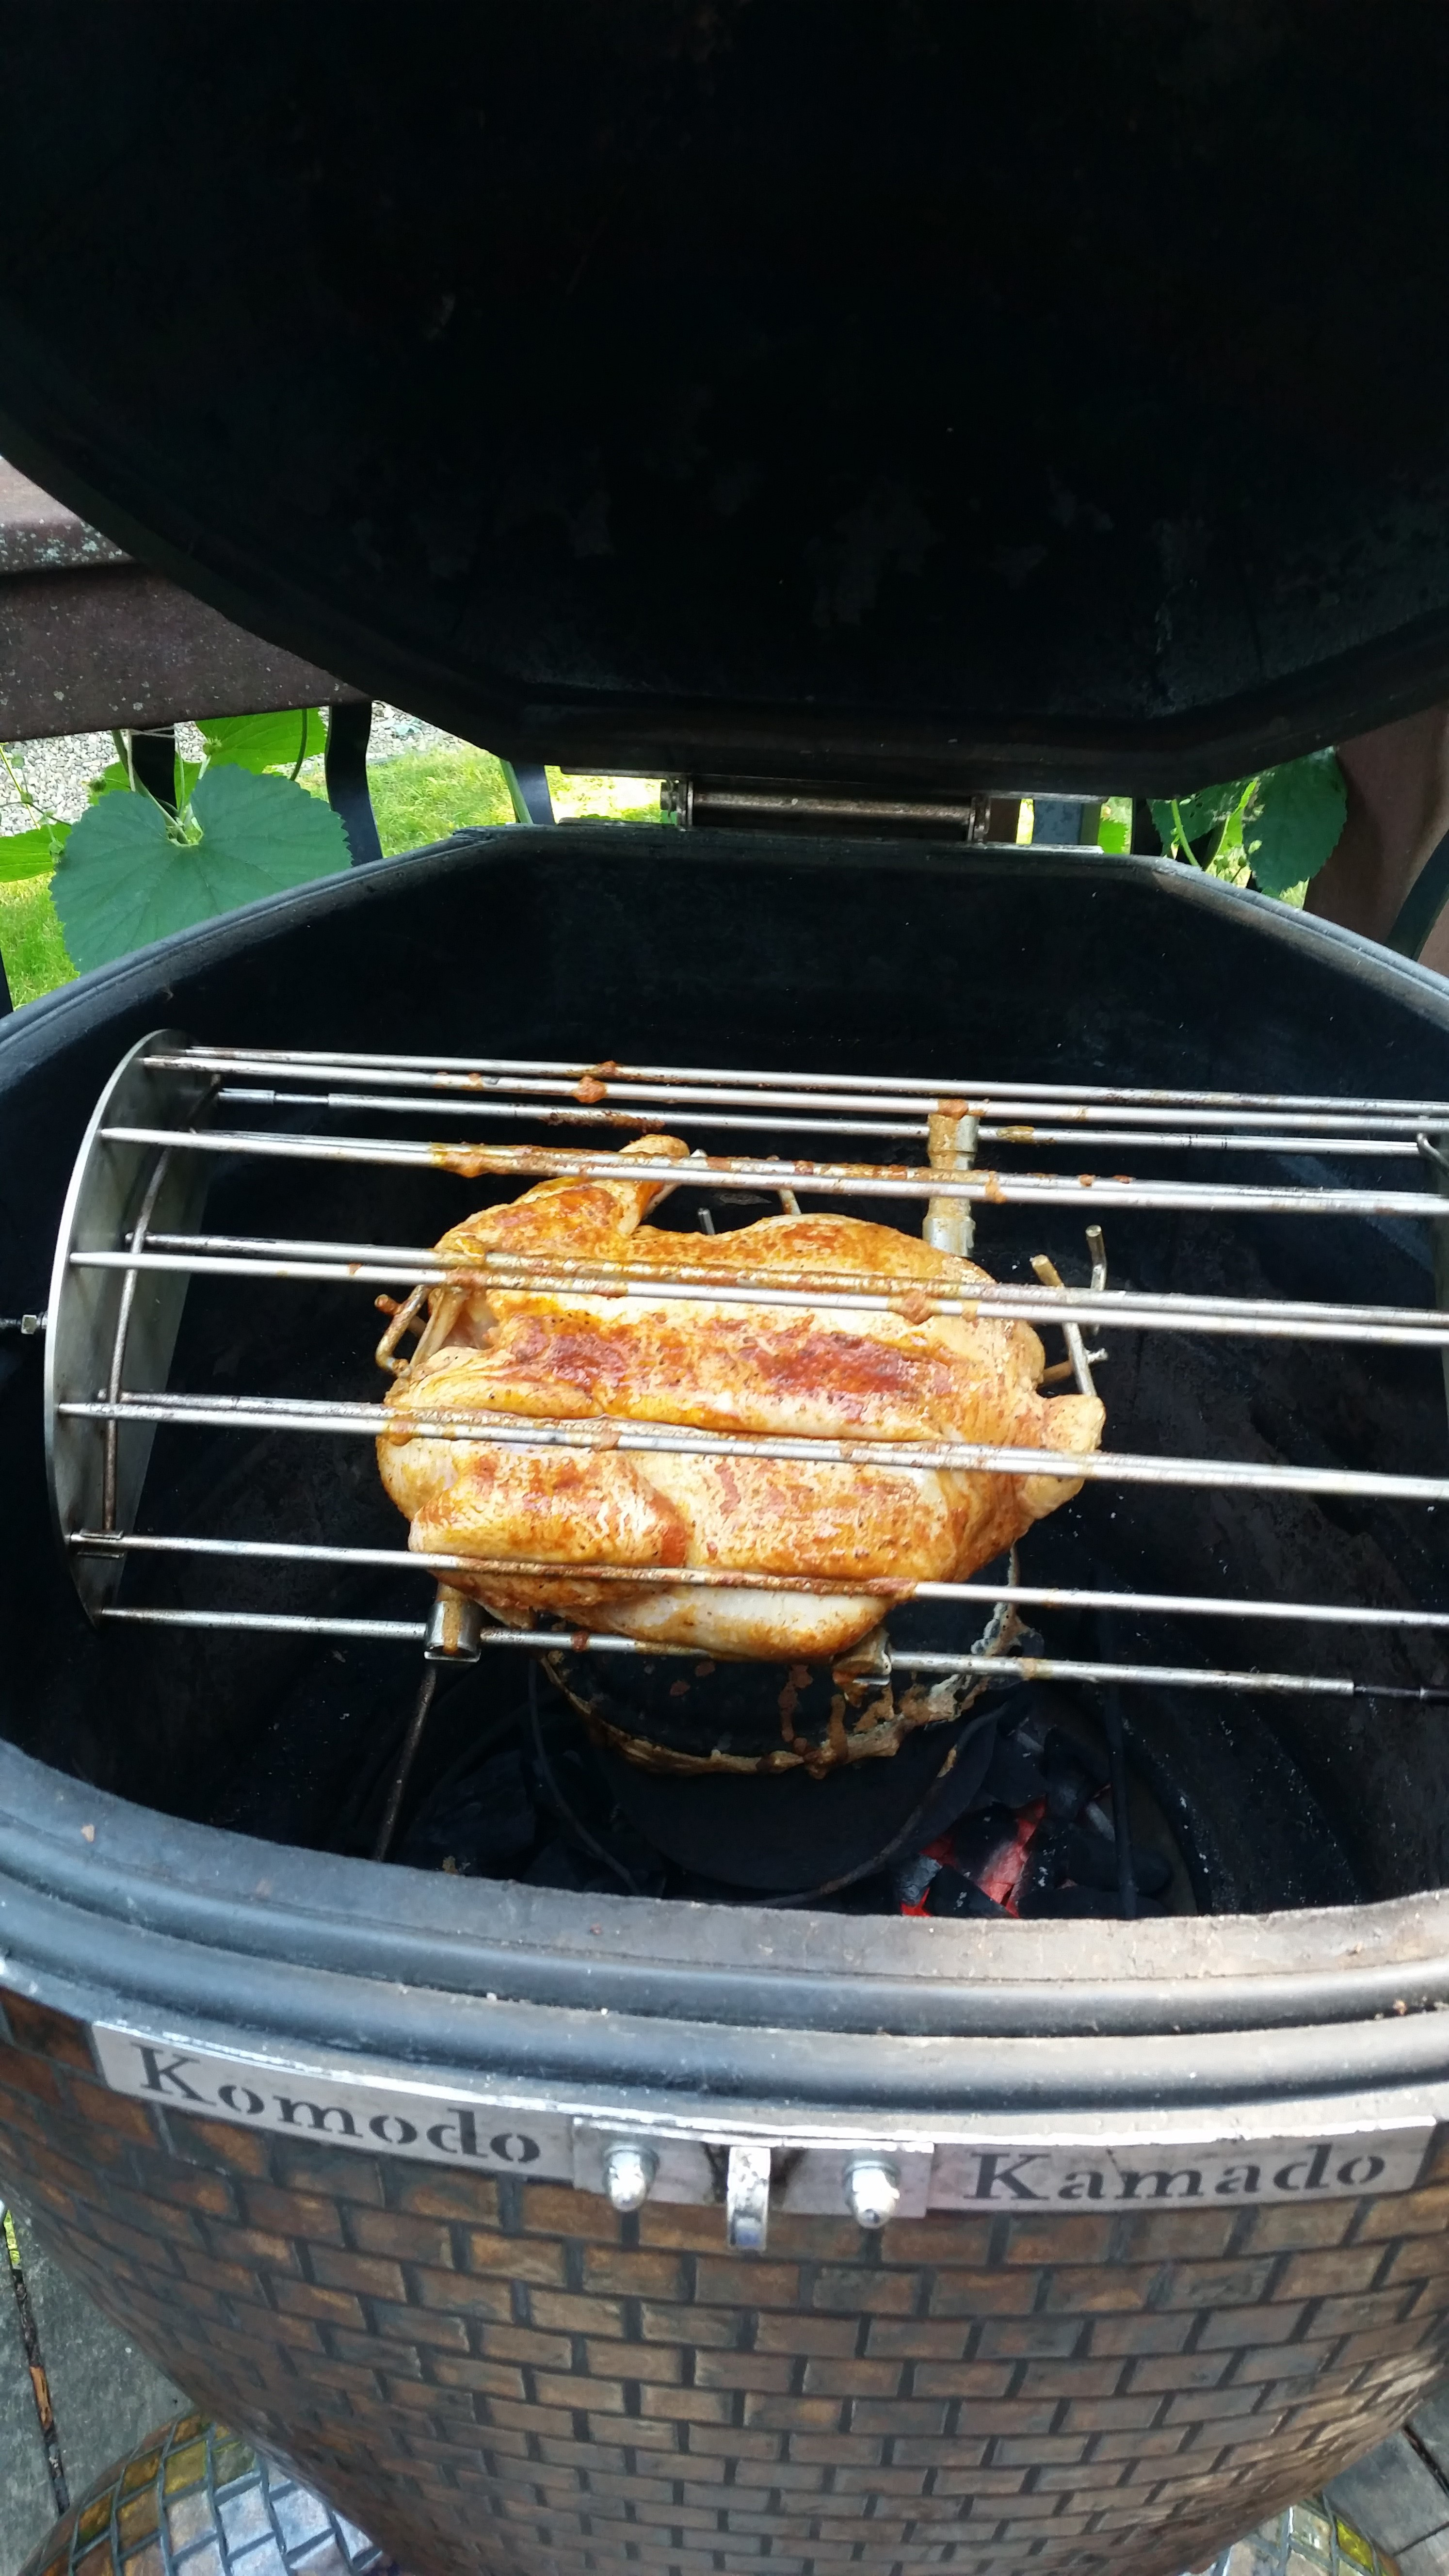
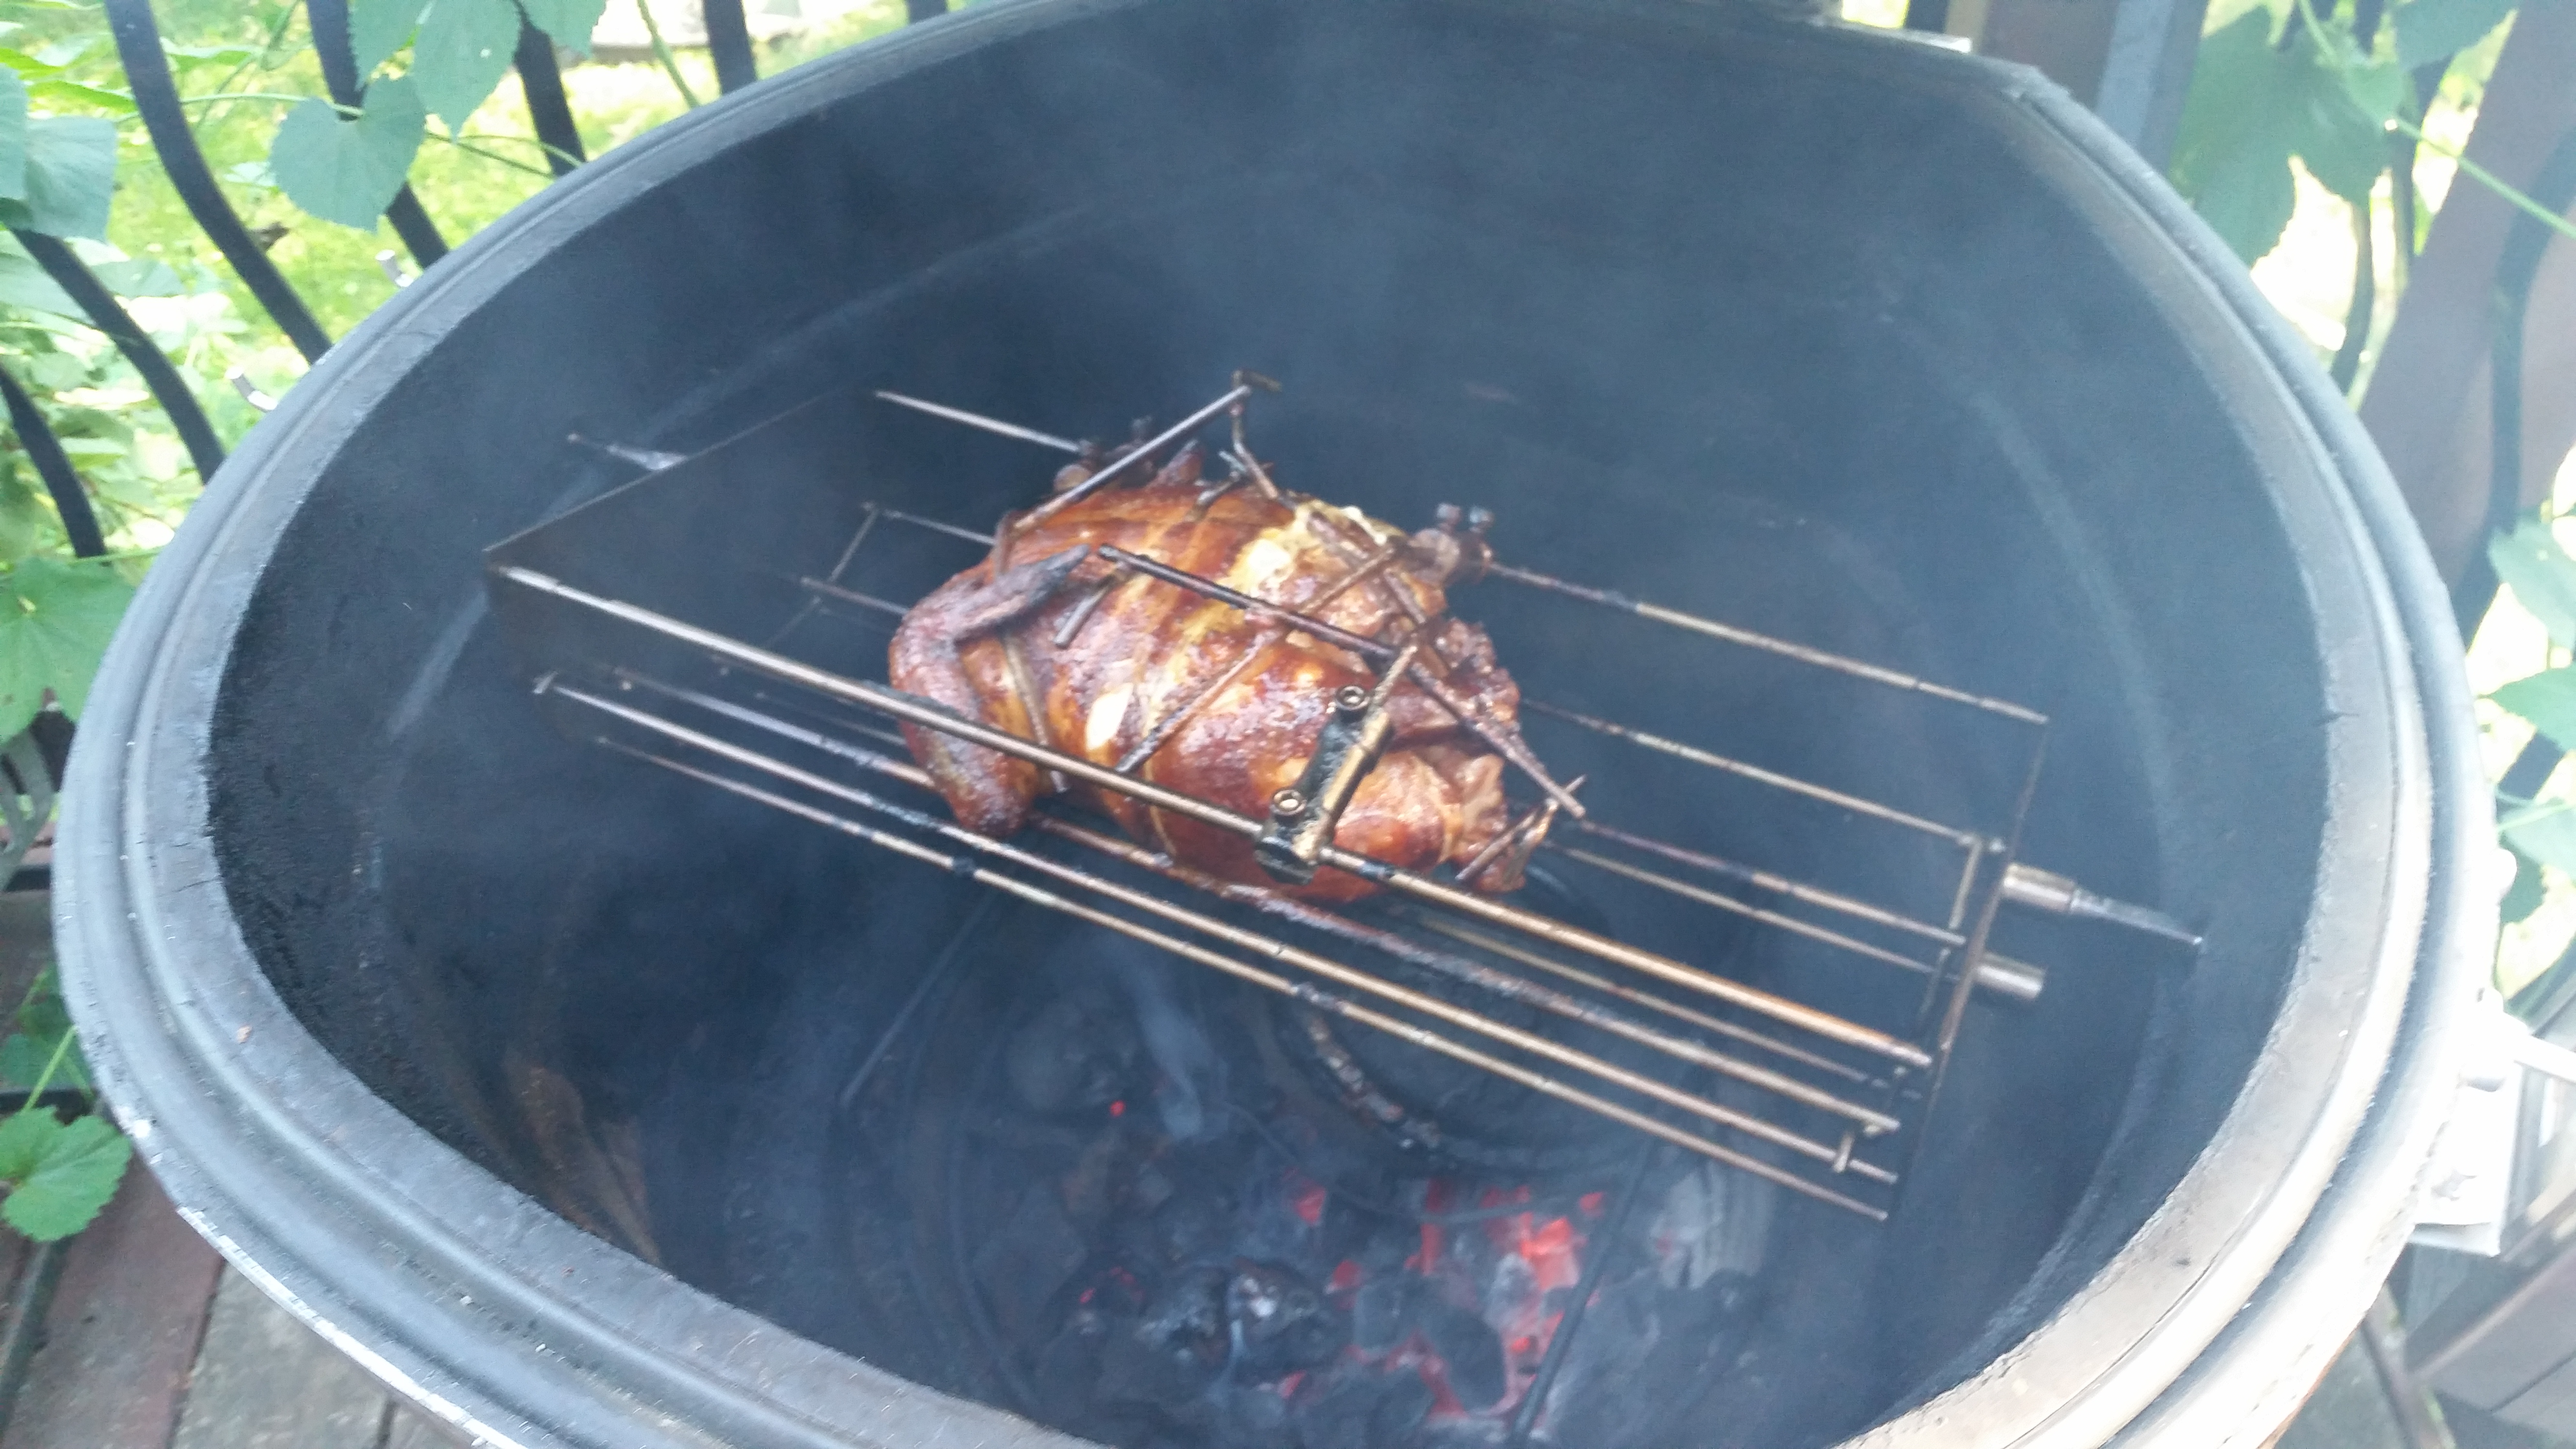
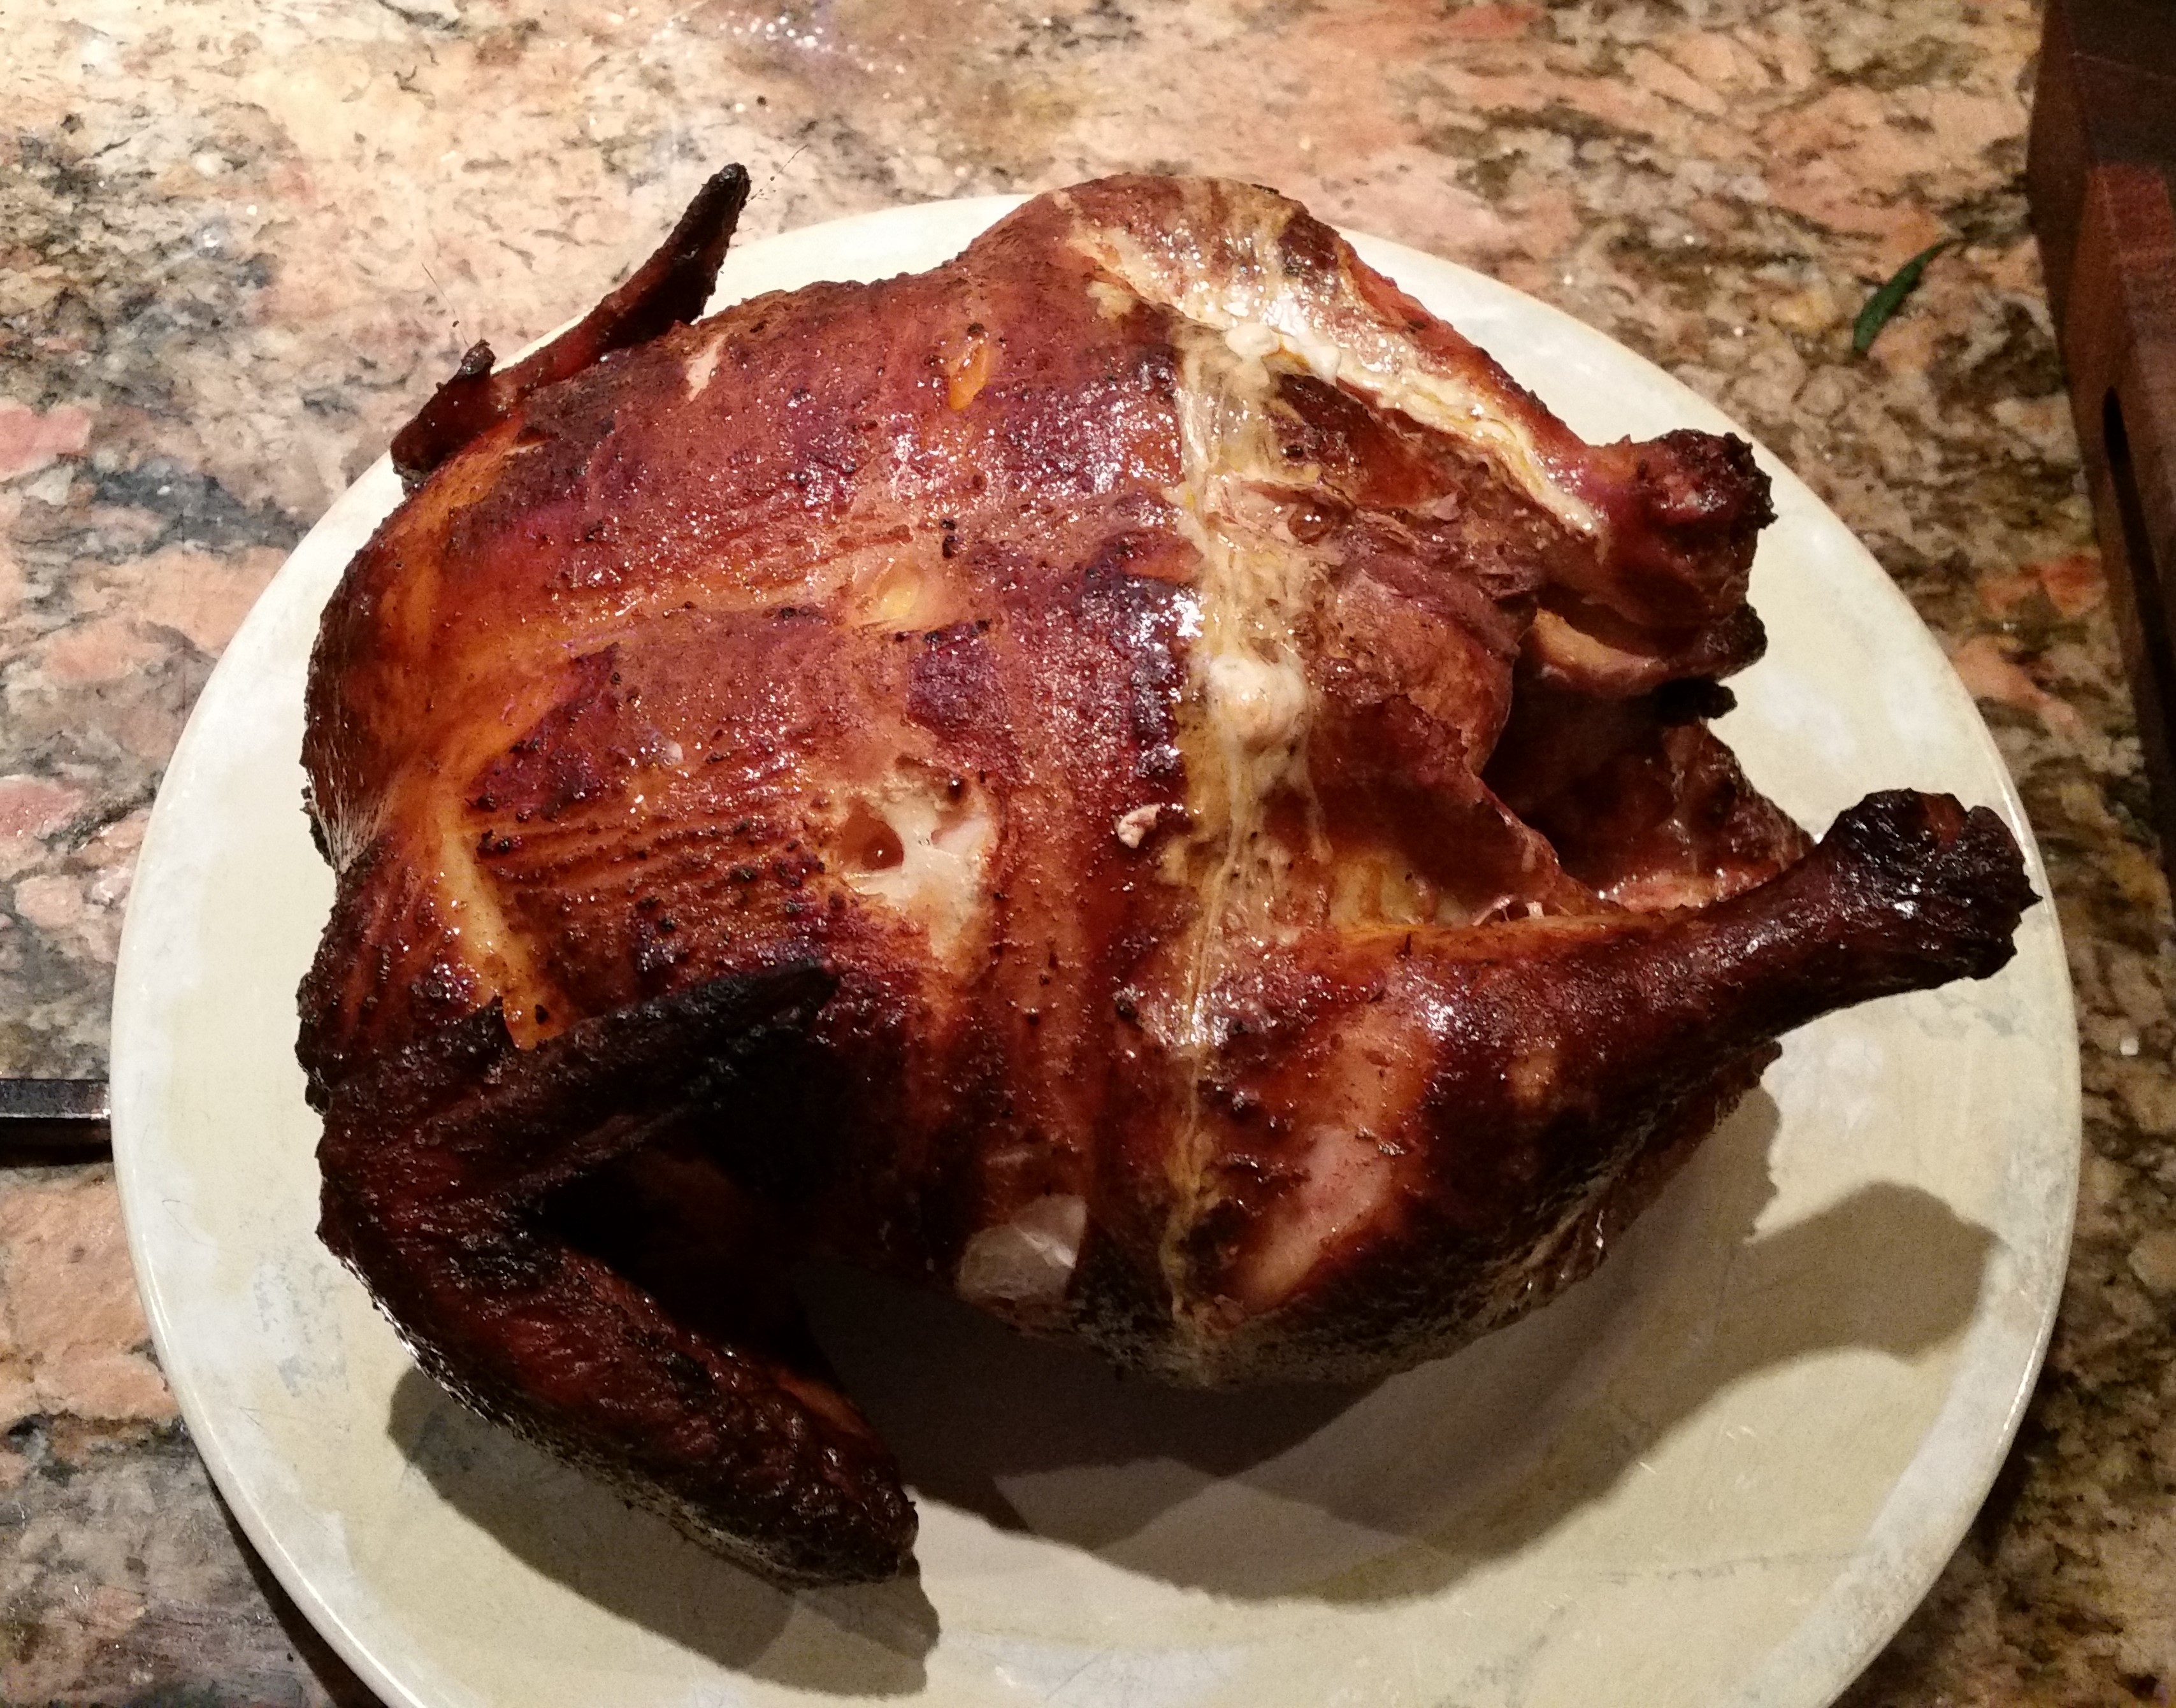
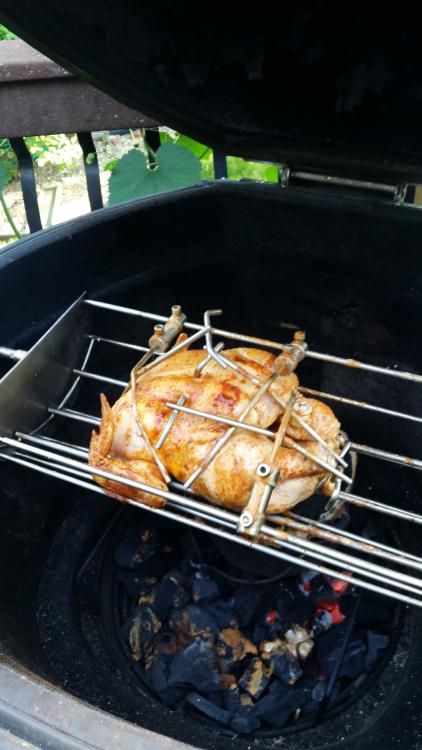
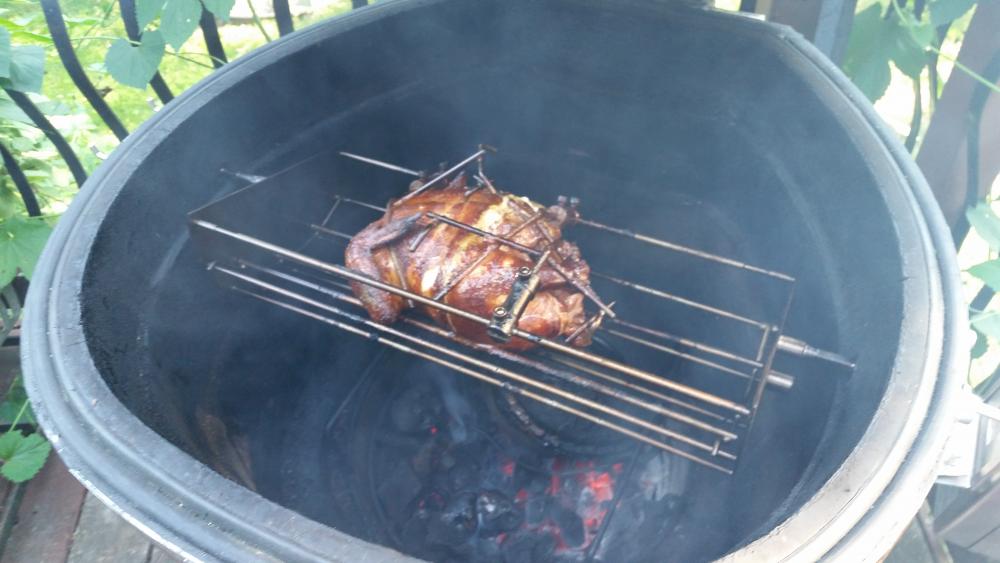
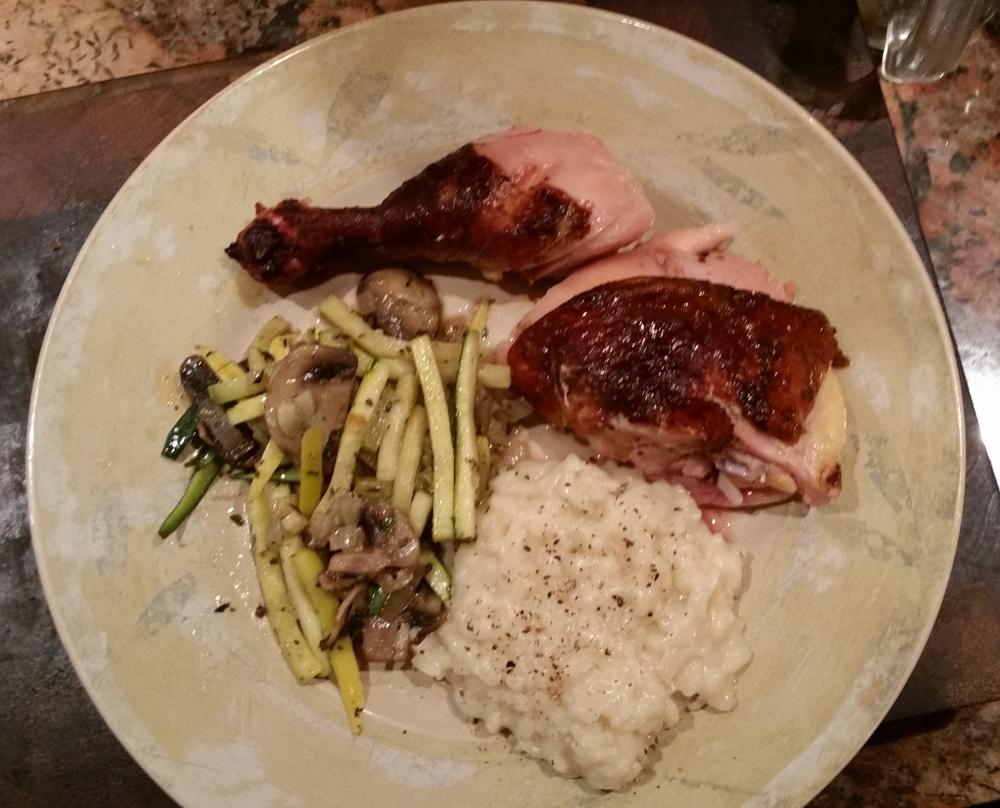
I finally had the time to try a rotisserie cook after all the trials and tribulations of getting this thing to work right! Had to do a whole chicken. Injected with Butcher's BBQ Rotisserie Chicken marinade and rubbed the skin with baking powder and kosher salt and let rest uncovered in the fridge overnight. Just before going on the KK, I brushed on some oil and dusted the outside all over with Yardbird rub. Into the rotisserie basket and onto the KK, preheated to 300F (final target was 350F for the 1st hour and 400F for the last 30 minutes or until done). Smoking pot with one chunk of pecan and two chunks of peach wood. Just about done. I noticed a lot of smoke in the grill. When I checked, I saw that I had leaks around the lid of the smoker pot. Never have had that happen before. No harm, no foul in my book. Done. Had been on the KK for about 1 hour and a half. Breast was 155F IT, legs were at 175F. Let rest for about 10 minutes while I finished up the sides. Plated with some cheese risotto and sauteed yellow squash, zucchini and mushrooms. Have to say that it was one of the best chickens that I've ever done. Seriously tasty. Skin wasn't quite as crispy as I wanted, but that's a tweak for next time. Maybe a tad more time on the KK at the higher temp.


-
Didn't think you were that much in the Dark Ages in OKC, but sounds like I could be wrong!
-
Plating shots are just stunning! You should seriously go Pro. You're that damned good, girl!
-
Looks like money from here already, Charles! Nicely done. @CeramicChef - Ken, I hear yah. But, it seems a bit off kilter for a Guru Challenge, where it's usually all about the recipe, not so much about the technique.
-
Who said that they were just for breakfast? We had a local pub that did pizza for a while and it was a standard on the menu. One of my "go to's" there. Alas, they swapped out the pizza oven for a smoker, and are now doing BBQ. Decent, but mine's better, so I don't often go there much anymore for the food; beer selection is great, though! btw - the trick is to cook the pizza w/o the eggs and then crack them on top right out of the oven. The residual heat will set the eggs just enough to firm up the white, but leave a nice runny yolk.
-
@CeramicChef - corn was tasty, but not the good local stuff yet. Won't start seeing that until late July. Driving out in the countryside yesterday, corn is only about 2 ft tall right now. Remember the old saying - knee high by the 4th of July. @bryan - no, it didn't. Hence, thinking it might have needed an extra day. @ckreef - I toyed with an actual side-by-side cook, but I've cooked these TJ steaks a few times now and have a pretty good feel for what they taste like and their texture. One of the reasons I chose this steak for the trial, is that they are a bit on the chewy side, but have great flavor. What would be fun to do is a sirloin, cut it half, do one half with the koji for 3 days and second half just plain, dry aged for 3 days. Cooked side-by-side. I've done bigger steaks in the fridge for up to a week and like the way they turn out. Been meaning to try the UMAi bags, but haven't broken down and ordered any yet. So many things to try, so few meals!
-
Been using my smoker pot for years now. I plan to use it tonight on the whole chicken cook. Works great on longer cooks. And the fun part is, if you use bigger wood chunks, you get a couple of pieces of charcoal at the end.
-
Nicely done, as usual, MacKenzie! Alas, my chives were killed this spring with a late frost. So, I've had to start over with new plants. Doing well, but no where near flowering like yours! Gotta love the pics of the butterflies. Fingers crossed my annuals come up soon in my butterfly garden. Planted the milkweed last year. it's all sprung up now. Haven't seen any Monarch's yet this year. @Bruce Pearson - hope you got in on the Father's Day sale at Anova. I posted the link over in the Sous Vide thread in this Forum. You're going to be amazed at how food turns out when done SV.
-
Don't forget those all important pictures!
-
Jon B. also comes to Cedar Rapids to visit periodically. Missed him earlier this year, but maybe we can coordinate and have a KK party on my deck next time?? It's nice that you stay in touch with the family. I am a widower and still visit my spouse's family up in Minneapolis a couple of times a year, including Christmas.
-
Yummy!
-
Thanks for the recipes. Never seen it done in 2 steps before. Will definitely be trying this one, as Tandoori chicken is a favorite, especially wings! Tell the little guy, I heartily approve of the Pink Flamingo cup. I do a charity dinner periodically, where the theme is Pink Flamingos. I have just about everything from tablecloths, napkins, glasses, plates, S&P shakers, decorations, you name it. Here's a picture from a previous one. Those are a couple of the guests in the picture.

-
@MacKenzie @CeramicChef - you two been living under a rock? Breakfast pizza has been around for a long time.
-
@bosco - you said it, buddy! Like handing Jacques Pipin a cast iron skillet and a non-stick pan, then asking which one he'd rather use for making a fritatta. Tell me it's the cook and not the equipment then!
-
First off, nice looking Surf-n-Turf. $5 each. Hell, I'd be eating those everynight! As the saying goes, "Any port in a storm."
-
Interesting challenge. I am assuming that it's suppose to test everyone's BBQ skills, by cooking "blind." But how will it be judged? It will be hard to tell how well (or not) food comes out by just looking at pictures. It's all about texture and moisture. Example, you could do a brisket and show the plated sandwich, which could be made to look good, but the brisket could actually be very tough (under cooked) or very dry (over cooked). Seems like a pointless exercise. Just saying.
-
Nicely done. Love the pink flamingo glass, too! Do you have a good recipe for the tandoori? Would you mind sharing it?
-
I vote pork butt. Super easy, very forgiving cook, always comes out tasty!
-
Yeah, a pallet load of charcoal boxes is more than you think!!
-
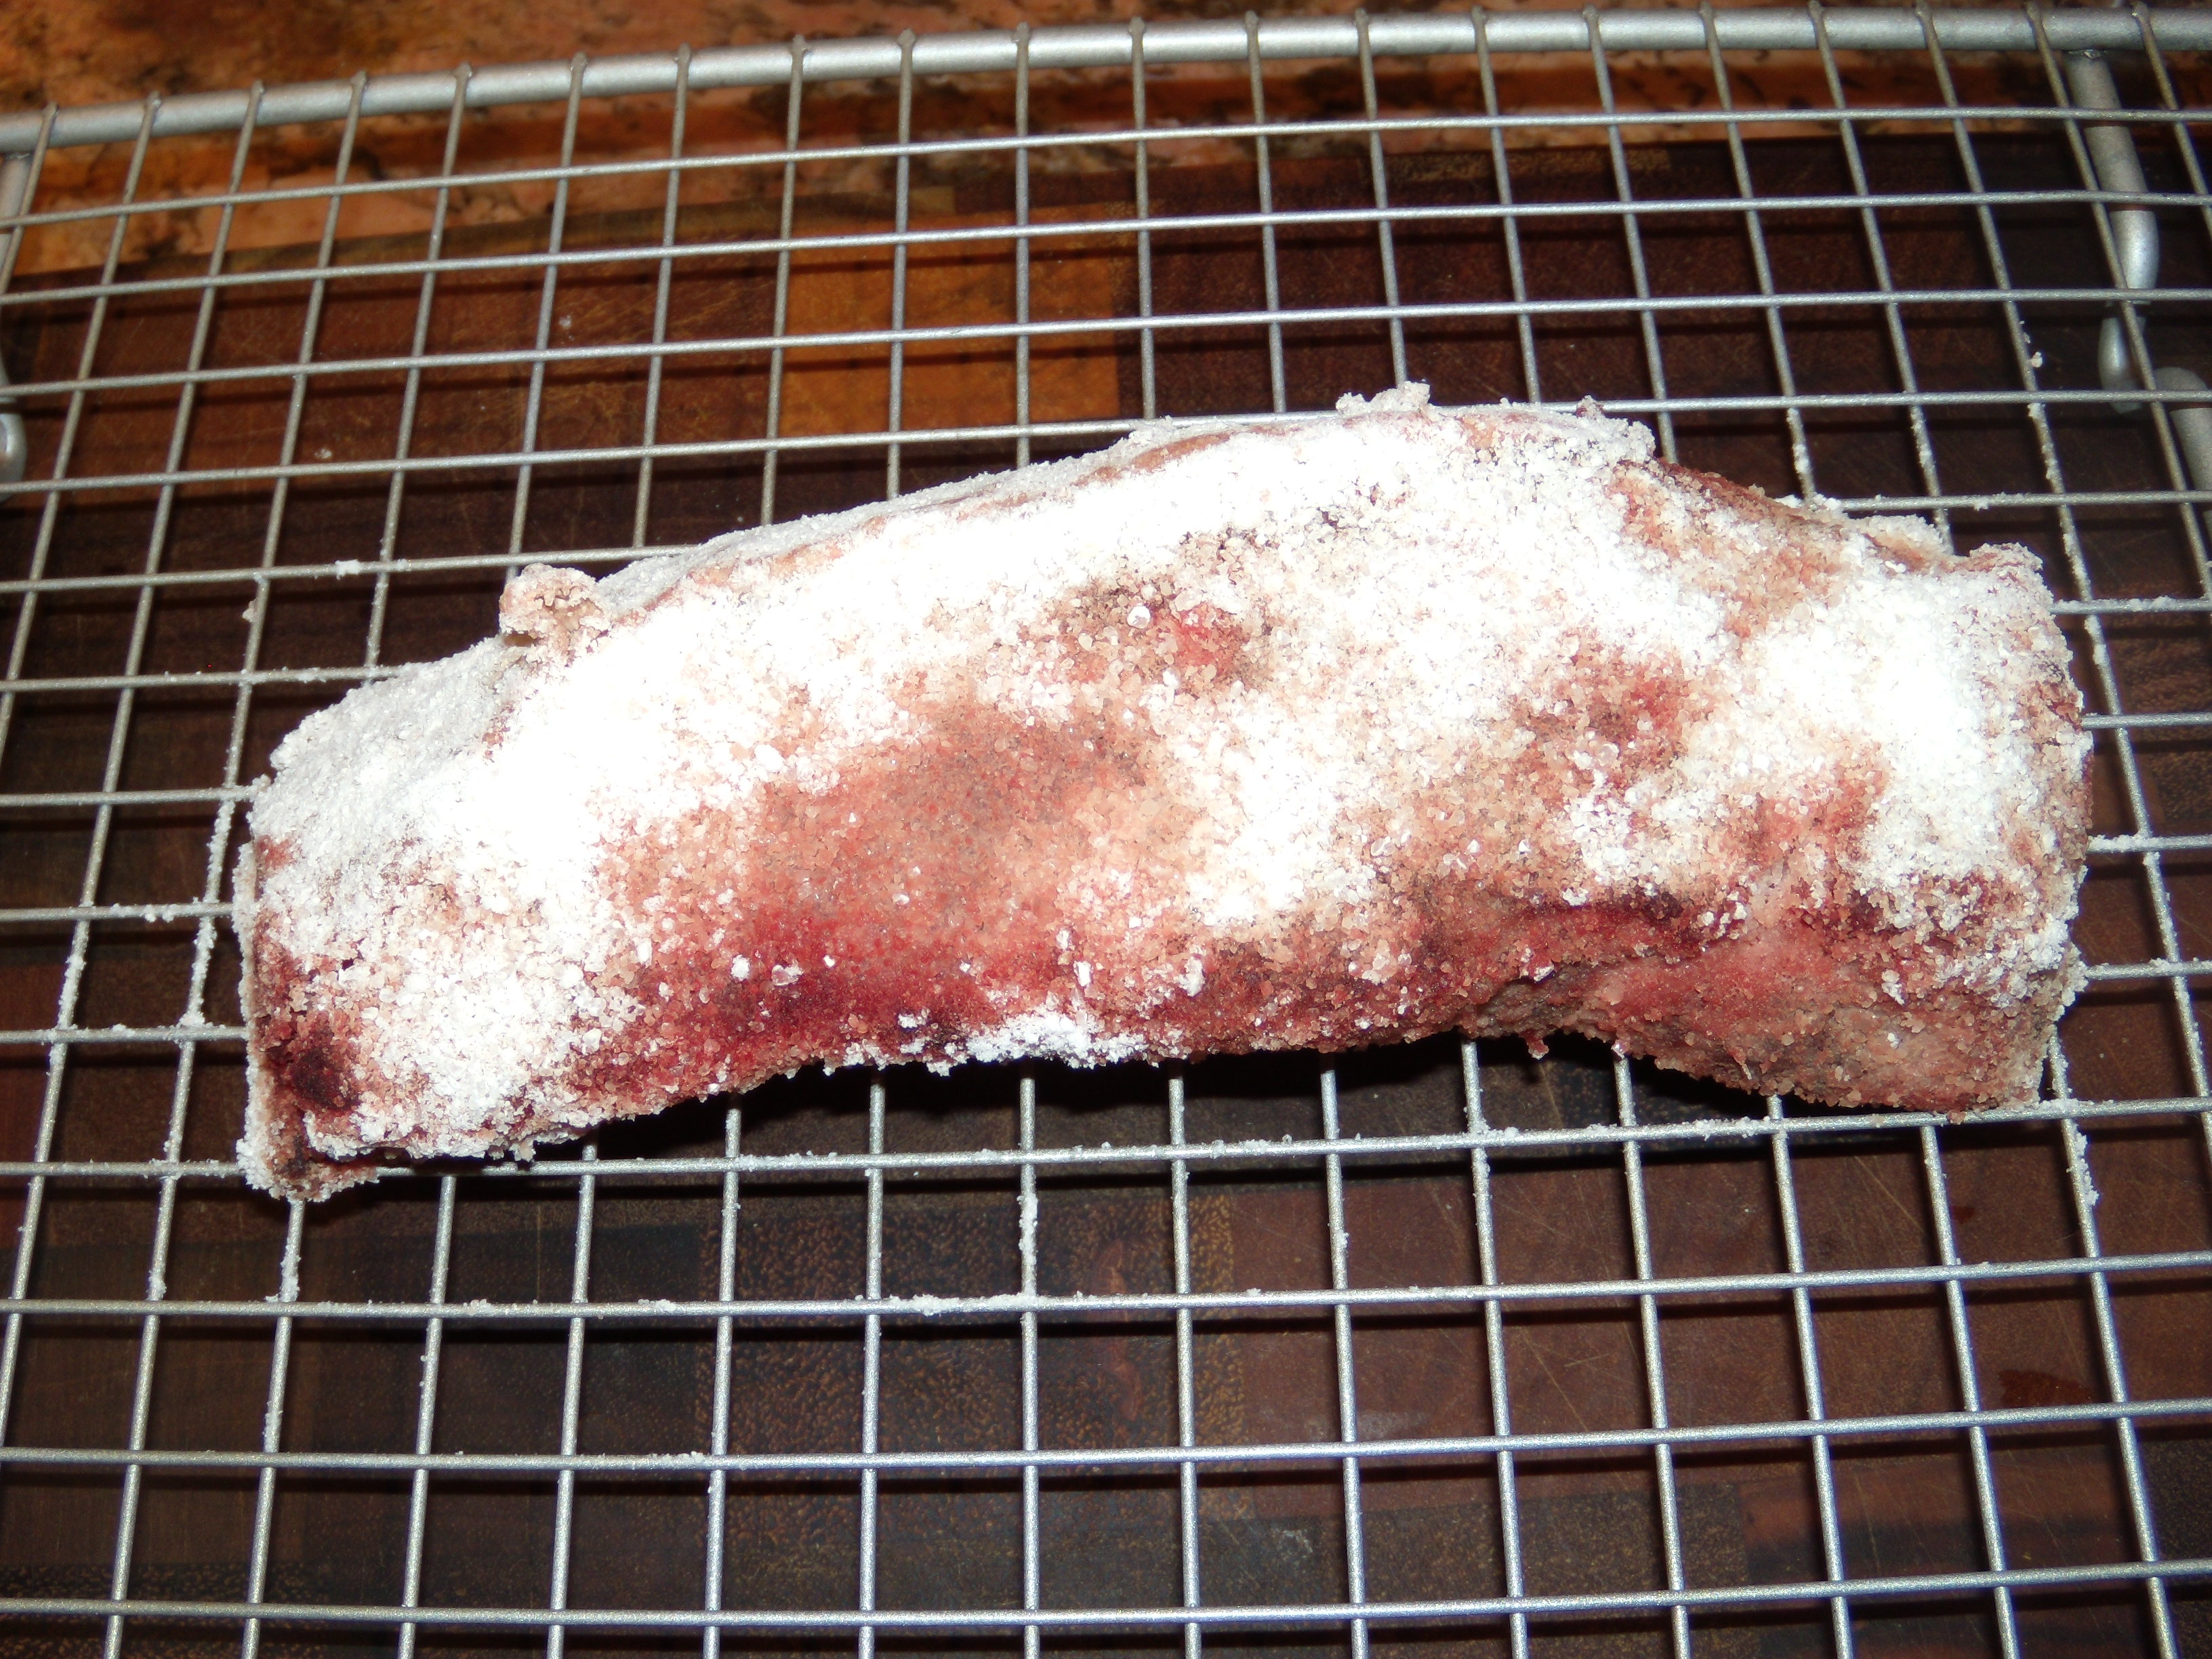
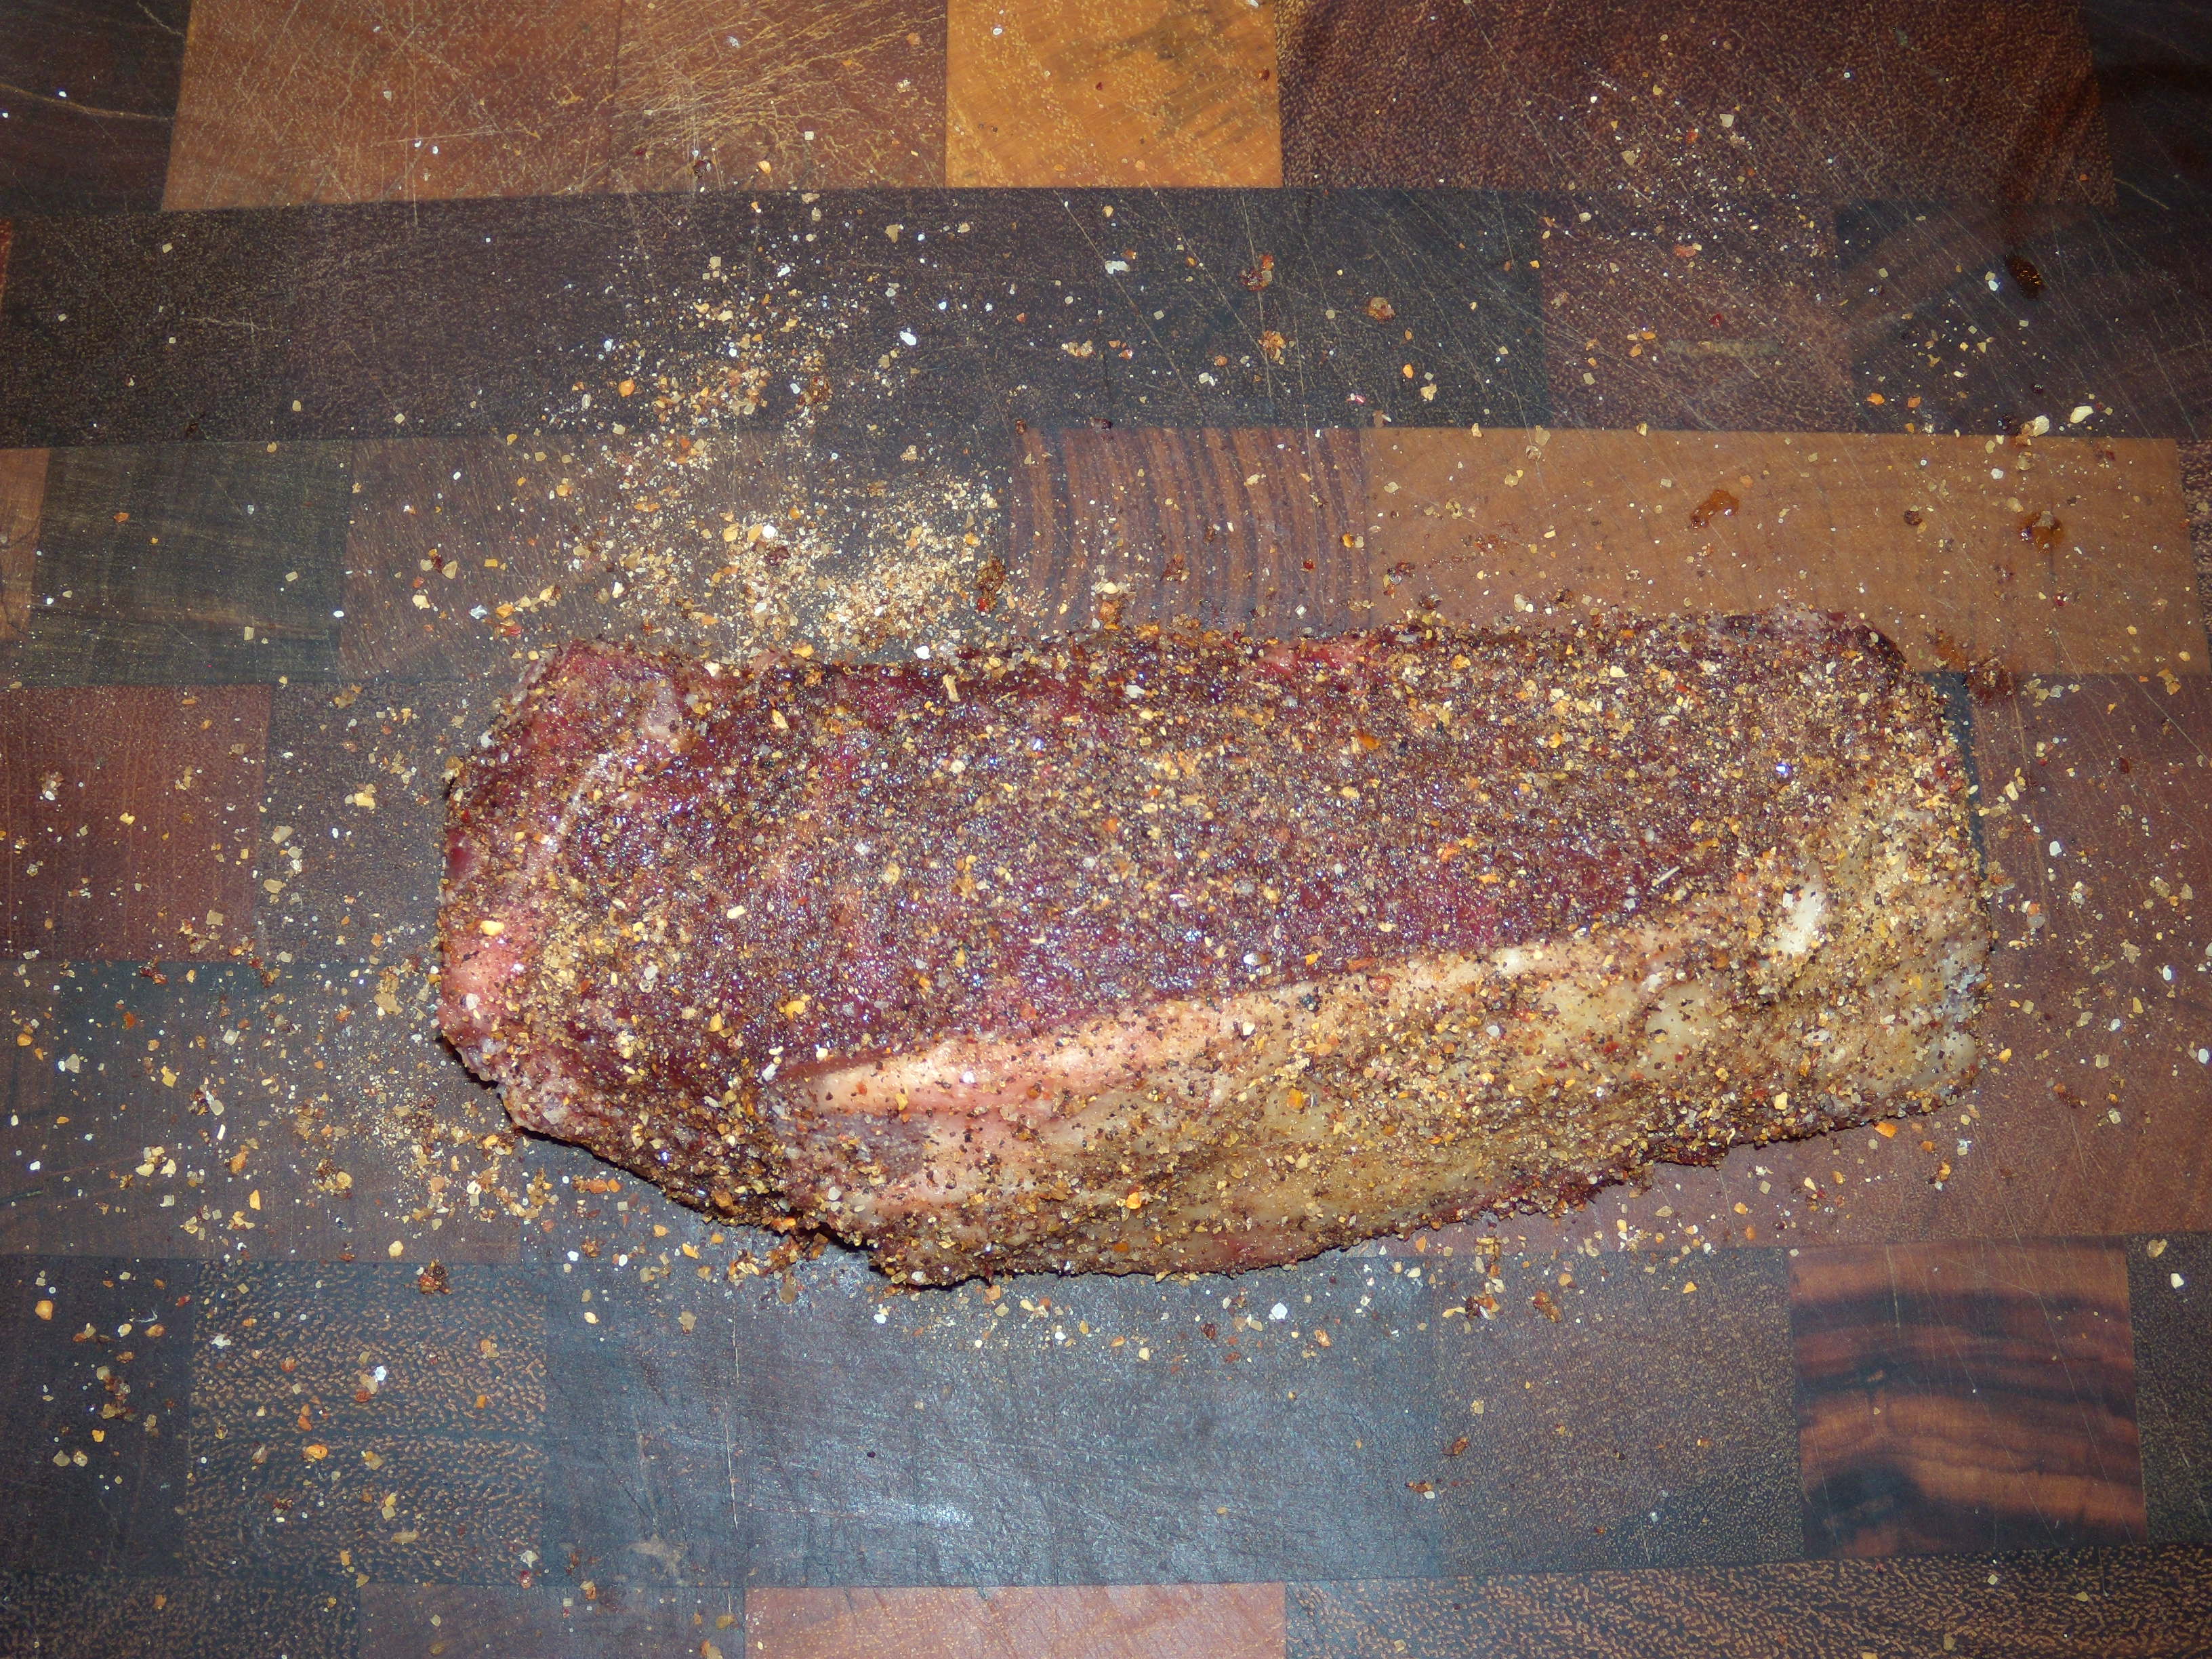
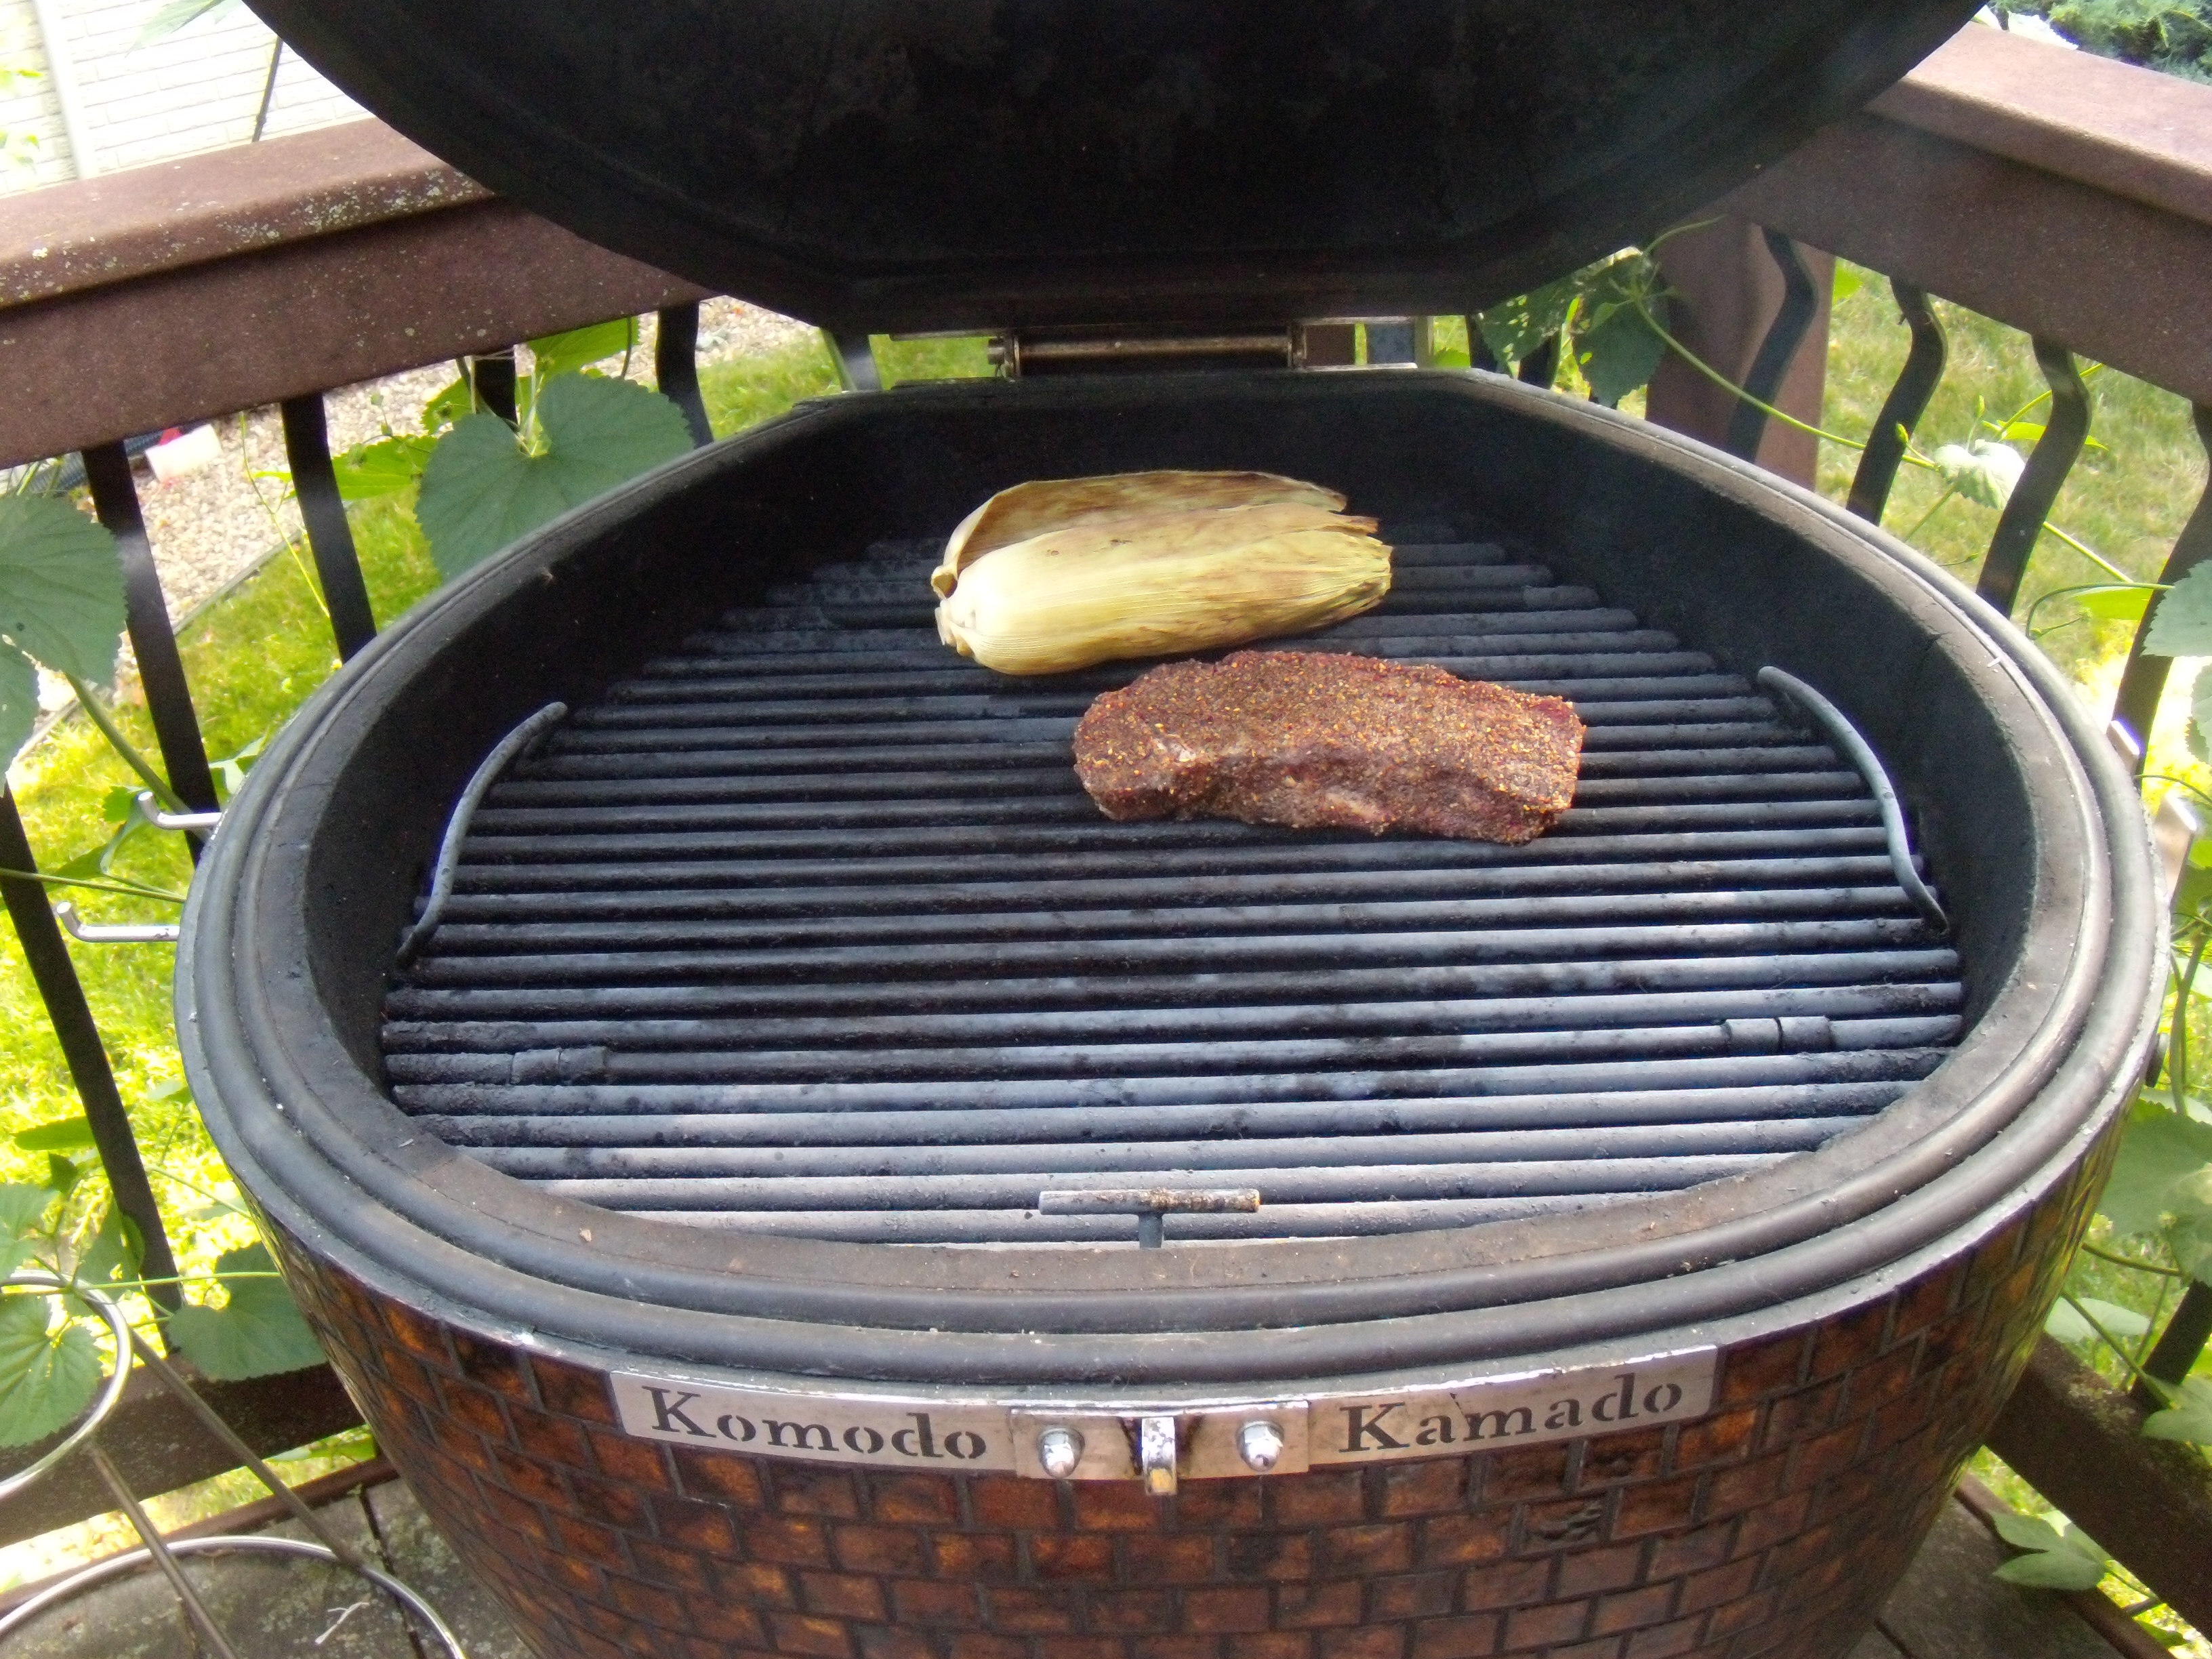
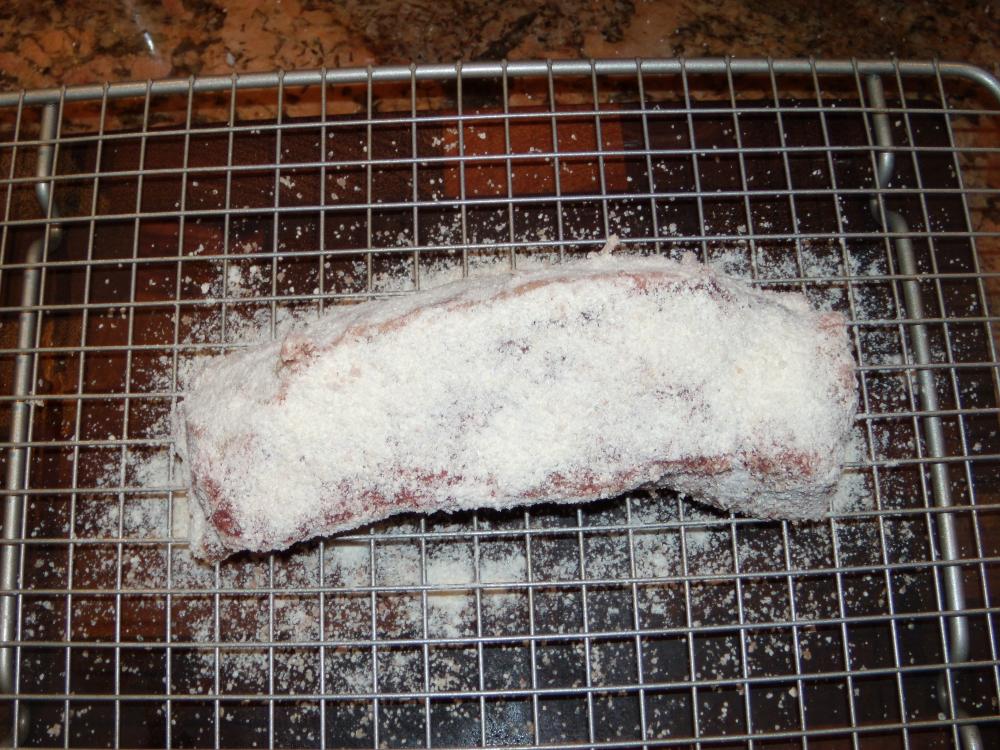
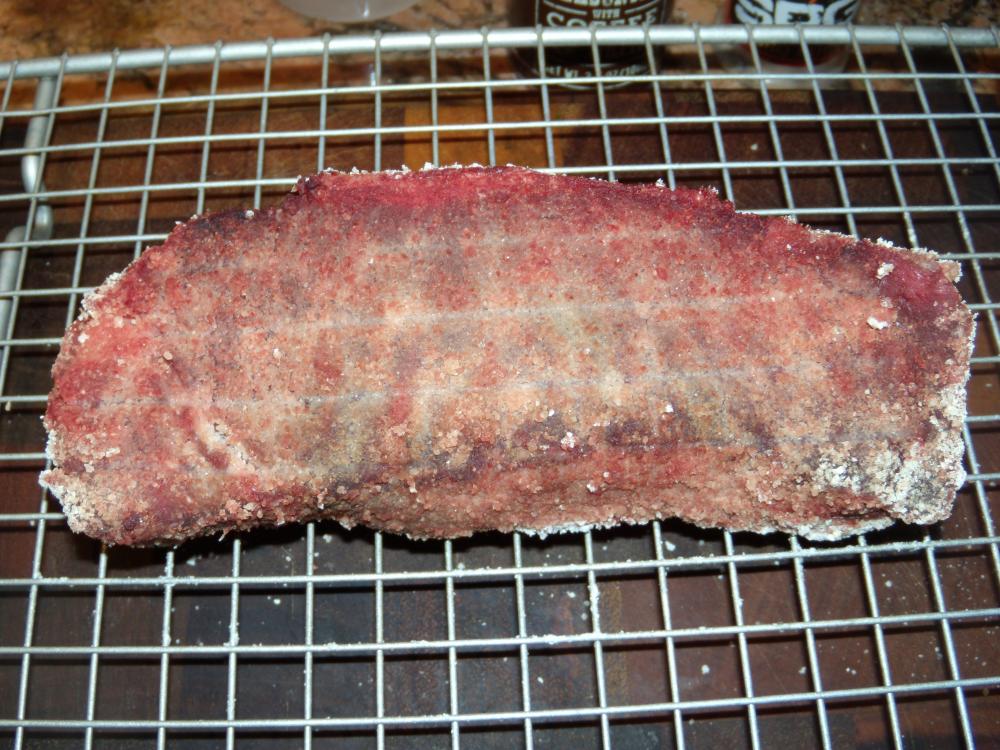
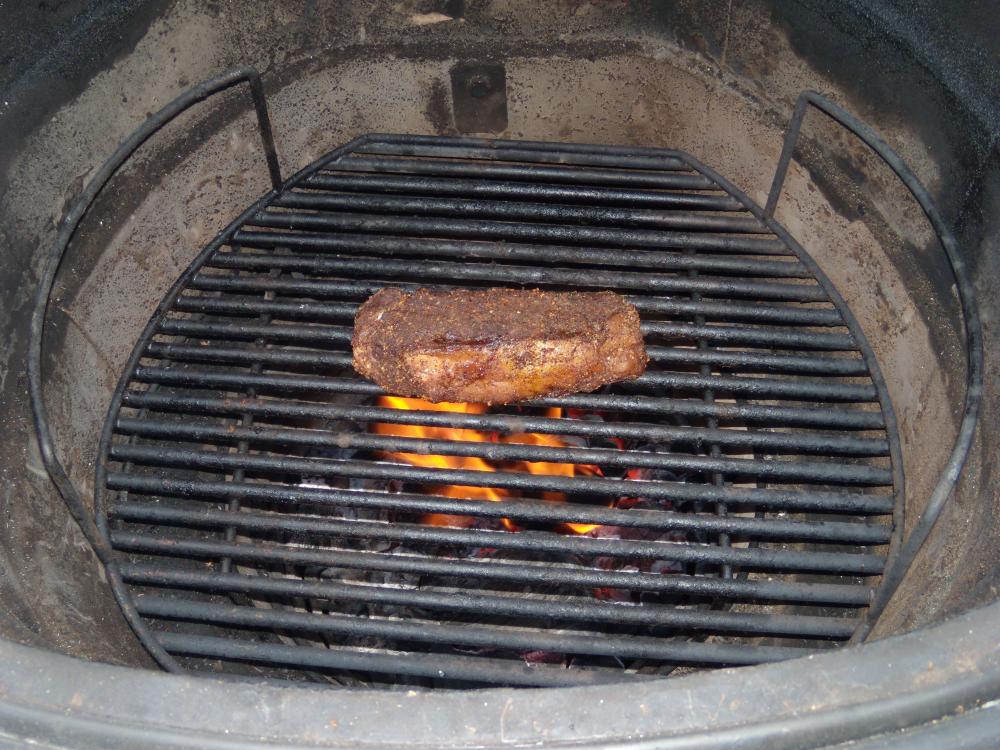
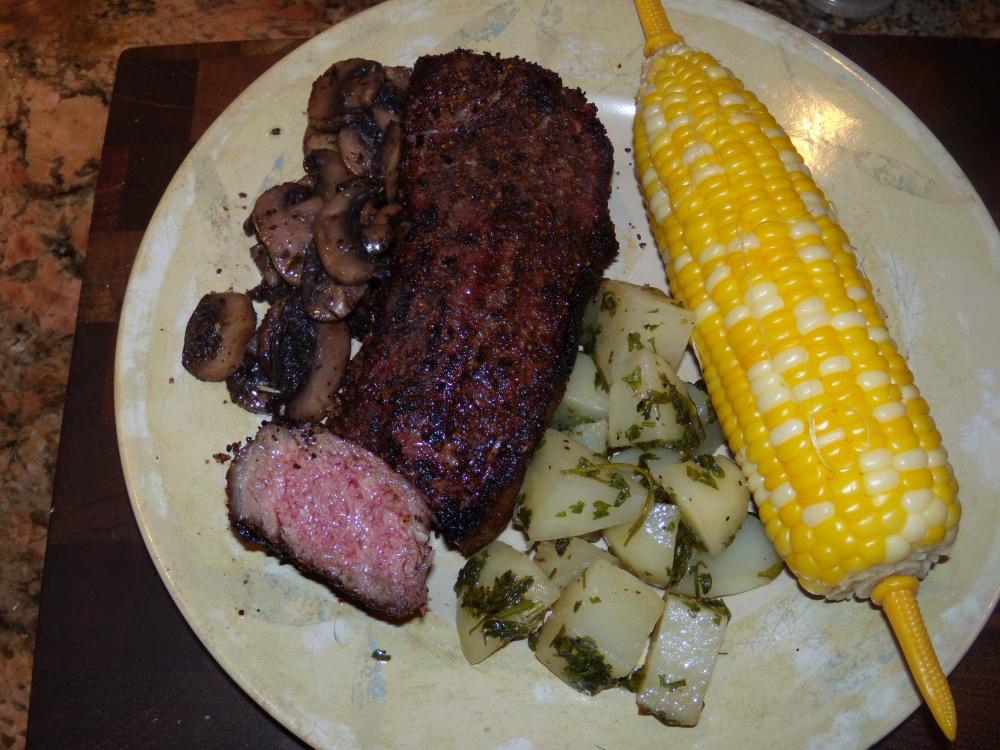
OK, so here's the koji rice steak aging experiment results. Here's the setup - a Trader Joe's strip steak (moderately tender cut) and the koji rice. Ground up some of the rice and rubbed all over the steak. Into the fridge on the rack. Here's what it looked like after one day. Things are starting to happen. Here's the result after 2 days. The grid marks are from turning the steak over after the first day. Rinsed, dried, and simple rub of Trader Joe's Steak rub (coffee based) and some Sucklebuster's SPG (salt, pepper, garlic). Onto the KK, direct @ 325F, bourbon barrel chunk, with some corn. 5 minutes on each side. (Note: corn had been on for 30 minutes already) Finished on the sear grate. 2 minutes on each side. Plated with some parsley potatoes w/black truffle oil, cooked SV @ 183F for 35 minutes. Some sauteed mushrooms on the side. And, don't forget that corn on the cob! So, what was the outcome? Will definitely try this again to see if first impressions hold. Steak was slightly more tender, but not dramatically so. I chose this rub combo, as I have used it on the same steak cut before, so I knew what it should taste like. There was a slightly noticeable taste difference this time - slightly sweet/malty, especially on the fatty outer layer. Not a bad thing, but different. Maybe next time, I'll keep it super simple and just use the SPG alone, to see if I still notice this sweetness. I might also go 3 days in the fridge, to see if that further improves the texture/aging. All in all, fun with food! My favorite hobby!


-
He is the Yoda of pizza here on the Forum.
-
Make sure that you order the maximum number of cocochar and/or coffee char boxes that will fit on the pallet. It's the cheapest shipping per box you will ever pay! Cover is a great accessory, depending on your climate. You will need to order a second charcoal basket to go with the basket splitter. Makes things sooooo much easier. Just swap out baskets. No assembly required.
-
I don't own a 32", but when I ordered my basket splitter, I ordered a second charcoal basket for it. It's a must do! When you order, send them an email with the order number and specify that you also want a second charcoal basket.
-
They look like stuffed crust pizzas? Or were they just that poofie?
.thumb.GIF.006d23b9323146d2dd9055f4e195bc2a.GIF)